
English Русский
Български
Беларускі
Український
Српски
Hrvatski
Română
Polski
Slovenský
Magyar
Articles Bookmark Contacts Sitemap   
Company Audi Company Ford Company Hyundai Company Kia Company Mazda Company Mercedes-Benz Company Nissan
MitsubishiMan.ru


Home Colt Lancer Galant L200 Outlander Pajero Others
Colt 5 (1995-2003, petrol) Colt 4 and 5 (1991-2003) Colt 2 and 3 (1983-1993)

Crankshaft — Installation and Checking of Main Bearing Lubrication Clearance (Mitsubishi Colt 2)

  • Home
  • Colt
  • 2 (1983-1993)
  • Power unit
  • Engine overhaul
  • Crankshaft — Installation and Checking of Main Bearing Lubrication Clearance
0
Contents: Checking the lubrication clearance…⤓ Plastigodge for determining the…⤓ Final installation of the crankshaft ⤓
1. Turn the engine over and remove the main bearing caps.

2. Remove the old liners and wipe the surface of the cylinder block and covers. They must be perfectly clean.

Checking the lubrication clearance of the main bearings


3. Install the bearing shells on the cylinder block and main bearing caps. Grooved shells are installed on the cylinder block, and protruding shells are installed on the caps. Check that the oil holes in the cylinder block match the grooves in the shells.
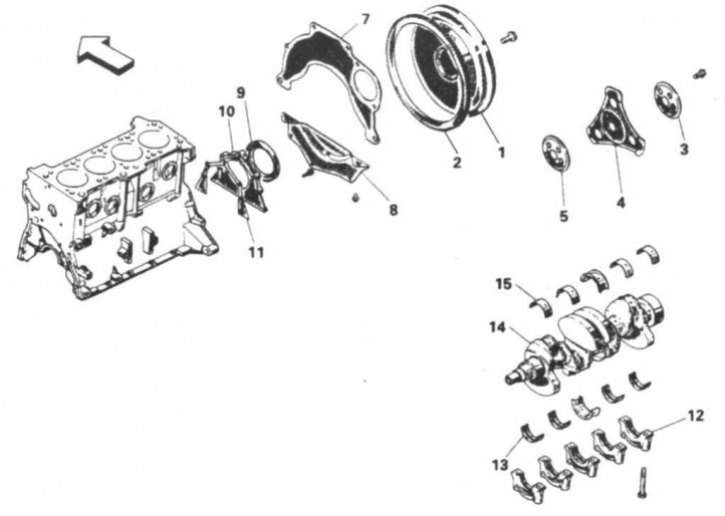


8.4 Internal engine components

1. Flywheel*; 2. Toothed ring*; 3. Adapter plate **; 4. Leading disk**; 5. Adapter plate**; 7. Back plate; 8. Clutch housing; 9. Rear oil seal; 10. Oil seal housing; 11. Gasket; 12. Main bearing cap; 13. Lower main bearing shell; 14. Crankshaft; 15. Upper main bearing shell
* Cars with manual transmission
**Cars with automatic transmission


4. The thrust bearing shells with flanges must be installed on the central cover and the cylinder block seat (8.4).


5. Wipe the surface of the bearings on the cylinder block and the crankshaft journals with a clean cloth.

6. Check that the oil holes in the crankshaft are clean.

7. Carefully install the crankshaft onto the bearings.

8' Before final installation of the crankshaft, it is necessary to check the lubrication clearances of the bearings.
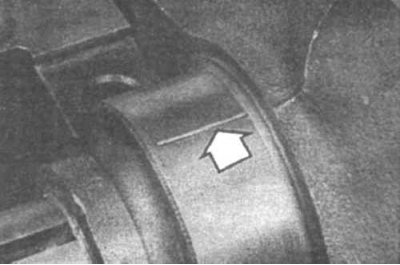


23.9 Place pieces of Plastigodge film (indicated by the arrow) on the main bearing journals parallel to the crankshaft axis


9. Cut several pieces of Plastigodge film (slightly shorter than the width of the main bearings) and place them on each of the main bearing journals parallel to the crankshaft axis (23.9).

10. Clean the surface of the liners in the covers and install the covers in place, with the arrows pointing towards the front of the engine.

11. Starting with the center cover, tighten the cover bolts in three stages to the specified torque. Do not rotate the crankshaft.

12. Unscrew the bolts and remove the covers.
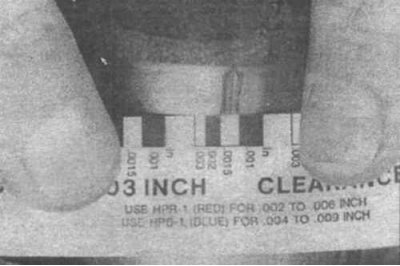


23.13 Measure the width of the crushed film


Plastigodge for determining the bearing lubrication gap


13. Compare the width of the crushed Plastigodge film on each neck with the scale included in the measuring kit (23.13).

14. If the clearance is too large or too small, install a different size bearing. Check that there is no dirt or oil when measuring the lubrication clearance between the bearing and the covers or cylinder block. If the width of the crushed film is wider at one end than at the other, the crankshaft journal is probably tapered.

15. Carefully remove any remaining film from the necks and liners.

Final installation of the crankshaft


16. Carefully remove the crankshaft from the engine.

17. Clean the bearing shells and lubricate them with an even layer of molybdenum grease. Also lubricate the thrust bearing flanges.

18. Check that the crankshaft journals are clean and install the crankshaft on the engine.

19. Clean the surface of the liners on the lids and lubricate them.

20. Replace the covers with the arrows facing forward.

21. Install the mounting bolts.

22. Tighten the bolts of all caps except the thrust bearing cap to the specified tightening torque (tighten the bolts in three stages, starting from the middle of the crankshaft).

23. Tighten the thrust bearing cap bolts to 10-12 in·lbs.

26. Move the crankshaft back and forth by tapping it with a brass hammer to align the thrust surfaces of the main bearing and the crankshaft.

27. Tighten all main bearing cap bolts to the specified torque.

28. On manual transmission models, install a new thrust bearing onto the end of the axle shaft.


[The material was borrowed from the website mitsubishiman.ru]

29. Turn the crankshaft by hand and check that it rotates freely.

30. Check the crankshaft axial clearance.
This article is available at: russian, bulgarian, belarusian, ukrainian, serbian, croatian, romanian, polish, slovak, hungarian
This article was reviewed by: Arseny Pavlov
Share with friends:
◀ Previous
Colt 2 and 3: Engine overhaul
Next ▶

Piston rings — installation
Engine overhaul — assembly order
Main and connecting rod bearing shells — inspection
Crankshaft — inspection
Pistons and connecting rods — inspection
Installing the rear crankshaft oil seal
Pistons and connecting rods — installation and checking of bearing lubrication clearance
First engine start after overhaul
Similar materials for other Mitsubishi models

➤ Checking the valve clearance compensator of a diesel engine Mitsubishi Lancer 3 and 5 (1984-1992)
➤ Crankshaft — installation and checking of main bearing… Mitsubishi Galant 5 (1983-1989, petrol)
➤ Determining the amount of clearance in a bearing using a… Mitsubishi L200 4 (2005-2014, diesel)
➤ Automatic transmission selector lever positions (main slot) Mitsubishi Outlander 1 (2003-2008)
➤ Checking the axial clearance of the rear hub bearing Mitsubishi Pajero 4 (2006-2021)
➤ Checking the engine crankshaft speed at idle speed Mitsubishi Carisma (1995-2004)
Link in different formats to this article
Comments and feedback from visitors
No comments yet


Add up two numbers 31 + 24


Colt 5 (1995-2003, petrol) 
  • General information
  • User manual
  • Specifications
  • Gasoline engines
  • 4G1 engines until 1995
  • 4G1 engines since 1995
  • Repair of 4G9 engines
  • Cooling system
  • Reduced exhaust gas toxicity
  • Engine electrical equipment
  • Injection system MPI
  • Carburetors
  • Transmission
  • Clutch and drive shafts
  • Manual gearbox F4M21/F5M21
  • Manual gearbox F4M41
  • Automatic gearbox F4A21
  • Automatic gearbox F4A41
  • Chassis and running gear
  • Car suspension
  • Steering
  • Brake system
  • Body
  • Exterior (external elements)
  • Electrical equipment
  • Equipment and devices
  • Electrical circuits
Colt 4 and 5 (1991-2003) 
  • General information
  • Maintenance
  • Power unit
  • Engine in a car
  • Engine repair (gasoline)
  • Engine repair (diesel)
  • Lubrication system
  • Cooling system
  • Carburetor
  • Fuel injection MPI
  • Fuel injection GDI
  • Emission reduction
  • Fuel system (diesel)
  • Ignition system
  • Exhaust system
  • Transmission
  • Clutch
  • Manual gearbox
  • Automatic gearbox
  • Drive shafts
  • Chassis and running gear
  • Chassis malfunctions
  • Front suspension
  • Rear suspension
  • Steering
  • Wheels and tires
  • Brake system
  • Body and interior
  • Body elements
  • Electrical equipment
  • Equipment and devices
  • Power devices
  • Heating and air conditioning
  • Electrical circuits
Colt 2 and 3 (1983-1993) 
  • General information
  • User manual
  • Daily care
  • Maintenance
  • Power unit
  • Engine in a car
  • Engine overhaul
  • Cooling system
  • Heater and air conditioner
  • Power and exhaust system
  • Engine electrical equipment
  • Emission reduction
  • Transmission
  • Mechanical gearbox
  • Automatic gearbox
  • Clutch and axles
  • Chassis and running gear
  • Brake system
  • Car suspension
  • Steering
  • Body and interior
  • Body and elements repair
  • Electrical equipment
  • Equipment and devices
  • Electrical circuits
MitsubishiMan.ru © 2018–2026 • Mobile version • Articles about Mitsubishi • Contacts • Sitemap: EN BG BY UA RS HR RO PL SK HU • Site search • Bookmark
Colt 2 and 3 (1983-1993) · Colt 4 and 5 (1991-2003) · Colt 5 (1995-2003) · Lancer 3 and 5 (1984-1992) · Lancer 9 (2000-2007) · Galant 5 (1983-1989) · Galant 6 and 7 (1987-1998) · L200 4 (2005-2014) · Outlander 1 (2003-2008) · Pajero 1 and 2 (1982-1999) · Pajero 4 (2006-2021) · Carisma (1995-2004) · Space Star (1998-2005) ·
This resource sets cookies 🍪 to avoid bothering you with repeated data entry.