



Unfortunately, vacuum gauge readings are difficult to interpret and the results of reading analysis may be erroneous, therefore, it is advisable to combine vacuum diagnostics with other methods.
The initial factors by which the vacuum gauge readings are analyzed and the most accurate conclusions about the engine condition are made are the absolute reading of the device and the nature of the movement of the instrument pointer (the dynamics of the readings). The scale of most vacuum gauges is graduated in mm Hg. As the vacuum increases (and, accordingly, the pressure drops), the reading of the device increases. For every 300 m above sea level, the absolute readings of the vacuum gauge will differ by approximately 25 mm Hg.
Attach the vacuum gauge directly to the intake manifold (See photo), but not to other vacuum ports separated from the manifold by a channel of a certain length (for example, to the ports in front of the throttle valve).
Before starting the test, warm up the engine completely. Block the wheels and set the handbrake. With the gearshift lever in neutral (or Park on cars with automatic transmission), start the engine and let it idle.
Warning! Before starting the engine, carefully check the condition of the fan blades (for damage or cracks). When the engine is running, do not put your hands too close to the fan, keep the device at a sufficient distance from the fan and do not stand in line with the rotating impeller.
Check the vacuum gauge reading. On a working engine, the vacuum gauge should show a vacuum of 430-560 mm Hg, and the instrument pointer should be practically motionless.
Below is a description of the nature of the vacuum gauge readings and the method for determining the engine condition based on them.
1. Too low a vacuum level usually indicates a leak in the gasket between the intake manifold and the throttle body, a vacuum hose, too late ignition timing or incorrect valve opening and closing timing. Before removing the timing belt covers and checking the alignment of the timing marks, check the ignition timing with a timing light and eliminate all other possible causes using the testing methods described in this Chapter.
2. If the vacuum gauge readings are 75-200 mm Hg below normal and are unstable (the arrow twitches), this indicates a leak in the gasket at the inlet of the intake manifold or a faulty injector.
3. If the pointer regularly deviates by 50-100 mm Hg, then the reason is the valves are not tight. To confirm this conclusion, check the compression in the engine cylinders.
4. The needle deflects irregularly towards low readings, or trembles and shows low vacuum. The probable cause is increased resistance to valve movement, or interruptions in the operation of the cylinders. Check the compression in the cylinders and inspect the spark plugs.
5. If the needle quickly fluctuates within 100 mm Hg at idle speed, and the engine operation is accompanied by smoke from the muffler, then the valve guides are worn out. To check this conclusion, it is necessary to conduct combustion chamber leak tests (with air pumping). If the needle quickly fluctuates and at the same time an increase in engine speed is observed, then it is necessary to check the tightness of the intake manifold gasket, the elasticity of the valve springs. Such readings can also be caused by burnt valves and interruptions in the operation of the cylinders (ignition failures).
6. Weak fluctuations of the pointer (within 20-30 mm Hg in both directions) indicate unstable ignition operation. Check all provided settings and adjustments, if necessary, connect an ignition system analyzer to the engine.
7. If the pointer fluctuates greatly, check the compression in the cylinders or perform leak tests, as the cause of the malfunction may be a non-working cylinder or a leaky cylinder head gasket.
8. If the instrument readings change slowly over a wide range, then check the cleanliness of the forced crankcase ventilation system pipes, the correct adjustment of the combustible mixture, the tightness of the throttle body gaskets, or the intake manifold.
9. Open the throttle valve sharply, and when the engine speed reaches 2500 rpm, release the valve. The valve should slowly return to its original position. The vacuum gauge readings should drop almost to zero, then increase and exceed the control readings corresponding to steady idle speed by approximately 125 mm Hg, after which the vacuum should be restored to the previous level. If the vacuum is restored slowly, and when the valve is opened sharply, the control reading is not exceeded, then the cause may be wear of the piston rings. If the vacuum is restored extremely slowly, check the cleanliness of the exhaust tract (usually the muffler or catalytic converter). The simplest way to check this is to open the exhaust tract before the suspect section and repeat the test.
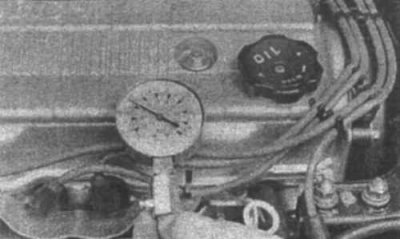
3.6 It is preferable to use a screw-in compression gauge rather than those devices that are pressed by hand to ensure a tight seal during measurement. Make sure that the throttle valve is secured in the fully open position
Checking the compression in the engine cylinders
The article was obtained from this portal (www.mitsubishiman.ru)
1. The results of the compression test in the engine cylinders allow us to judge the condition of a group of parts in the upper part of the engine (pistons, rings, valves and cylinder head gasket). Namely, a decrease in compression may be due to a leak in the combustion chambers due to wear of the piston rings, damage to the valve heads and seats, or burnout of the cylinder head gasket.
Note: To obtain accurate test results, the engine must be at normal temperature and the battery must be fully charged.
2. Start by cleaning the areas near the spark plugs, for which you can blow them with compressed air (if you don't have a compressor, blow them with a car or even a bicycle pump). This is necessary to prevent dirt from getting into the cylinders when measuring compression.
3. Remove the spark plugs (see Chapter 1).
4. Open the throttle valve fully and secure it in this position.
5. Disconnect the central high-voltage wire from the ignition distributor cap, connect it to ground on the cylinder block. For reliability, connect to ground using a special short-circuiting piece of wire with alligator-type clamps on both ends. It also does not hurt to remove the fuse of the electronic fuel injection system on the mounting block, which will ensure
complete shutdown of the electric fuel pump when measuring compression.
6. Insert the compression gauge into the spark plug hole.
7. Turn on the starter and turn the crankshaft a few revolutions, monitoring the readings of the compression tester. On a serviceable engine, the pressure should increase quickly. Low pressure after the first piston stroke and a slow increase during subsequent compression strokes indicates wear of the piston tracks. If the pressure is low after the first piston stroke and does not increase during subsequent compression strokes, then the cause is a leak in the valves or a leaky cylinder head gasket (the cause may also be cracks in the head). A decrease in compression can also be caused by carbon deposits on the valve heads. Record the highest compression value.
8. Repeat the measurement procedure for the remaining cylinders, compare the results with the standard data.
9. Inject a small amount of engine oil (about three full syringe oilers) into each cylinder through the spark plug hole, then repeat the tests.
10. If the compression increases after adding oil, then we can make a clear conclusion that the piston rings are worn out. If the compression increases slightly, then the leak is through the valves or the cylinder head gasket. Leakage through the valves can be caused by burnt valve seats and/or chamfers, as well as deformation of the valve stems or the formation of cracks on them.
11. If the compression is equally low only in two adjacent cylinders, then the most likely cause is a burnt gasket between these cylinders. Confirmation of this conclusion will be the appearance of traces of coolant in the combustion chambers or in the crankcase of the cylinder block.
12. If the compression value in one of the cylinders is 20 percent lower than in the other cylinders and the engine runs unsteadily at idle, then the cause may be wear of the camshaft cam that controls the exhaust valve.
13. If the compression value exceeds the norm, then the combustion chamber is covered with carbon deposits. In this case, the cylinder head must be removed and the carbon removed.
14. If the compression in all cylinders is low, or varies greatly between cylinders, then it is necessary to conduct combustion chamber leak tests, for which you should contact a specialized workshop. As a result of the tests, the leak locations should be precisely determined and a quantitative characteristic of the leak should be given.
Dismantling the power unit - methods and safety precautions
If a decision has been made to dismantle the engine for major repairs or repairs of the main components, then certain preparatory measures must be carried out.
It is extremely important to mark the place where the work will be carried out. Undoubtedly, the best place is a workshop. It is very important to have an equipped work area, as well as a place to store the car. If there is no workshop or garage, then at least a flat and clean concrete or asphalt area will be required.
Washing the engine compartment and power unit before dismantling will keep the tool clean and in constant working order.
You will also need a floor lift or hoist. Make sure these devices have the capacity to lift the engine and transmission. Safety is of the utmost importance here, as lifting the engine from the vehicle is a potentially dangerous operation.
If the engine dismantling work is carried out by an inexperienced person, then an assistant is needed. Consult and ask for help from people who have experience in such work. There are many examples of how attempts to dismantle the engine by lifting it from the engine compartment alone ended in failure.
Plan your actions in advance. Before starting work, rent or purchase all the necessary tools and equipment. Some devices that ensure safety during engine dismantling and installation, as well as reducing labor costs include (in addition to the lift) a jack-trolley of sufficient lifting capacity, a full set of keys and mandrels, wooden blocks, rags and solvent for cleaning up the inevitable puddles from spilled engine fluids. If you are renting a lift, agree on this in advance, having completed all the work that does not require this mechanism. This will save money and time.
Keep in mind that you will not be able to use your car for a significant period of time. To perform some work that is not possible at home due to the lack of special equipment, you will have to contact a car service workshop. These companies work on a schedule and it would be advisable to consult there before dismantling the engine in order to accurately estimate the time costs for repair and restoration of parts.
Always be very careful when dismantling and assembling the power unit. Unconsidered actions can cause serious injuries. Think about your actions in advance. Do not spare time for this, because the main thing is to work without injuries.