



Contents: Mechanical pump (carburetor models) ⤓ Chassis mounted electric pump (fuel…⤓ Fuel tank mounted (all others) ⤓
Mechanical pump (carburetor models)
1. Disconnect the cable from the negative battery terminal.
2. Remove the fuel tank filler cap and release the pressure from the tank.
3. Remove the air filter (see section 8).
4. Apply the parking brake and place chocks behind the rear wheels. Raise the front of the car and support it on stands.
5. Disconnect the inlet, outlet and return hoses from the pump (see illustration).
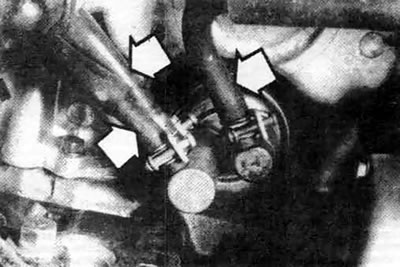
5.5. Disconnect the inlet and outlet hoses from the fuel pump, as well as the fuel return hose
6. Unscrew the fuel pump mounting bolts (see illustration).
(The text of the article was obtained from the website: MITSUBISHIMAN)
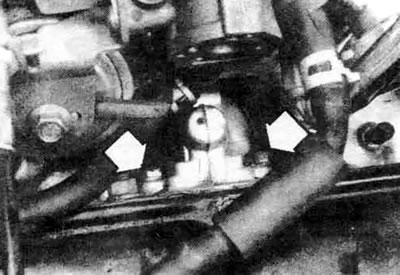
5.6. Unscrew the fuel pump mounting bolts (arrows), then carefully remove the pump by hand
7. Carefully detach the fuel pump by hand (do not use a pry bar) and remove it together with the gasket and insulator. Note that the gaskets are installed on both sides of the insulator.
8. Using a scraper, remove old gaskets from the insulator, pump (if one is to be used), and cylinder head mating surface.
9. Check the condition of the inlet, outlet and return hoses. If they are damaged or worn, replace them (see section 2).
10. Install in the reverse order of removal. Use new gaskets.
Chassis mounted electric pump (fuel injected models) (Cordia and Tredia)
11. Release the fuel pressure (see section 2).
12. Remove the left rear wheel.
13. Loosen the fuel tank clamp and lower the tank slightly.
14. Unscrew the pump mounting bolts (see illustration).
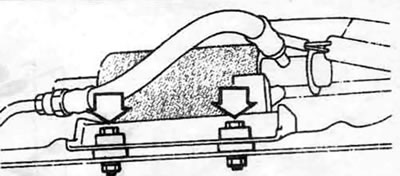
5.14 On Cordle or Tredia fuel injected models, remove the rear left wheel, then unscrew the pump sprinkling bolts (arrows)
15. Disconnect the fuel lines from the pump.
16. Disconnect the electrical connector from the pump.
17. Remove the fuel pump and bracket.
18. Perform installation in reverse order.
Fuel tank mounted (all others)
19. Release the fuel pressure (see section 2).
20. Disconnect the cable from the negative battery terminal.
21. If necessary, remove the fuel tank or disconnect the fuel lines and electrical connector at the fuel pump mounting location (see illustration).
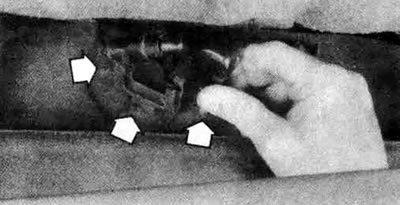
5.21a. On some medals, such as the Galant, the fuel pump is removed through the side of the fuel tank, without the need to remove the fuel tank itself - simply disconnect the electrical connector and lines and unscrew the mounting screws as shown
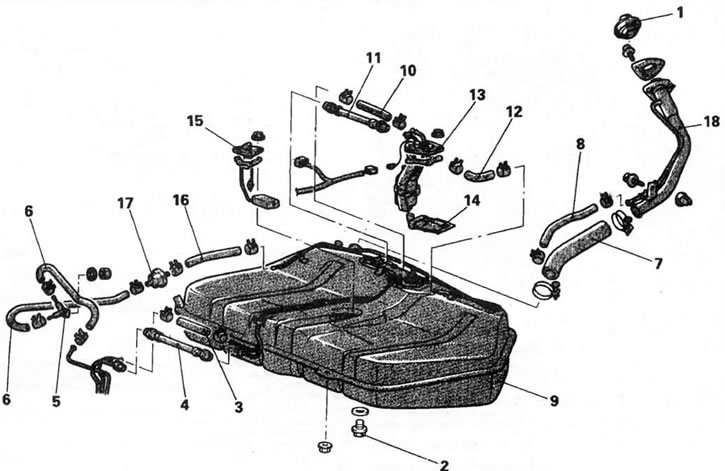
5.21b On other models, such as the Mirage, the fuel pump is removed through the top of the fuel tank, so the fuel tank must be removed first (see section 6). 1. Fuel tank cap, 2. Drain plug, 3. Return hose, 4. High-pressure fuel hose, 5. Check valve, 6. Fuel vapor hose, 7. Filler hose, 8. Vent hose, 9. Fuel tank, 10. Return hose, 11. High-pressure fuel hose, 12. Fuel vapor hose, 13. Fuel pump, 14. In-tank fuel filter, 15. Fuel level sensor, 16. Fuel vapor hose, 17. Fuel check valve, 18. Filler neck
22. Unscrew the mounting screws.
23. Remove the fuel pump from the tank.
24. Check the condition of the fuel pump gasket. Replace it if necessary.
25. Check the condition of the filter at the lower end of the fuel pump (see Illustration 5.21b). If it is dirty, remove it, clean it in solvent and blow it out with compressed air. If the filter is too dirty to clean, replace it.