



Contents: Diagnostics ⤓ Bulkhead ⤓
Diagnostics
1. Before a thorough overhaul of the carburetor, it is necessary to conduct a full road test and check the adjustments. The values of some adjustments are indicated on the VECI (Vehicle Emission Control Information) plate, which is located in the engine compartment.
2. Carburetor problems usually manifest themselves as high fuel levels in the float bowl, hard starting, engine stalling, backfiring, and poor acceleration. If there is a fuel leak and/or the carburetor is covered in moisture, it definitely requires attention.
3. Some performance degradations commonly associated with the carburetor are usually due to loose, improperly adjusted or faulty engine or electrical components. Others are due to leaking, disconnected or improperly connected vacuum hoses. A proper approach to carburetor failure analysis should include the following:
- a) Check all vacuum hoses and actuators for leaks and correct installation (see Chapter 1 и 6).
- b) Tighten the intake manifold and carburetor mounting nuts/bolts evenly and securely.
- c) Check the cylinder compression (see Chapter 2).
- d) If necessary, clean or replace the spark plugs (see Chapter 1).
- d) Check the high-voltage wires (see Chapter 1).
- e) Check the primary ignition circuit.
- g) Check the ignition timing (as per the emission control information plate).
- z) Check the fuel pump (see section 3).
- i) Check the operation of the air filter thermostat valve (see Chapter 1)
- k) Check/replace the air filter (see Chapter 1).
- l) Check the PCV system (see Chapter 6).
- m) Check/replace fuel filter (see Chapter 1). In addition, the filter in the fuel tank may be clogged.
- n) Check the patency of the exhaust system.
- o) Check the operation of the EGR valve (see Chapter 6).
- p) Check the air damper - when the engine is warmed up to normal operating temperature, it should be fully open (see Chapter 1).
- p) Check for fuel leaks and kinked or crushed fuel lines (see Chapter 1 и 4).
- c) With the engine off, check the operation of the accelerator pump (remove the air filter cover and, moving the throttle valve, look into the carburetor channel - a uniform stream of fuel should flow into the carburetor).
- t) Check the quality of the fuel.
- y) Check the valve clearances and camshaft lobe height (see Chapter 1 и 2).
- f) Have the electronic control units (engine and carburetor) checked by specialists.
4. To diagnose carburetor problems, the engine must be run with the air filter removed. Backfires are possible in this case. Backfires are usually caused by a faulty carburetor, but removing the air filter alone may be enough to lean the fuel-air mixture enough to cause backfires.
Warning: When checking or servicing the carburetor, do not place any part of your body, especially your face, directly over the carburetor. Wear safety glasses.
Bulkhead
5. Once you have decided to overhaul the carburetor, there are several options for further action. If you are going to overhaul the carburetor yourself, first of all, purchase a good quality repair kit (containing all the necessary gaskets, internal parts, instructions and a list of parts). You will also need a special solvent and a means for blowing air through the internal passages of the carburetor.
6. An alternative solution may be to purchase a new or rebuilt carburetor. Make sure that the carburetor you purchase is identical to the old one. Usually, the carburetor will have a tag attached to it or a number stamped on the float chamber. The number will help you determine the exact type of carburetor. When purchasing a rebuilt carburetor or a repair kit, check that they match. Seemingly small differences can make a big difference in engine performance.
7. If you decide to rebuild your own carburetor, take the time to carefully disassemble it, soak the parts in a cleaning solution (usually for at least half a day or according to the instructions that come with the carburetor cleaner), and reassemble it. Reassembly usually takes much longer than disassembly. When disassembling the carburetor, compare each part with the illustration that came with the rebuild kit and stack them on a clean work surface. If the reassembly is performed by an inexperienced mechanic, the engine may run very poorly or not at all. To avoid this, disassemble carefully so that the carburetor can be reassembled correctly.
8. Since the design of carburetors is constantly being changed by the manufacturer in order to meet the ever-tightening requirements for toxic emissions into the atmosphere, it is not possible to describe here a step-by-step overhaul of each type. Detailed illustrated instructions are included with the repair kits; they are more closely matched to the carburetor installed on your vehicle. The detailed views of carburetors provided here will help you decide whether you should overhaul the carburetor yourself.
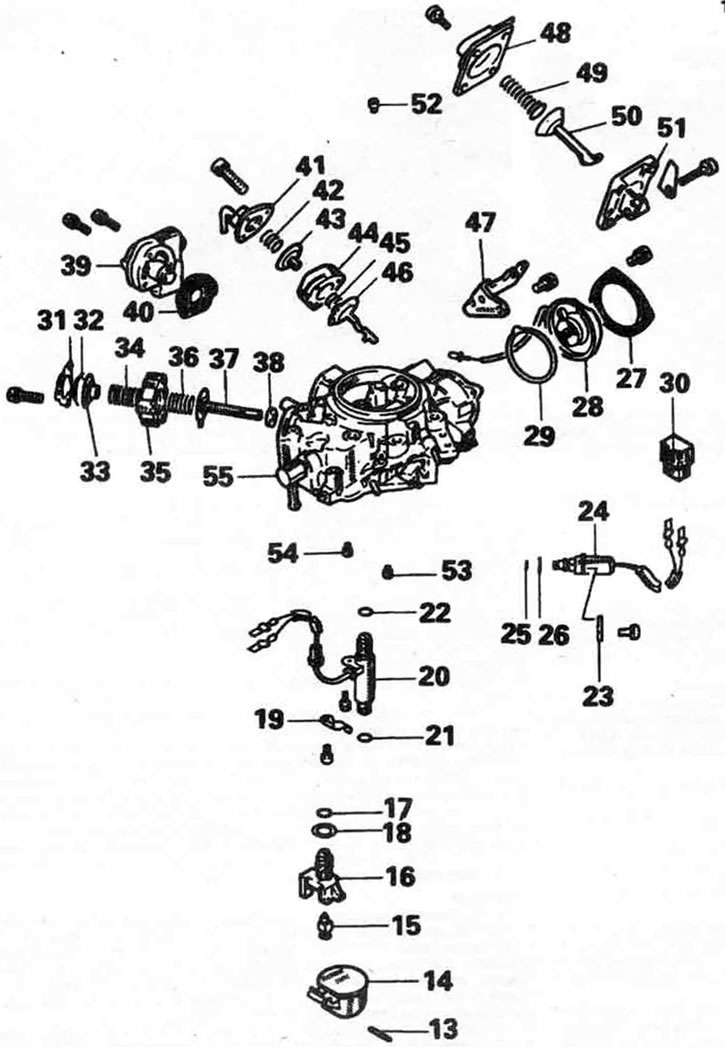
10.8a. Exploded view of the top of a typical Mitsubishi feedback carburetor. 13. Pin, 14. Float; 15. Needle valve; 18. Needle valve seat; 17. Sealing ring; 18. Compaction; 19. Holder; 20. Feedback Solenoid Valve (FBSV); 21. Sealing ring; 22. Sealing ring; 23. Holder; 24. Shut-off electromagnetic valve of forced idle speed; 25. Sealing ring; 26. Sealing ring; 27. Flange; 28. Bimetallic unit; 29. Compaction; 30. Connector; 31. Lid; 32. Diaphragm; 33. Spring seat; 34. Spring; 35. Body; 36. Spring; 37. Diaphragm; 38. Valve; 39. Fuel mixture control valve (MCV); 40. Gasket; 41. Lid; 42. Spring; 43. Diaphragm; 44. Body; 45. Spring; 46. Diaphragm; 47. Bracket; 48. Lid; 49. Spring; 50. Diaphragm; 51. Body; 52. Main air jet (primary); 53. Auxiliary jet (primary); 54. Auxiliary jet (secondary); 55. Float chamber cover
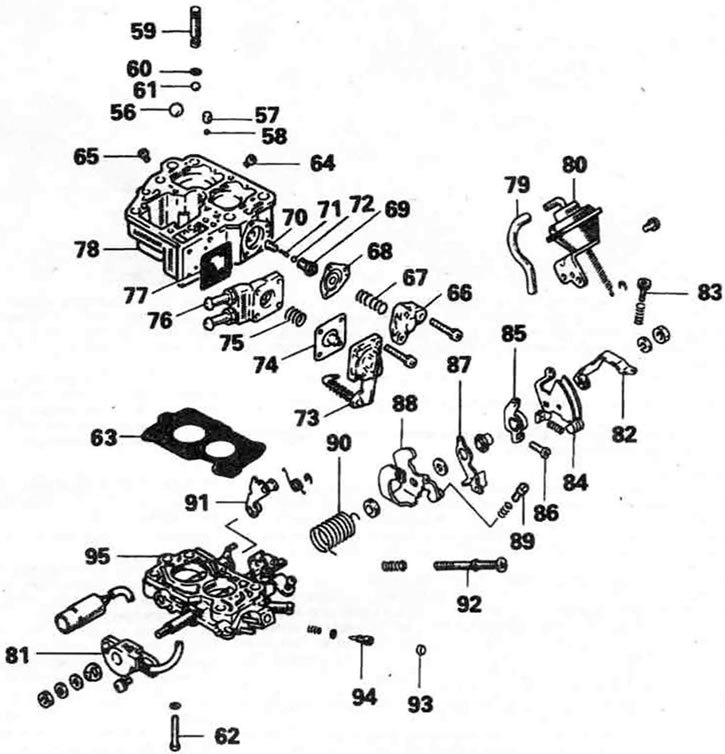
10.8b. Exploded view of the lower part of a typical Mitsubishi feedback carburetor 56. Steel ball; 57. Cargo; 58. Ball; 59. Cork; 60. Sealing ring; 61. Ball; 62. Screw; 63. Gasket; 64. Main jet (primary); 65. Main jet (secondary); 66. Lid; 67. Spring; 68. Diaphragm; 69. Fuel mixture enrichment jet valve; 70. Fuel mixture enrichment jet; 71. Spring; 72. Ball; 73. Pump cover assembly; 74. Diaphragm; 75. Spring; 76. Pump body; 77. Gasket; 78. Mixer body; 79. Vacuum hose; 80. Vacuum chamber; 81. Throttle Position Sensor (TPS); 82. Lever; 83. Adjusting screw; 84. Throttle lever; 85. Cam follower lever; 86. High idle speed adjustment screw 87 Free lever; 88. Locking lever; 89. Idle speed adjustment screw; 90. Spring; 91. Secondary damper lever; 92. Idle speed adjustment screw; 93. Cork; 94. Fuel mixture quality adjustment screw (MAS); 95. Throttle body