
English Русский
Български
Беларускі
Український
Српски
Hrvatski
Română
Polski
Slovenský
Magyar
Articles Bookmark Contacts Sitemap   
Company Audi Company Ford Company Hyundai Company Kia Company Mazda Company Mercedes-Benz Company Nissan
MitsubishiMan.ru


Home Colt Lancer Galant L200 Outlander Pajero Others
Galant 6 and 7 (1987-1998) Galant 5 (1983-1989, petrol)

Checking and replacing spark plug wires, distributor cap and rotor (Mitsubishi Galant 5)

  • Home
  • Galant
  • 5 (1983-1989, petrol)
  • General information
  • Maintenance
  • Checking and replacing spark plug wires, distributor cap and rotor
0
1. When installing new spark plugs, it is necessary to check the high-voltage wires.

2. Begin this procedure by visually inspecting the high-tension wires while the engine is running. In a dark garage (make sure there is ventilation), start the engine and inspect each high-tension wire. Be careful not to touch any moving parts of the engine. If there is a break in the wire, you will see an electric arc or small flashes in the damaged area. If an electric arc is detected, new wires must be installed. Allow the engine to cool and inspect the distributor cap and rotor.

3. High-voltage wires should be inspected one by one to avoid confusion in their location, which is important for the correct operation of the engine. To make it easier to determine the position of each wire, they are numbered. If the number is illegible, you can write the number on a piece of adhesive tape and wrap it around the wire.

4. Disconnect the high-voltage wire from the spark plug. You can use a special device for this, or you can turn the cap half a turn and remove it from the spark plug. Do not pull on the wire itself.

5. Check for corrosion inside the cap, which looks like a white, porous coating.

6. Place the wire and boot back onto the spark plug. The boot should fit snugly onto the plug. If not, disconnect the wire and use pliers to gently squeeze the metal tab inside the boot until it fits snugly.

7. Using a clean cloth, wipe the wires along their entire length and remove dust and grease. After the wires are clean, check for burns, cracks, and other damage. Do not bend the wire at a sharp angle to avoid breaking the conductor.


8. Disconnect the wire from the distributor. Pull only the caps. Check for corrosion and tightness. Reconnect the wires to the distributor.

9. Check the remaining high-voltage wires, make sure they are tightly connected to the distributor and spark plugs.

10. If new spark plugs need to be installed, purchase a set specifically for your engine. Remove and install the wires one at a time to avoid mixing up the spark sequence.

11. Disconnect the distributor cap by opening the two clamps. Check for cracks in the cap, carbon deposits and wear, integrity of the contacts and absence of increased play in them.
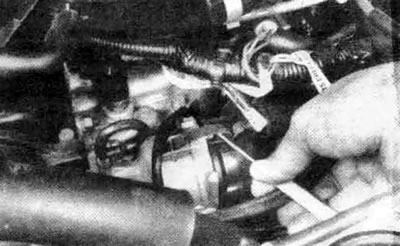


28.11a. Use a small screwdriver to release the distributor cap clamps.
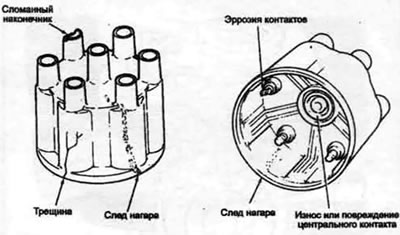


28.11b. Most common distributor cap faults (if in doubt, install a new cap).


12. Remove the rotor from the distributor shaft and check for cracks and carbon deposits. If any defect or damage is found, replace the cover and rotor.
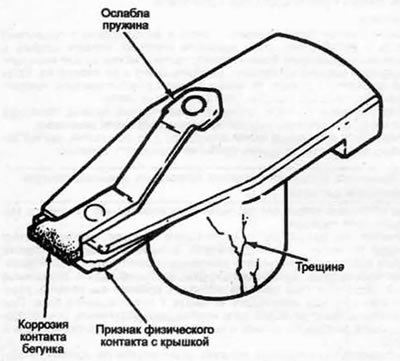


28.12. Check that the rotor is not damaged as shown here (if in doubt, install a new rotor).


(The original can be found on the website: «MitsubishiMan»)

13. It is common practice to install a new distributor cap when replacing high-voltage wires, but if you want to use the old cap, clean the terminals first.

14. When installing a new cover, disconnect the high-voltage wires one by one and connect the new ones in the same place - do not disconnect all the wires from the old cover at the same time to avoid their incorrect installation.
This article is available at: russian, bulgarian, belarusian, ukrainian, serbian, croatian, romanian, polish, slovak, hungarian
This article was reviewed by: Vladimir Glazunov
Share with friends:
◀ Previous
Galant 5: Maintenance
Next ▶

Replacing spark plugs
Replacing the fuel filter
Checking the oil level in a manual transmission
Checking the exhaust system
Checking axle shaft covers
Checking and cleaning the carburetor air damper
Checking the Heated Air Intake (HAI) Air Filter
Cooling system maintenance (draining, flushing and filling coolant)
Checking, lubricating and adjusting rear wheel bearings (only with drum brakes)
Changing brake fluid (Precis models only)
Similar materials for other Mitsubishi models

➤ Spark Plug Wires — Checking and Replacing Mitsubishi Colt 4 and 5 (1991-2003)
➤ Replacing spark plugs / checking electrical connections Mitsubishi Lancer 3 and 5 (1984-1992)
➤ Checking and replacing the air filter element Mitsubishi L200 4 (2005-2014, diesel)
➤ Replacing bulbs in headlights and taillights Mitsubishi Outlander 1 (2003-2008)
➤ Checking the spark plug relay Mitsubishi Pajero 1 and 2 (1982-1999)
➤ Checking high voltage wires Mitsubishi Carisma (1995-2004)
Link in different formats to this article
Comments and feedback from visitors
No comments yet


Add up two numbers 28 + 32


Galant 6 and 7 (1987-1998) 
  • General information
  • Introduction to guide
  • User manual
  • Driving and operation
  • Maintenance
  • Power unit
  • Dismantling the engine
  • Engine overhaul
  • Cooling and heating
  • Power and exhaust systems
  • Engine electrical equipment
  • Engine management systems
  • Transmission
  • Mechanical gearbox
  • Automatic gearbox
  • Clutch
  • Drive shafts and transfer case
  • Chassis and running gear
  • Brake system
  • Car suspension
  • Steering
  • Body and interior
  • Exterior (external elements)
  • Interior (internal elements)
  • Doors, locks and windows
  • Electrical equipment
  • Equipment and devices
  • Wiring diagrams Galant
  • Wiring diagrams Mirage
  • Wiring diagrams Diamante
Galant 5 (1983-1989, petrol) 
  • General information
  • Troubleshooting
  • Maintenance
  • Power unit
  • Engine repair
  • Engine overhaul
  • Cooling and heating
  • Fuel and exhaust system
  • Engine electrical equipment
  • Reducing exhaust toxicity
  • Transmission
  • Manual gearbox
  • Automatic gearbox
  • Clutch and drive shafts
  • Chassis and running gear
  • Brake system
  • Car suspension
  • Steering
  • Body and interior
  • Exterior (external elements)
  • Interior (internal elements)
  • Doors, locks and windows
  • Electrical equipment
  • Equipment and devices
  • Electrical diagrams
MitsubishiMan.ru © 2018–2026 • Mobile version • Articles about Mitsubishi • Contacts • Sitemap: EN BG BY UA RS HR RO PL SK HU • Site search • Bookmark
Colt 2 and 3 (1983-1993) · Colt 4 and 5 (1991-2003) · Colt 5 (1995-2003) · Lancer 3 and 5 (1984-1992) · Lancer 9 (2000-2007) · Galant 5 (1983-1989) · Galant 6 and 7 (1987-1998) · L200 4 (2005-2014) · Outlander 1 (2003-2008) · Pajero 1 and 2 (1982-1999) · Pajero 4 (2006-2021) · Carisma (1995-2004) · Space Star (1998-2005) ·
This resource sets cookies 🍪 to avoid bothering you with repeated data entry.