
English Русский
Български
Беларускі
Український
Српски
Hrvatski
Română
Polski
Slovenský
Magyar
Articles Bookmark Contacts Sitemap   
Company Audi Company Ford Company Hyundai Company Kia Company Mazda Company Mercedes-Benz Company Nissan
MitsubishiMan.ru


Home Colt Lancer Galant L200 Outlander Pajero Others
Galant 6 and 7 (1987-1998) Galant 5 (1983-1989, petrol)

Cooling system maintenance (draining, flushing and filling coolant) (Mitsubishi Galant 5)

  • Home
  • Galant
  • 5 (1983-1989, petrol)
  • General information
  • Maintenance
  • Cooling system maintenance (draining, flushing and filling coolant)
0
Contents: Draining the coolant ⤓ Flushing the system ⤓ Filling the system ⤓
Warning: Antifreeze is a corrosive and poisonous solution, so do not allow it to come into contact with your car's paint or your skin. If this happens, rinse the antifreeze off immediately with plenty of clean water. The electric cooling fan may turn on at any time, even when the ignition is off. When working near the fan, turn off its power or disconnect the cable from the negative battery terminal.


1. Periodically, it is necessary to drain the liquid from the cooling system, flush the system and fill it with a new solution, thus preventing the formation of rust, which can degrade the performance of the cooling system and cause engine damage. During maintenance of the cooling system, all hoses and the radiator cap should be checked and, if necessary, replaced.

Draining the coolant


2. Apply the parking brake and block the wheels with chocks. If the car has just been moving, allow the engine to cool for several hours before starting work.

3. After the engine has cooled down completely, remove the radiator cap.

4. Remove the splash guard located under the radiator (some models). Place a large container under the radiator drain hole to collect the coolant. To direct the antifreeze into the container, connect a hose with an internal diameter of 10 mm to the radiator drain nipple (some models are already equipped with a hose), then open the drain nipple (you may need pliers).
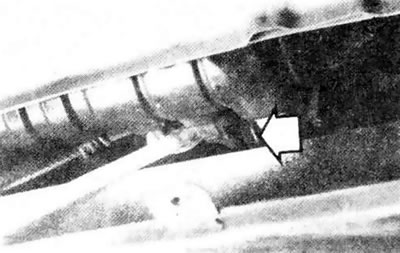


31.4. Before opening the drain valve located at the bottom of the radiator, place a piece of hose with a diameter of 8 mm on the fitting


5. After the fluid has stopped flowing out of the radiator, move the container under the drain plug of the engine block. Unscrew the plug and drain the fluid from the cylinder block.
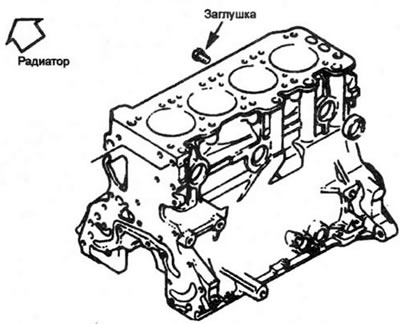


31.5. After the liquid has stopped flowing out of the radiator, remove the drain plug from the cylinder block and drain the coolant from the engine


6. When draining the fluid, check the condition of the radiator hoses, interior heater hoses and clamps (see section 14).

7. Replace damaged hoses and clamps (the replacement procedure is described in detail in Chapter 3).

Flushing the system


8. After all the fluid has been drained from the system, flush the radiator with water from a garden hose until clear water comes out of the drain hole. The water will remove sediment, but will not wash away rust and scale from the surfaces of the cooling pipes.

9. Rust can be removed with special cleaners. Follow the manufacturer's instructions. If the radiator is seriously damaged by corrosion, is destroyed or is leaking, it must be removed (see Chapter 3) and take it to a specialized repair shop.

10. Disconnect the hose from the coolant expansion tank. Drain the coolant from the tank and rinse it with clean water, then reconnect the hose.


Filling the system


11. Close and tighten the radiator drain plug. Install and tighten the engine block drain plug.

12. Set the heater temperature control to the maximum temperature position.

13. Slowly pour new coolant into the radiator until it is completely full. Fill the tank with liquid up to the lower mark.

14. Leave the radiator cap open, start the engine in a well-ventilated area and warm it up until the thermostat opens (coolant will start flowing through the radiator and the upper radiator hose will become hot).

15. Turn off the engine and let it cool. Add more fluid to the top edge of the radiator filler neck.

16. Squeeze the upper radiator hose to force out air, then add more fluid if necessary. Replace the radiator cap.

17. Start the engine, warm it up to normal operating temperature and check for leaks.
This article is available at: russian, bulgarian, belarusian, ukrainian, serbian, croatian, romanian, polish, slovak, hungarian
This article was reviewed by: Vladimir Glazunov
Share with friends:
◀ Previous
Galant 5: Maintenance
Next ▶

Checking the Heated Air Intake (HAI) Air Filter
Checking and cleaning the carburetor air damper
Checking and replacing spark plug wires, distributor cap and rotor
Replacing spark plugs
Replacing the fuel filter
Checking, lubricating and adjusting rear wheel bearings (only with drum brakes)
Changing brake fluid (Precis models only)
Replacing the working fluid and filter of the automatic transmission
Changing oil in manual transmission
Emission control system check and tank replacement
Similar materials for other Mitsubishi models

➤ Draining, flushing and filling the cooling system Mitsubishi Colt 4 and 5 (1991-2003)
➤ Checking the tightness of the cooling system Mitsubishi Lancer 3 and 5 (1984-1992)
➤ Flushing the automatic transmission fluid cooling lines Mitsubishi L200 4 (2005-2014, diesel)
➤ Checking for leaks in the cooling system Mitsubishi Outlander 1 (2003-2008)
➤ Airbag System Maintenance Mitsubishi Pajero 1 and 2 (1982-1999)
➤ Checking the tightness of the cooling system Mitsubishi Carisma (1995-2004)
Link in different formats to this article
Comments and feedback from visitors
No comments yet


Add up two numbers 38 + 21


Galant 6 and 7 (1987-1998) 
  • General information
  • Introduction to guide
  • User manual
  • Driving and operation
  • Maintenance
  • Power unit
  • Dismantling the engine
  • Engine overhaul
  • Cooling and heating
  • Power and exhaust systems
  • Engine electrical equipment
  • Engine management systems
  • Transmission
  • Mechanical gearbox
  • Automatic gearbox
  • Clutch
  • Drive shafts and transfer case
  • Chassis and running gear
  • Brake system
  • Car suspension
  • Steering
  • Body and interior
  • Exterior (external elements)
  • Interior (internal elements)
  • Doors, locks and windows
  • Electrical equipment
  • Equipment and devices
  • Wiring diagrams Galant
  • Wiring diagrams Mirage
  • Wiring diagrams Diamante
Galant 5 (1983-1989, petrol) 
  • General information
  • Troubleshooting
  • Maintenance
  • Power unit
  • Engine repair
  • Engine overhaul
  • Cooling and heating
  • Fuel and exhaust system
  • Engine electrical equipment
  • Reducing exhaust toxicity
  • Transmission
  • Manual gearbox
  • Automatic gearbox
  • Clutch and drive shafts
  • Chassis and running gear
  • Brake system
  • Car suspension
  • Steering
  • Body and interior
  • Exterior (external elements)
  • Interior (internal elements)
  • Doors, locks and windows
  • Electrical equipment
  • Equipment and devices
  • Electrical diagrams
MitsubishiMan.ru © 2018–2026 • Mobile version • Articles about Mitsubishi • Contacts • Sitemap: EN BG BY UA RS HR RO PL SK HU • Site search • Bookmark
Colt 2 and 3 (1983-1993) · Colt 4 and 5 (1991-2003) · Colt 5 (1995-2003) · Lancer 3 and 5 (1984-1992) · Lancer 9 (2000-2007) · Galant 5 (1983-1989) · Galant 6 and 7 (1987-1998) · L200 4 (2005-2014) · Outlander 1 (2003-2008) · Pajero 1 and 2 (1982-1999) · Pajero 4 (2006-2021) · Carisma (1995-2004) · Space Star (1998-2005) ·
This resource sets cookies 🍪 to avoid bothering you with repeated data entry.