
English Русский
Български
Беларускі
Український
Српски
Hrvatski
Română
Polski
Slovenský
Magyar
Articles Bookmark Contacts Sitemap   
Company Audi Company Ford Company Hyundai Company Kia Company Mazda Company Mercedes-Benz Company Nissan
MitsubishiMan.ru


Home Colt Lancer Galant L200 Outlander Pajero Others
Galant 6 and 7 (1987-1998) Galant 5 (1983-1989, petrol)

Checking the compression in the cylinders (Mitsubishi Galant 5)

  • Home
  • Galant
  • 5 (1983-1989, petrol)
  • Power unit
  • Engine overhaul
  • Checking the compression in the cylinders
0
1. A compression test will help you determine the condition of the upper part of the engine. In particular, you can find out that compression is dropping due to worn piston rings, valves and seats, or a burnt head gasket.

Note: Before testing, the engine must be warmed up to normal operating temperature and the battery must be charged. In addition, the choke must always be fully open to accurately measure compression (if the engine is warm, the choke is open).


2. Start by cleaning the area around the spark plugs before removing them (use compressed air if possible, otherwise use a small brush or even a bicycle pump). The goal is to keep dirt out of the cylinder during the compression test.

3. Remove all spark plugs from the engine (Chapter 1).

4. Fix the throttle valve in the fully open position.

5. Disconnect the wire from the center terminal of the distributor cap and short it to the engine block. Use an auxiliary wire with alligator clips to ensure reliable grounding.

6. Install the compression gauge into the spark plug hole.
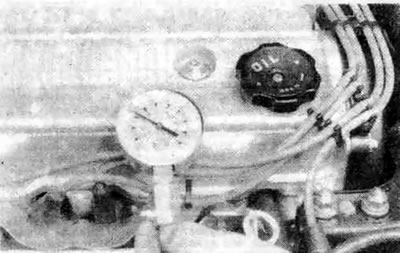


3.6. A compression gauge with a threaded nipple screwed into the spark plug hole is preferable to a device that needs to be pressed by hand - when checking the compression, do not forget to fully open the throttle and air valves


7. Rotate the engine crankshaft at least seven compression strokes and look at the indicator. If the engine is in good condition, the compression should increase quickly. Low compression on the first cycle with a gradual increase in subsequent cycles indicates worn piston rings. Low compression on the first cycle, which does not increase in subsequent cycles, indicates leaky valves or a burnt-out cylinder head gasket (cracks in the cylinder head are also possible). Carbon deposits on the inside of the cylinder head can also cause a decrease in compression. Record the highest reading on the compression gauge.

(The article was taken from the website: mitsubishiman.ru)

8. Repeat the procedure for the remaining cylinders and compare the results with specification.

9. Pour some engine oil (a few cubic centimeters) into each cylinder through the spark plug hole and repeat the check.

10. If the compression has increased after adding oil, then the piston rings are definitely worn. If the compression has not increased significantly, then there is an oil leak in the valves or through the cylinder head gasket. A leak in the valves may be due to burnt valve seats and/or valve heads, or to warping, breakage, or bending of the valves.

11. If two adjacent cylinders have equally low compression, then there is a high probability that the cylinder head gasket between them has burned out. This can be checked by the presence of coolant in the combustion chambers or in the crankcase.

12. If the compression in one cylinder is 20% less than in the others, and the engine idles unevenly, then the cause may be wear of the exhaust camshaft.


13. If the compression is unusually high, then the combustion chambers may be covered with a thick layer of carbon deposits. In this case, it is necessary to remove the cylinder head and remove the carbon deposits.

14. If the compression is low or varies greatly between cylinders, a leak test should be performed at a repair shop. This test will accurately show the location of the leak and how to fix it.
This article is available at: russian, bulgarian, belarusian, ukrainian, serbian, croatian, romanian, polish, slovak, hungarian
This article was reviewed by: Vladimir Glazunov
Share with friends:
◀ Previous
Galant 5: Engine overhaul
Next ▶

Engine Overhaul — General Information
Engine Overhaul Procedures — General Information
General Engine Overhaul Procedures — Specifications
Top dead center (TDC) of the piston of the first cylinder — installation
Engine Removal — Methods and Safety Measures
Engine — removal and installation
Engine assembly options
Engine overhaul — disassembly sequence
Similar materials for other Mitsubishi models

➤ Checking the compression in the cylinders Mitsubishi Colt 4 and 5 (1991-2003)
➤ Checking the oil level Mitsubishi Lancer 3 and 5 (1984-1992)
➤ Checking and adjusting the tension of auxiliary drive belts Mitsubishi L200 4 (2005-2014, diesel)
➤ Removal, Checking and Installing the Oil Pan (2WD Models) Mitsubishi Outlander 1 (2003-2008)
➤ Checking the compression in engine cylinders — general… Mitsubishi Pajero 1 and 2 (1982-1999)
➤ Checking for fluid leaks and hose tightness Mitsubishi Carisma (1995-2004)
Link in different formats to this article
Comments and feedback from visitors
No comments yet


Add up two numbers 29 + 48


Galant 6 and 7 (1987-1998) 
  • General information
  • Introduction to guide
  • User manual
  • Driving and operation
  • Maintenance
  • Power unit
  • Dismantling the engine
  • Engine overhaul
  • Cooling and heating
  • Power and exhaust systems
  • Engine electrical equipment
  • Engine management systems
  • Transmission
  • Mechanical gearbox
  • Automatic gearbox
  • Clutch
  • Drive shafts and transfer case
  • Chassis and running gear
  • Brake system
  • Car suspension
  • Steering
  • Body and interior
  • Exterior (external elements)
  • Interior (internal elements)
  • Doors, locks and windows
  • Electrical equipment
  • Equipment and devices
  • Wiring diagrams Galant
  • Wiring diagrams Mirage
  • Wiring diagrams Diamante
Galant 5 (1983-1989, petrol) 
  • General information
  • Troubleshooting
  • Maintenance
  • Power unit
  • Engine repair
  • Engine overhaul
  • Cooling and heating
  • Fuel and exhaust system
  • Engine electrical equipment
  • Reducing exhaust toxicity
  • Transmission
  • Manual gearbox
  • Automatic gearbox
  • Clutch and drive shafts
  • Chassis and running gear
  • Brake system
  • Car suspension
  • Steering
  • Body and interior
  • Exterior (external elements)
  • Interior (internal elements)
  • Doors, locks and windows
  • Electrical equipment
  • Equipment and devices
  • Electrical diagrams
MitsubishiMan.ru © 2018–2026 • Mobile version • Articles about Mitsubishi • Contacts • Sitemap: EN BG BY UA RS HR RO PL SK HU • Site search • Bookmark
Colt 2 and 3 (1983-1993) · Colt 4 and 5 (1991-2003) · Colt 5 (1995-2003) · Lancer 3 and 5 (1984-1992) · Lancer 9 (2000-2007) · Galant 5 (1983-1989) · Galant 6 and 7 (1987-1998) · L200 4 (2005-2014) · Outlander 1 (2003-2008) · Pajero 1 and 2 (1982-1999) · Pajero 4 (2006-2021) · Carisma (1995-2004) · Space Star (1998-2005) ·
This resource sets cookies 🍪 to avoid bothering you with repeated data entry.