
Diagnostics
1. Before checking the carburetor, the following items must be checked:
- A) Check all vacuum hoses and diaphragms for leaks and correct installation.
- b) Tighten all the carburetor and intake manifold mounting bolts and nuts securely.
- V) Perform a compression test on the cylinders.
- G) Clean and replace spark plugs if necessary.
- d) Check high voltage wires.
- e) Check the ignition coil primary wires.
- and) Check ignition timing.
- h) Check fuel pump.
- And) Check the operation of the damper that regulates the temperature of the incoming air.
- To) Check/replace air filter, l) Check the crankcase ventilation system, m) Check/replace fuel filter.
- n) Check if the pipes of the exhaust system are clogged.
- O) Check the operation of the exhaust gas recirculation valve.
- P) Check the operation of the air damper.
- R) Check the fuel system for leaks or deformed fuel lines.
- With) Check the operation of the accelerator pump with the engine off.
- T) Check the fuel used.
- at) Check the adjustment of the gas distribution mechanism.
- f) Contact specialists to check the electronic systems of the engine and carburetor.
Bulkhead
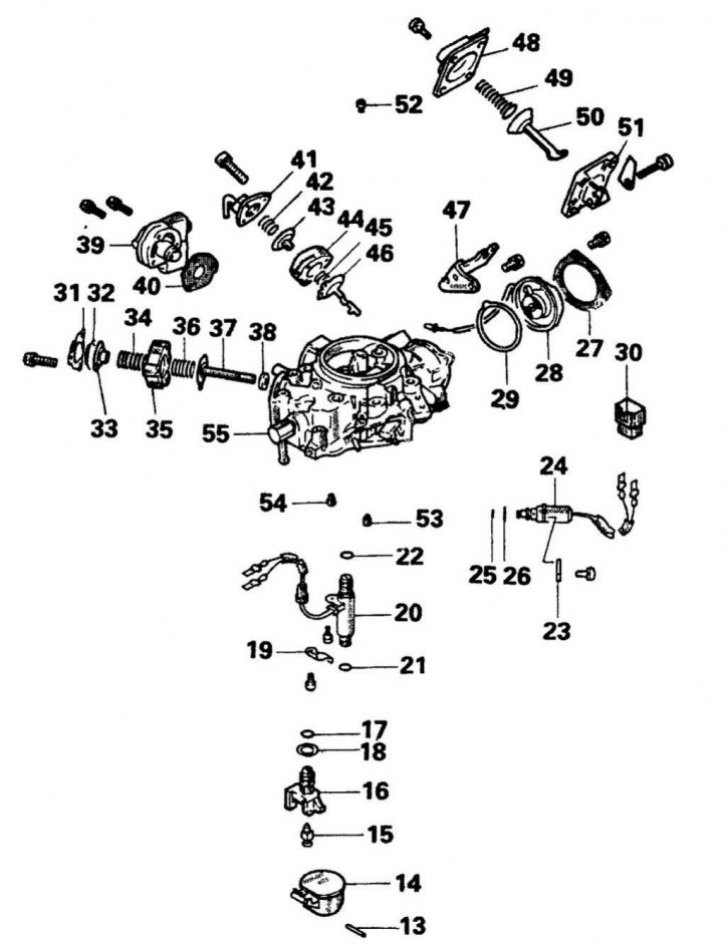
10.2a Mitsubishi carburettor cover elements
13. Pin; 14. Float; 15. Needle valve; 16. Needle valve seat; 17. O-ring; 18. Gasket; 19. Fastening; 20. Solenoid valve feedback system; 21. O-ring; 22. O-ring; 23. Fastening; 24. Solenoid valve for gradual shutdown of fuel supply; 25. O-ring; 26. O-ring; 27. Record; 28. Bimetallic spiral; 29. Gasket; 30.Connection connector; 31. Lid; 32. Diaphragm; 33. Spring seat; 34. Spring; 35. Hull; 36. Spring; 37. Diaphragm; 38. Valve; 39. Solenoid mixture adjustment valve; 40. Gasket; 41. Lid; 42. Spring; 43. Diaphragm; 44. Hull; 45. Spring; 46. Diaphragm; 47. Bracket; 48. Lid; 49. Spring; 50. Diaphragm; 51. Hull; 52. The main air jet of the primary chamber; 53. The main fuel jet of the primary chamber; 54. The main fuel jet of the secondary chamber; 55. Float chamber cover
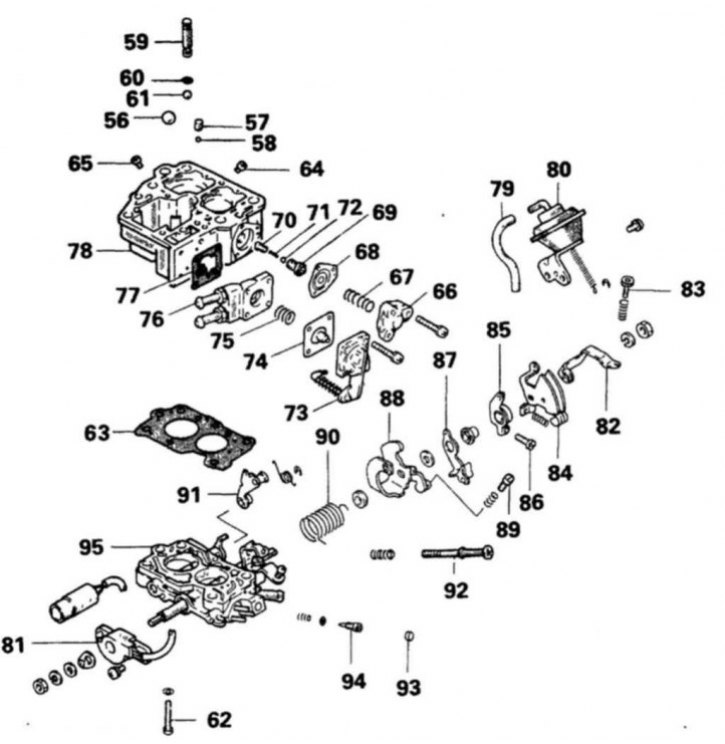
10.2b Elements of the Mitsubishi carburetor throttle block
56. Steel ball; 57. Weight; 58. Ball; 59. Plug; 60. O-ring; 61. Ball; 62. Screw; 63. Gasket; 64. Main fuel jet (primary chamber); 65. Main fuel jet (secondary chamber); 66. Lid; 67. Spring; 68. Diaphragm; 69. Enrichment jet valve; 70. Enrichment jet; 71. Spring; 72. Ball; 73. Pump cover; 74. Diaphragm; 75. Spring; 76. Pump housing; 77. Gasket; 78. Mixing chamber; 79. Vacuum hose; 80. Vacuum chamber; 81. Throttle position sensor; 82. Lever; 83. Adjusting screw; 84. Throttle lever; 85. Cam; 86. Fast idle adjusting screw; 87. Shutdown lever; 88. Base plate; 89. Idle adjusting screw; 90. Spring; 91. Throttle lever of the secondary chamber; 92. Idle adjusting screw; 93. Plug; 94. Screw for adjusting the composition of the mixture; 95. Throttle block
2. For a carburetor overhaul, it is recommended to purchase a repair kit that includes all necessary gaskets, internals and overhaul instructions and a list of spare parts. An alternative to overhauling a carburetor is to purchase a remanufactured or new carburetor. Check that the new carburetor is the same model as the old carburetor. The carburetor designation is usually printed on a plate on top of the carburetor or an identification number is stamped on the wall of the float chamber. When overhauling the carburetor, follow the drawings (10.2a and 10.2b).