
English Русский
Български
Беларускі
Український
Српски
Hrvatski
Română
Polski
Slovenský
Magyar
Articles Bookmark Contacts Sitemap   
Company Audi Company Ford Company Hyundai Company Kia Company Mazda Company Mercedes-Benz Company Nissan
MitsubishiMan.ru


Home Colt Lancer Galant L200 Outlander Pajero Others
Colt 5 (1995-2003, petrol) Colt 4 and 5 (1991-2003) Colt 2 and 3 (1983-1993)

Fuel Pump / Fuel Pressure — Check (Mitsubishi Colt 2)

  • Home
  • Colt
  • 2 (1983-1993)
  • Power unit
  • Power and exhaust system
  • Fuel Pump / Fuel Pressure — Check
0
Contents: Fuel pump - check ⤓ Checking the vent ⤓ Checking the pump operation ⤓ Checking the intake valve ⤓

Fuel pump - check


Models with carburetor engine


Warning! Be careful when working with gasoline!


1. Check fuel lines for leaks.

2. If no leak is found, check the fuel pump, after disconnecting the negative battery cable.

Checking the vent
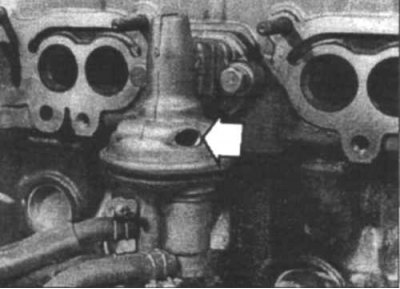


3.3 Check the fuel pump vent (arrow) - if oil or petrol is leaking out, replace the fuel pump


3. Check if fuel or oil is leaking from the vent (3.3). If there is a leak, replace the fuel pump.

Checking the pump operation


4. Disconnect the fuel supply line from the carburetor and place the end of the line in a suitable container.

Connect the negative battery terminal wire. Disconnect the wires from the ignition coil primary winding terminals.

5. Turn the engine crankshaft with the starter for about 10 seconds. If the fuel is ejected in rhythmic portions, then the pump is working properly. If not, replace it.

Checking the intake valve


6. Disconnect the fuel supply hose from the pump. Connect a vacuum gauge to the pump pipe. Crank the engine with the starter.


7. The pressure gauge should register the presence of a constant vacuum. If the pressure jumps, it means that the inlet valve does not provide sufficient sealing and the fuel pump must be replaced.

Models with multi-point fuel injection


8. Release pressure from the fuel system.
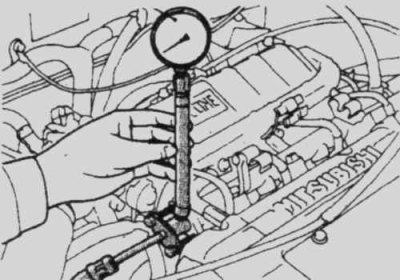


3.9 On models with multi-point fuel injection, use a special adapter (MD 998742 or similar) to install the pressure sensor


9. Disconnect the fuel supply pipe from the fuel manifold and connect the pressure sensor (3.9).

10. Start the engine and compare the pressure shown by the gauge with the pressure specified in the specifications section.

11. Disconnect the vacuum hose from the pressure regulator and cap the end of the hose. Read the pressure gauge readings.

12. Crank the engine two or three times. Start the engine and read the pressure sensor.

13. Gently pinch the return line hose of the pressure regulator and check for pressure.

14. If the fuel pressure was low in both tests, the fuel filter or fuel supply line is clogged or the fuel pump is faulty.

15. If the pressure was high when the pressure regulator was connected, it means that the regulator is faulty or is not receiving vacuum.


16. If the pressure was low when the regulator was connected, and normal after disconnecting the regulator, then the pressure regulator is faulty.

Models with two-point fuel injection


17. Release pressure from the fuel system.
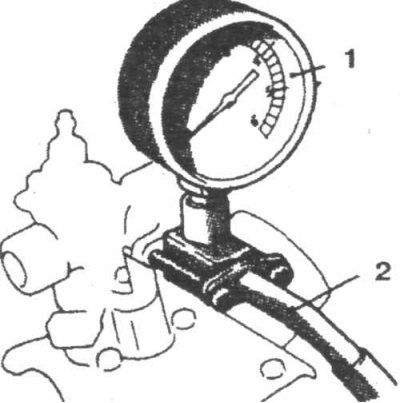


3.18 On models with two-point fuel injection, use a special adapter (MD 998742 or similar) to install the pressure sensor


18. Disconnect the fuel supply pipe from the throttle body and connect the pressure sensor (3.18).

19. Start the engine and compare the pressure shown by the gauge with the pressure specified in the specifications section.

20. If the pressure is low, check to see if the fuel filter is clogged, the pressure regulator is faulty, there is a leak in the fuel supply line, and the fuel pump is working properly.

21. For more detailed diagnostics, please contact a specialist.
This article is available at: russian, bulgarian, belarusian, ukrainian, serbian, croatian, romanian, polish, slovak, hungarian
This article was reviewed by: Arseny Pavlov
Share with friends:
◀ Previous
Colt 2 and 3: Power and exhaust system
Next ▶

Releasing pressure from the fuel system (fuel injection models)
General description of the power supply system
Technical characteristics of the power supply system
Fuel lines and connections — checking and replacing
Fuel pump — removal and installation
Fuel tank — removal and installation
Air filter — removal and installation
Carburetor — removal and installation
Similar materials for other Mitsubishi models

➤ High pressure fuel pump (HPFP) Mitsubishi Lancer 3 and 5 (1984-1992)
➤ Fuel Pump/Fuel Pressure — Check Mitsubishi Galant 5 (1983-1989, petrol)
➤ Fuel supply control valve to the high-pressure fuel pump Mitsubishi L200 4 (2005-2014, diesel)
➤ Fuel selection Mitsubishi Outlander 1 (2003-2008)
➤ High pressure fuel pump Mitsubishi Pajero 4 (2006-2021)
➤ High pressure fuel pump for engines manufactured since 1999 Mitsubishi Space Star (1998-2005)
Link in different formats to this article
Comments and feedback from visitors
No comments yet


Add up two numbers 40 + 12


Colt 5 (1995-2003, petrol) 
  • General information
  • User manual
  • Specifications
  • Gasoline engines
  • 4G1 engines until 1995
  • 4G1 engines since 1995
  • Repair of 4G9 engines
  • Cooling system
  • Reduced exhaust gas toxicity
  • Engine electrical equipment
  • Injection system MPI
  • Carburetors
  • Transmission
  • Clutch and drive shafts
  • Manual gearbox F4M21/F5M21
  • Manual gearbox F4M41
  • Automatic gearbox F4A21
  • Automatic gearbox F4A41
  • Chassis and running gear
  • Car suspension
  • Steering
  • Brake system
  • Body
  • Exterior (external elements)
  • Electrical equipment
  • Equipment and devices
  • Electrical circuits
Colt 4 and 5 (1991-2003) 
  • General information
  • Maintenance
  • Power unit
  • Engine in a car
  • Engine repair (gasoline)
  • Engine repair (diesel)
  • Lubrication system
  • Cooling system
  • Carburetor
  • Fuel injection MPI
  • Fuel injection GDI
  • Emission reduction
  • Fuel system (diesel)
  • Ignition system
  • Exhaust system
  • Transmission
  • Clutch
  • Manual gearbox
  • Automatic gearbox
  • Drive shafts
  • Chassis and running gear
  • Chassis malfunctions
  • Front suspension
  • Rear suspension
  • Steering
  • Wheels and tires
  • Brake system
  • Body and interior
  • Body elements
  • Electrical equipment
  • Equipment and devices
  • Power devices
  • Heating and air conditioning
  • Electrical circuits
Colt 2 and 3 (1983-1993) 
  • General information
  • User manual
  • Daily care
  • Maintenance
  • Power unit
  • Engine in a car
  • Engine overhaul
  • Cooling system
  • Heater and air conditioner
  • Power and exhaust system
  • Engine electrical equipment
  • Emission reduction
  • Transmission
  • Mechanical gearbox
  • Automatic gearbox
  • Clutch and axles
  • Chassis and running gear
  • Brake system
  • Car suspension
  • Steering
  • Body and interior
  • Body and elements repair
  • Electrical equipment
  • Equipment and devices
  • Electrical circuits
MitsubishiMan.ru © 2018–2026 • Mobile version • Articles about Mitsubishi • Contacts • Sitemap: EN BG BY UA RS HR RO PL SK HU • Site search • Bookmark
Colt 2 and 3 (1983-1993) · Colt 4 and 5 (1991-2003) · Colt 5 (1995-2003) · Lancer 3 and 5 (1984-1992) · Lancer 9 (2000-2007) · Galant 5 (1983-1989) · Galant 6 and 7 (1987-1998) · L200 4 (2005-2014) · Outlander 1 (2003-2008) · Pajero 1 and 2 (1982-1999) · Pajero 4 (2006-2021) · Carisma (1995-2004) · Space Star (1998-2005) ·
This resource sets cookies 🍪 to avoid bothering you with repeated data entry.