



Contactless ignition systems with distributor
Examination
Models with ignition coil built into the distributor
1. Disconnect the negative cable from the battery.
Warning! If the car stereo system is equipped with a security code, make sure you have the correct combination to activate the audio system before disconnecting the battery!
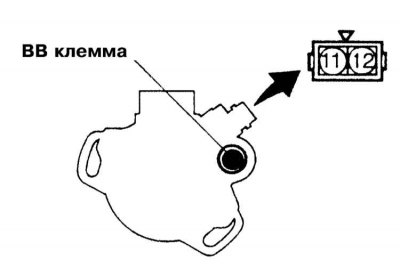
2. Measure the resistive resistance of the primary winding of the ignition coil:
- a) Disconnect the ignition distributor wiring connector;
- b) Using an ohmmeter, measure the resistance between the two terminals of the connector on the distributor housing (on 3.5L models, the measurement is made between terminals 1 and 2 of the connector);
- c) Compare the measurement result with the regulatory requirements (0.9÷1.2 Ohm: for 1.5 L, 1.8 L and 2.4 L models and 0.5÷0.7 Ohm: for 3.5 L models);
- d) If the resistance is normal, then there are no breaks or short circuits in the winding;
- e) If the measurement result is out of the acceptable range, replace the coil.
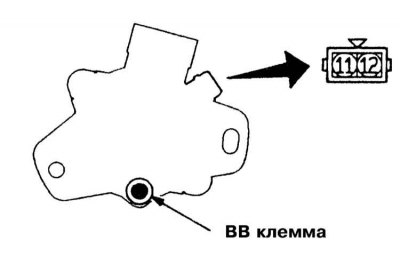 | 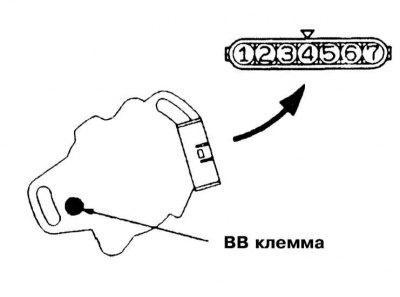 |
3. Next, measure the resistive resistance of the secondary circuit of the coil:
- a) Connect one of the test leads to the secondary terminal of the ignition coil on top of the distributor cap;
- b) Connect the second wire to terminal 1 or 2 of the distributor connector.
- c) Read the ohmmeter reading and compare the measurement result with the standard requirements (20÷29 kOhm: for 1.5 l, 1.8 l and 2.4 l models and 9÷13 kOhm: for 3.5 l models);
- d) If the resistance is normal, then there are no breaks or short circuits in the winding;
- e) If the measurement result is out of the acceptable range, replace the coil.
Models with separately installed ignition coil
1. Disconnect the negative cable from the battery.
Warning! If the car stereo system is equipped with a security code, make sure you have the correct combination to activate the audio system before disconnecting the battery!
2. Measure the resistive resistance of the primary winding of the ignition coil:
- a) Disconnect the ignition coil wiring connector;
- b) Using an ohmmeter, measure the resistance between the two terminals of the connector on the distributor housing;
- c) Compare the measurement result with the standard requirements (0.9÷1.2 Ohm: for 2.0L SOHC models and 0.72÷0.88 Ohm: for 3.0L SOHC models);
- d) If the resistance is normal, then there are no breaks or short circuits in the winding;
- e) If the measurement result is out of the acceptable range, replace the coil.
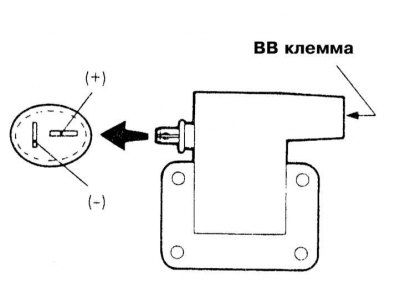
3. Next, measure the resistive resistance of the secondary circuit of the coil:
- a) Connect one of the test leads to the secondary terminal of the ignition coil on top of the distributor cap;
- b) Connect the second wire to terminal 1 or 2 of the distributor connector.
- c) Read the ohmmeter reading and compare the measurement result with the standard requirements (20÷29 kOhm: for 2.0 L SOHC models and 10.29÷13.92 kOhm: for 3.0 L SOHC models);
- d) If the resistance is normal, then there are no breaks or short circuits in the winding;
- e) If the measurement result is out of the acceptable range, replace the coil.
Replacement
Models with ignition coil built into the distributor
On these models the coil is built into the distributor assembly (see below).
Models with separately installed ignition coil
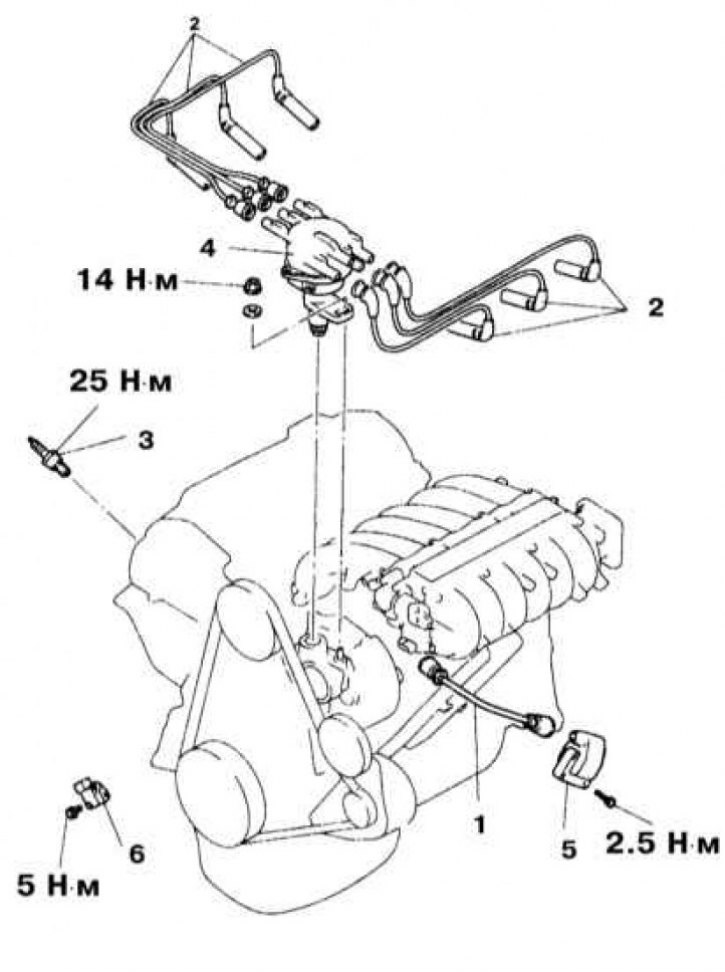
Ignition Coil Installation and Wiring Details for 3.0L SOHC Models
1 - HV wire; 2 - Spark plug wires; 3 - Spark plug; 4 - Ignition distributor; 5 - Ignition coil; 6 - Ignition system key transistor
1. The details of installation and connection of the ignition coil in the contactless system are shown in the illustration.
2. Disconnect the negative cable from the battery.
Warning! If the car stereo system is equipped with a security code, make sure you have the correct combination to activate the audio system before disconnecting the battery!
3. Disconnect the high-voltage wire from the ignition coil (pull by the terminal tip, and never by the wire itself!).
4. Disconnect the coil wiring connector.
5. Remove the mounting screws and remove the ignition coil assembly from the engine.
6. Installation is carried out in reverse order.
Direct Ignition System (DIS)
Examination
Engines 1.6 l and 2.0 l DOHC 1990 release.
1. Disconnect the negative cable from the battery.
Warning! If the car stereo system is equipped with a security code, make sure you have the correct combination to activate the audio system before disconnecting the battery!
2. Disconnect the coil harness connector.
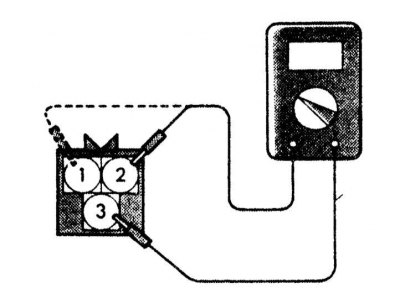
3. Measure the resistive resistance of the primary winding of the ignition coil:
- a) Using an ohmmeter, measure the resistance between terminals 4 and 2 of the connector (for coils on the side of cylinders No.1 and 4)/4 and 1 (for coils on the side of cylinders No.2 and 3);
- b) Compare the measurement result with the standard requirements (0.77÷0.95 Ohm).
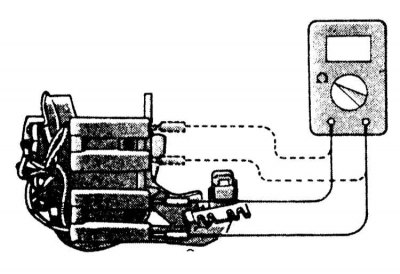
4. Next, measure the resistive resistance of the secondary circuit of the coil:
- a) Disconnect the wiring from the coil;
- b) Measure the resistance between the high voltage terminals of cylinders No.1 and 4 and No.2 and 3 respectively;
- c) Connect one of the test leads to the secondary terminal of the ignition coil on top of the distributor cap;
- d) Compare the measurement result with the standard requirements (10.3÷13.9 kOhm);
5. If the result of at least one measurement is outside the acceptable range, replace the corresponding coil.
Engines 2.0 l DOHC 1991÷1993.
1. Disconnect the negative cable from the battery.
Warning! If the car stereo system is equipped with a security code, make sure you have the correct combination to activate the audio system before disconnecting the battery!
2. Disconnect the coil harness connector.
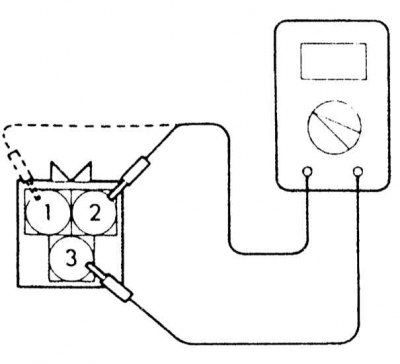
3. Measure the resistive resistance of the primary winding of the ignition coil:
- a) Using an ohmmeter, measure the resistance between terminals 3 and 2 of the connector (for coils on the side of cylinders No.1 and 4)/3 and 1 (for coils on the side of cylinders No.2 and 3);
- b) Compare the measurement result with the standard requirements (0.70÷0.86 Ohm).
The material is based on data from the website www.mitsubishiman.ru
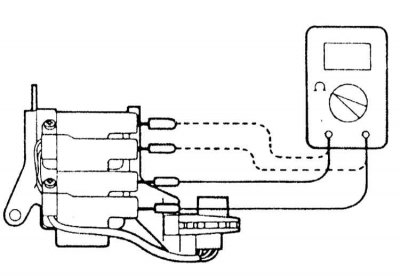
4. Next, measure the resistive resistance of the secondary circuit of the coil:
- a) Disconnect the wiring from the coil;
- b) Measure the resistance between the high voltage terminals of cylinders No.1 and 4 and No.2 and 3 respectively;
- c) Connect one of the test leads to the secondary terminal of the ignition coil on top of the distributor cap;
- d) Compare the measurement result with the standard requirements (11.3÷15.3 kOhm).
5. If the result of at least one measurement is outside the acceptable range, replace the corresponding coil.
Engines 1.8 l 1997÷2000 and 2.4 l SOHC 1999 and 2000.
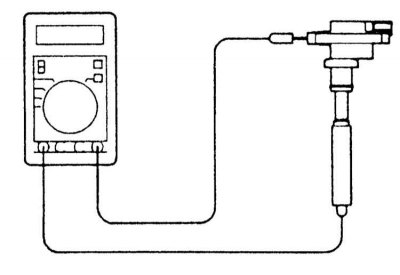
Measure the resistive resistance of the secondary circuit of the coil:
- a) Connect one of the test leads to the secondary terminal of the ignition coil;
- b) Connect the second wire to terminal 1 or 2 of the coil connector;
- c) Read the ohmmeter reading and compare the measurement result with the standard requirements (9.4÷12.8 kOhm);
- d) If the resistance is normal, then there are no breaks or short circuits in the winding;
- e) If the measurement result is out of the acceptable range, replace the coil.
Engines 2.4L DOHC
1. Disconnect the negative cable from the battery.
Warning! If the car stereo system is equipped with a security code, make sure you have the correct combination to activate the audio system before disconnecting the battery!
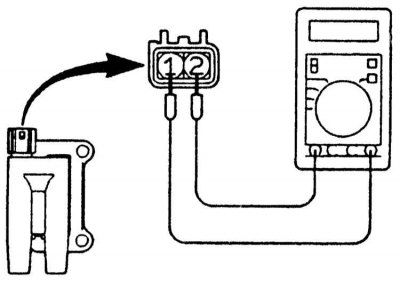
2. Measure the resistive resistance of the primary winding of the ignition coil:
- a) Disconnect the wiring from the coil assembly;
- b) Using an ohmmeter, measure the resistance between the two terminals of the coil connector:
- c) Compare the measurement result with the standard requirements (0.74÷0.90 Ohm).
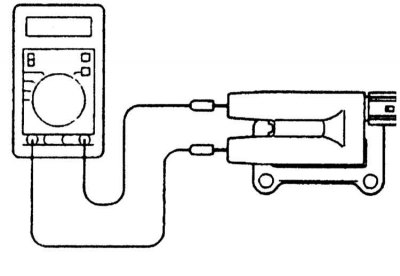
3. Next, measure the resistive resistance of the secondary circuit of the coil:
- a) Label and disconnect the spark plug wires from the coil assembly;
- b) Measure the secondary circuit resistance between the terminals of each of the individual coil modules;
- c) Compare the measurement result with the standard requirements (20.1÷27.3 kOhm);
4. If the result of at least one measurement is outside the acceptable range, replace the corresponding coil.
Engines 2.4L DOHC
1. Disconnect the negative cable from the battery.
Warning! If the car stereo system is equipped with a security code, make sure you have the correct combination to activate the audio system before disconnecting the battery!
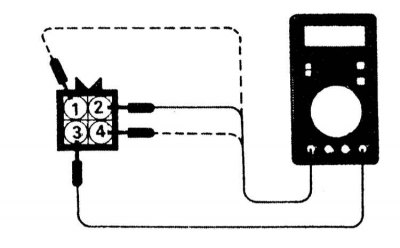
2. Measure the resistive resistance of the primary winding of the ignition coil:
- a) Disconnect the wiring from the coil assembly;
- b) Using an ohmmeter, measure the resistance between the corresponding terminals of the coil connectors (terminals 2 and 3 - for module A; terminals 1 and 3 - for module B and terminals 4 and 3 - for module C);
- c) Compare the measurement result with the standard requirements (0.67÷0.81 Ohm).
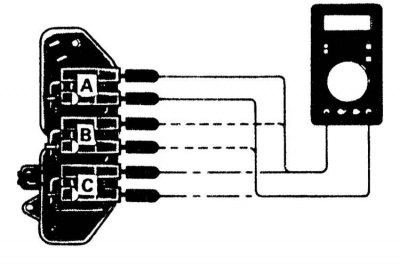
3. Next, measure the resistive resistance of the secondary circuit of the coil:
- a) Using an ohmmeter, measure the resistance between the corresponding terminals of the coil connectors (terminals 1 and 4 - for module A; terminals 2 and 5 - for module B and terminals 3 and 6 - for module C);
- b) Compare the measurement result with the standard requirements (11.3÷15.3 kOhm).
4. If the result of at least one measurement is outside the permissible range, replace the corresponding coil assembly
Replacement
Engines 1.6L, 2.0L DOHC and 2.4L DOHC
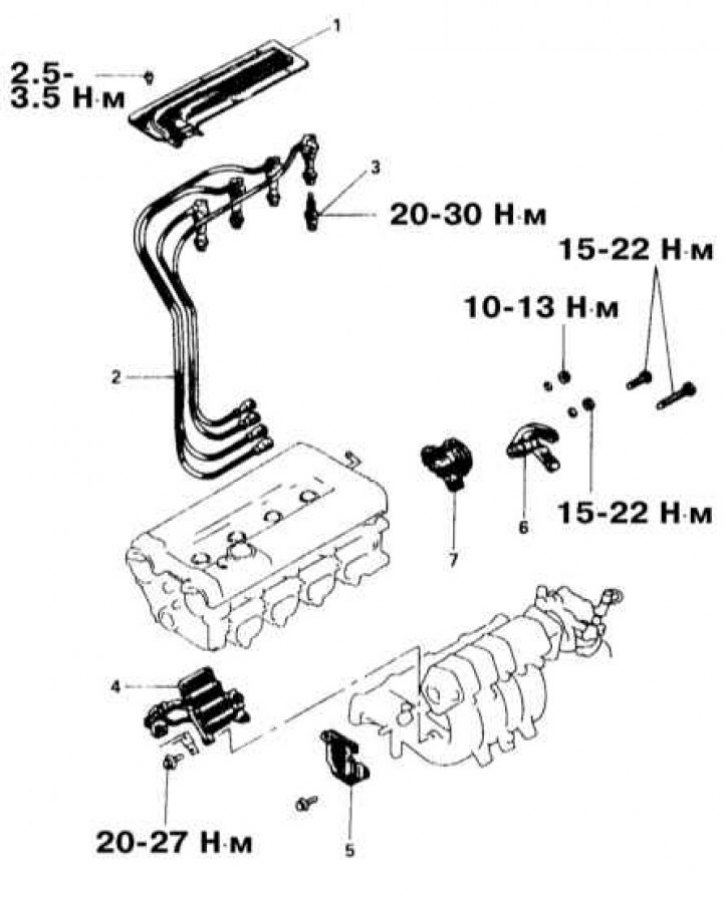
Installation and connection details of the ignition coil on 1.6L and 2.0L DOHC models
1 - Central cover; 2 - Spark plug wires; 3 - Spark plug; 4 - Ignition coil; 5 - Ignition system key transistor; 6 - Throttle body mounting bracket; 7 - CKP sensor
1. Installation details of ignition system components on models equipped with 1.6L, 2.0L DOHC and 2.4 DOHC engines are shown in the illustration.
2. Disconnect the negative cable from the battery.
Warning! If the car stereo system is equipped with a security code, make sure you have the correct combination to activate the audio system before disconnecting the battery!
3. Mark and disconnect the spark plug wires from the coil assembly - pull only by the tip, and under no circumstances by the wire itself!
4. Disconnect other electrical wiring from the coil.
5. Remove the mounting screws and remove the coil assembly from the engine.
6. Installation is carried out in reverse order.
Engines 1.8 l 1997÷2000 and 2.4 l since 1999.
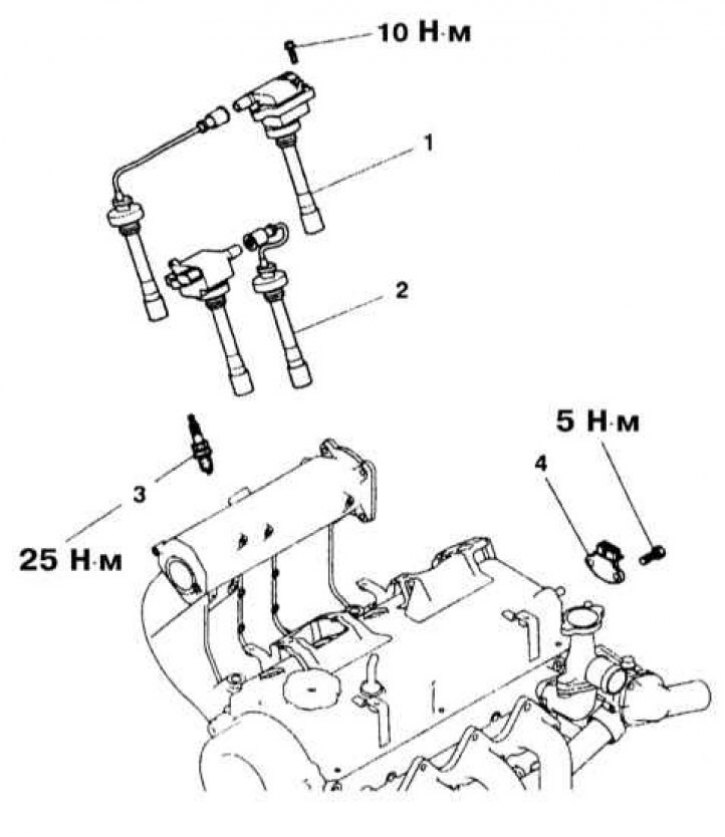
Installation and connection details of the ignition coil on 1.8L models since 1997 and 2.0L DOHC models since 1999.
1 - Ignition coil; 2 - Spark plug wires; 3 - Spark plug; 4 - Ignition failure sensor
1. Installation details of ignition system components on models equipped with 1.8L engines since 1997 and 2.4L DOHC engines since 1999 are shown in the illustration.
2. Disconnect the negative cable from the battery.
Warning! If the car stereo system is equipped with a security code, make sure you have the correct combination to activate the audio system before disconnecting the battery!
3. Disconnect the wiring from the coil(s).
4. Remove the spark plug wires from the corresponding cylinders.
5. Remove the mounting bolts and remove the corresponding coil from the cylinder head.
6. Installation is carried out in reverse order.
Engines 3.0L DOHC
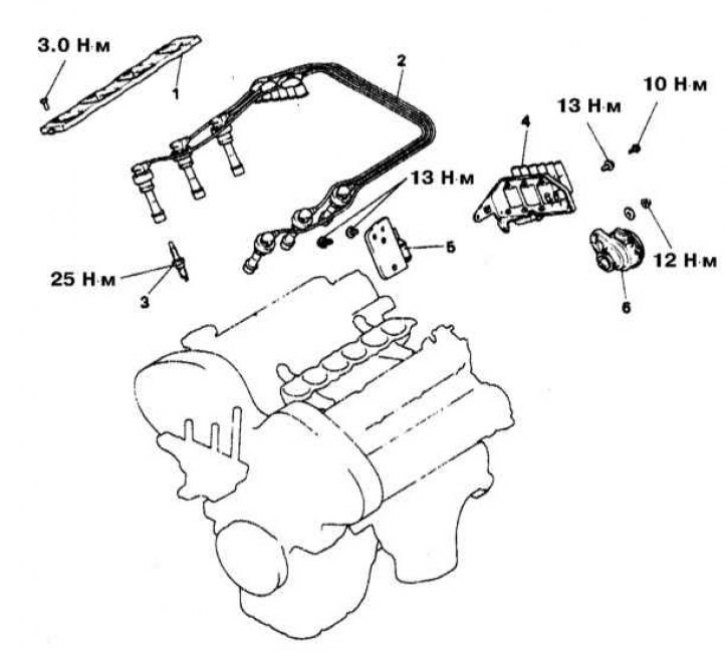
Ignition Coil Installation and Wiring Details for 3.0L DOHC Models
1 - Central cover; 2 - Spark plug wires; 3 - Spark plug; 4 - Ignition coil; 5 - Key transistor; 6 - CKP Sensor (with built-in CMP sensor) (1992 models)
1. Installation details of ignition system components on models equipped with 3.0L DOHC engines are shown in the illustration.
2. Disconnect the negative cable from the battery.
Warning! If the car stereo system is equipped with a security code, make sure you have the correct combination to activate the audio system before disconnecting the battery!
3. Remove the pressure chamber (upper section of the pipe) from the intake manifold (see Chapter Engine).
4. Mark and disconnect the spark plug wires from the coil assembly - pull only by the tip, and under no circumstances by the wire itself!
5. Disconnect other electrical wiring from the coil.
6. Remove the mounting screws and remove the coil assembly from the engine.
7. Installation is carried out in reverse order.