Removal
Disconnect the ground cable from the battery.
Caution: This erases data in the electronic memory, such as the engine fault memory or the radio receiver code. Disconnect the battery only when the ignition is switched off, otherwise the fuel injection device control unit may be damaged. Before disconnecting the battery, read the instructions in the "Radio receiver" and "Removing and installing the battery" sections.
Fuel injection engine/diesel engine: Remove the air filter, see p. 6.6.
Drain the oil from the gearbox.
Remove the battery and battery holder, see item 23.10.
Disconnect stretcher "1".
Remove the gear shift cables "2" from the gearbox. To do this, pull out the cotter pins from the side with pliers. Remove the spacer washers. Disconnect the bracket.
Petrol engine manufactured from January 1984 to August 1986: Remove the gearshift rods from the gearbox. To do this, disconnect the stabilizer rod and remove it with the bushing and spacers. Loosen the gearshift rod mounting bolt, having first cut the safety wire. Pull the rods off the gearbox and move them to the side or hang them on the body with a wire.
Remove clutch cable "3".
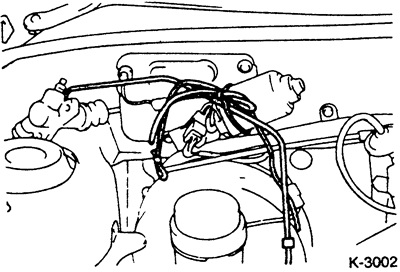
Disconnect the clutch slave cylinder "4" and the pipe holder. Secure the slave cylinder with the pipe connected to the bottom of the car, see the figure.
Disconnect the reverse light wire "5" from the box.
Loosen the union nut of the tachometer shaft "6" and pull out the flexible shaft.
Remove starter "7", for which remove 2 bolts. Before this, disconnect the cable and connector from the starter.
Loosen the upper mounting bolts "8"; release from 9.88 to 3.92: 5 bolts; release from 1.84 to 8.88: 6 bolts. Remove the ground wire from the gearbox, having previously marked its position.
Disconnect the gearbox bracket "9"
Raise the car, see item 29.
Remove the lower engine compartment pan.
Press the steering rod joints and also the axial joints to the steering knuckles, see item. 14.6/16.4.
Remove the drive shafts from the gearbox, see item 14.9.
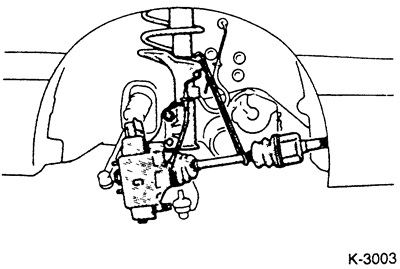
Secure the removed drive shafts to the body with ropes as far away from the gearbox housing as possible.
Disconnect the clutch basket housing.
Remove the lower gearbox mounting bolts.
Cars manufactured from 1.84 to 9.88: Loosen the gearbox suspension mount bolt. Remove the plug from the inside of the right wheel arch and remove the gearbox mount.
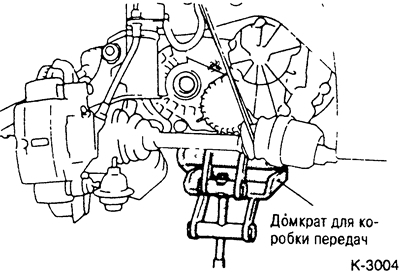
Support the gearbox with a jack. Press the gearbox away from the engine with a crowbar, move it to the right and lower it to the ground.
Note: Place the jack on the largest possible surface and do not forget to lay wooden spacers.
Installation
Before installing the gearbox, check the clutch and clutch release bearing, see p. 11.1.
Clean the splines of the input shaft and lightly lubricate with MOLY paste or MOLY aerosol.
Caution: If too much grease is applied, it may come into contact with the clutch disc surfaces during operation and cause malfunctions.
Insert the gearbox into the engine compartment in the reverse order of removal.
If the gearbox primary shaft does not engage the clutch disc when installing the gearbox, the assistant should turn the engine crankshaft slightly. To do this, rotate the front wheel with the gear engaged or, with the gearbox in neutral, turn the crankshaft slightly by the central pulley bolt.
Straighten the gearbox. Most cars have guide pins on the engine flange, these should fit into the holes in the clutch housing.
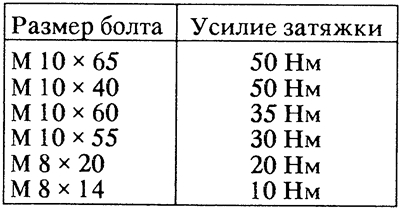
Finally, insert all the mounting bolts and tighten evenly, securing the gearbox to the engine. The tightening force depends on the outer diameter of the bolt. With an outer diameter of 10 mm, the tightening force is 35 Nm, with a diameter of 8 mm, the tightening force is 10 Nm.
Caution: In this case, under no circumstances should the box be pulled toward the engine by tightening the mounting bolts. All bolts must first be evenly tightened and then tightened using a torque wrench.
Cars manufactured from 1.84 to 9.88: Install the gearbox. Tighten the gearbox suspension bolt. Insert the plug from the inside of the right wheel arch.
Install the clutch basket cover and tighten it with a torque of 10 Nm.
Install the drive shafts, see item 14.9.
The original material is posted on the website: mitsubishiman
Install the steering rod joints and axle joints, see item. 14.6/16.4.
Install the lower engine oil pan.
Lower the car, see item 29.
Install the gearbox bracket "9".
Attach the ground cable to the box.
Insert the starter and tighten the two bolts to 30 Nm. At the same time, secure the cable holder with the lower bolt.
Connect the cable and connector to the starter.
Insert the tachometer shaft into the gearbox and tighten the union nut.
Connect the reversing light wire to the box.
Install the clutch slave cylinder on the gearbox housing. Tighten the bolts to 20 Nm. Install the hydraulic supply in the gearbox holder.
Install the clutch cable.
Install the shift cables on the gearbox levers, put in spacer washers, and secure with new cotter pins. Adjust the gear shifting if necessary.
Petrol engines from 1.84 to 8.86: Insert the gearshift rod into the gearbox, tighten the mounting bolt with a force of 30 Nm and secure with wire. Install the stabilizer rod with the bushing and spacer washers and secure with a force of 65 Nm.
Attach stretcher "1".
Install the battery, see item 23.10.
Fill the gearbox with oil.
Fuel injection engine/diesel engine: Install air filter see p. 6.6.
Connect the ground cable to the battery.
If they are available, set the time on the clock and enter the security code into the radio.
Check the operation of the gear shift handle.
Check the functioning of instruments and indicators.
Check the wheel alignment angles as soon as possible.
Gearbox mount
Cars produced from 1.84 to 8.88*