
English Русский
Български
Беларускі
Український
Српски
Hrvatski
Română
Polski
Slovenský
Magyar
Articles Bookmark Contacts Sitemap   
Company Audi Company Ford Company Hyundai Company Kia Company Mazda Company Mercedes-Benz Company Nissan
MitsubishiMan.ru


Home Colt Lancer Galant L200 Outlander Pajero Others
Pajero 4 (2006-2021) Pajero 1 and 2 (1982-1999)

Replacement of protective cover (rubber protective cover) of CV joint with divider «EUJ» (Mitsubishi Pajero 4)

  • Home
  • Pajero
  • 4 (2006-2021)
  • Transmission
  • Drive shafts
  • Replacement of protective cover (rubber protective cover) of CV joint with divider «EUJ»
0
1. Remove the clamps (big and small) protective covers for CV joints with divider "EUJ".

Note: The clamps of the protective CV joint boots with the "EUJ" divider cannot be reused.


2. Remove the protective cover of the CV joint with the "EUJ" divider.

3. Wrap insulating tape around the shaft splines and assemble the CV joint protective boot clamp with the "EUJ" divider and the CV joint protective boot with the "EUJ" divider.
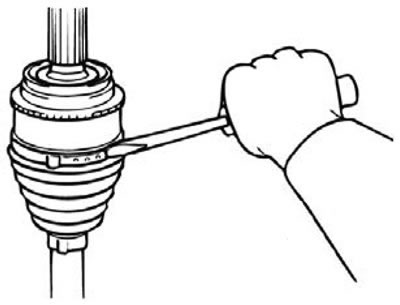


4. Install the protective cover of the CV joint with the "EUJ" divider of the smallest diameter in a position in which the groove on the shaft is visible.
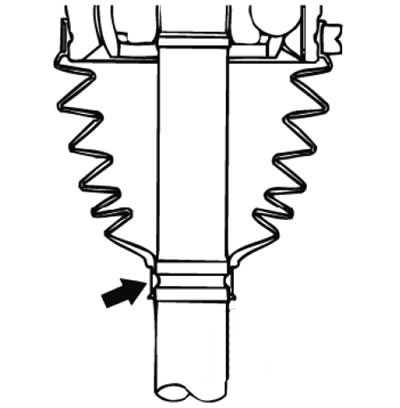


5. Turn the adjusting bolt on the special tool so that the opening size (W) matches the nominal value.

Nominal value W: 2.9 mm.


  • (If it is more than 2.9 mm) - Tighten the adjusting bolt.
  • (If it is less than 2.9 mm) - Loosen the adjusting bolt.

Note: The W value will change approximately 0.7mm for each turn of the adjusting bolt. Do not turn the adjusting bolt more than one turn.
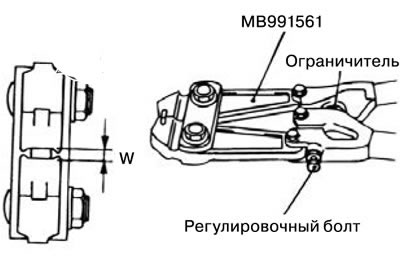


6. Place the small clamp of the CV joint protective boot with the "EUJ" divider close to the protrusion at the end of the boot and secure it so that a gap remains, as shown in the figure.
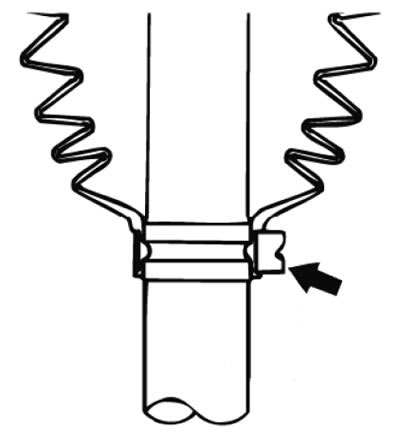


7. Use a special tool to crimp the small clamp of the CV joint protective boot with the "EUJ" divider.

Attention: Fix the shaft in a vertical position and firmly grasp the part of the clamp that will be compressed with the jaws of the special tool. Squeeze the clamp until the travel of the special tool is limited by the stopper.
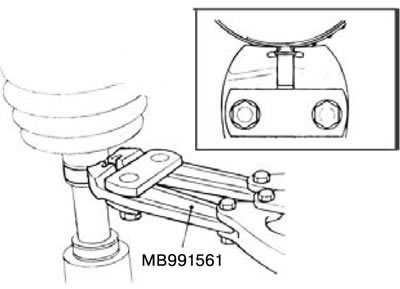


8. Check that the width of the compressed part (A) of the CV joint protective boot clamp with the "EUJ" divider corresponds to the nominal value.

Nominal width (A): 2.4 - 2.8 mm.
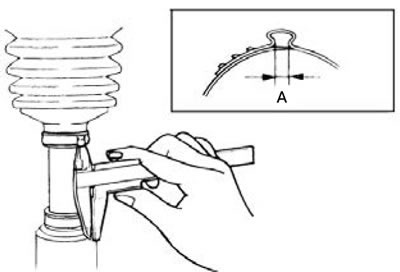


9. Check that the clamp of the CV joint protective boot with the "EUJ" divider has not shifted from its installation location. If the clamp of the protective CV joint boot with the "EUJ" divider has shifted, remove it and then repeat the operations described in points (6) through (8), using a new clamp of the protective CV joint boot with the "EUJ" divider.

10. Fill the inside of the protective cover of the CV joint with the "EUJ" divider with the specified amount of the appropriate consistent grease.

Recommended grease: Grease from the belt. set


Required quantity: 175±10 g.

Attention. A special consistent grease is used to lubricate CV joints. Do not mix old and new grease, or different types of grease.


11. Install the large clamp of the CV joint protective boot with the "EUJ" divider.

12. Follow the instructions in point (5) to adjust the opening size (W) on the special tool to match the nominal value.

Nominal value (W): 3.2 mm.
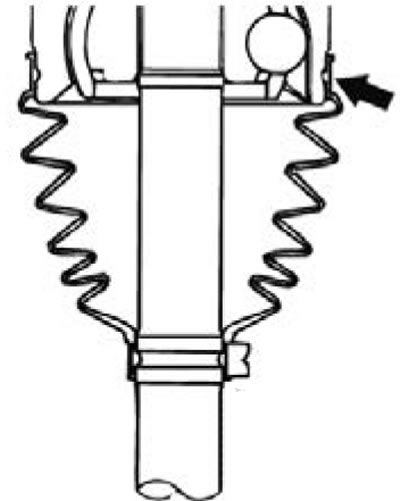


13. Place the large clamp of the CV joint protective boot with the "EUJ" divider close to the protrusion at the end of the boot and secure it.

14. Use a special tool to crimp the large clamp of the CV joint protective boot with the "EUJ" divider in the same way as in point (7).
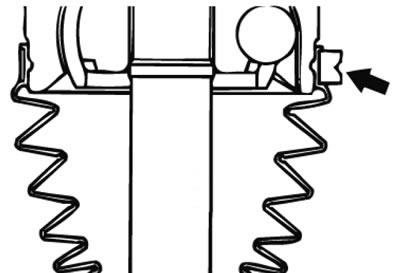


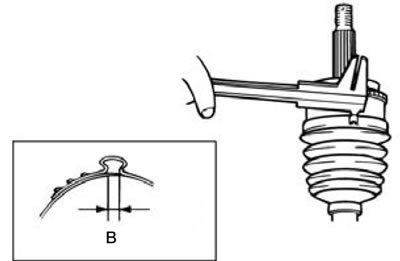
15. Check that the width of the compressed part (E) of the CV joint protective boot clamp with the "EUJ" divider corresponds to the nominal value.


Nominal width (B): 2.4 - 2.8 mm

16. Check that the clamp of the CV joint protective boot with the "EUJ" divider has not shifted from its installation location. If the clamp of the protective CV joint boot with the "EUJ" divider has shifted, remove it and then repeat the operations described in points (13) through (15), use a new clamp of the protective CV joint boot with the "EUJ" divider.
This article is available at: russian, bulgarian, belarusian, ukrainian, serbian, croatian, romanian, polish, slovak, hungarian
This article was reviewed by: Miroslav Rakov
Share with friends:
◀ Previous
Pajero 4: Drive shafts
Next ▶

Checking the drive shaft
Drive shaft assembly
Disassembling the drive shaft
Installing the drive shaft
Removal the drive shaft
Removal the inner shaft
Installing the inner shaft
Disassembling the inner shaft
Assembly of the inner shaft
Removal the differential housing and overrunning clutch
Similar materials for other Mitsubishi models

➤ Ball joint protective cover, stabilizer struts — replacement Mitsubishi Colt 4 and 5 (1991-2003)
➤ Checking the ball joint protective covers Mitsubishi Lancer 9 (2000-2007, petrol)
➤ Checking the condition of the protective covers of the… Mitsubishi Galant 6 and 7 (1987-1998)
➤ Removal and installation the valve cover Mitsubishi L200 4 (2005-2014, diesel)
➤ Checking the protective boot of the ball joint of the… Mitsubishi Outlander 1 (2003-2008)
➤ Replacing the protective cover of the ball joint of the… Mitsubishi Carisma (1995-2004)
Link in different formats to this article
Comments and feedback from visitors
No comments yet


Add up two numbers 24 + 44


Pajero 4 (2006-2021) 
  • General information
  • User manual
  • Troubleshooting
  • Maintenance
  • Technical specifications
  • Power unit
  • Engine repair
  • Cooling system
  • Lubrication system
  • Fuel system
  • Engine management system
  • Intake and exhaust system
  • Engine electrical equipment
  • Transmission
  • Clutch
  • Manual gearbox
  • Automatic gearbox
  • Drive shafts
  • Chassis and running gear
  • Front suspension
  • Rear suspension
  • Brake system
  • Steering
  • Body and interior
  • Exterior (external elements)
  • Interior (internal elements)
  • Doors, locks and windows
  • Body dimensions
  • Electrical equipment
  • Safety system (SRS)
  • Air conditioner
  • Equipment and devices
  • Electrical diagrams
Pajero 1 and 2 (1982-1999) 
  • General information
  • User manual
  • Seats and seat belts
  • Instruments and controls
  • Driving and operation
  • Maintenance
  • Power unit
  • Gasoline engines
  • Diesel engines
  • Ignition system
  • Engine electrical equipment
  • Cooling and lubrication system
  • Power and exhaust system
  • Fuel system (gasoline)
  • Fuel system (diesel)
  • Transmission
  • Clutch
  • Mechanical gearbox
  • Automatic gearbox
  • Drive shafts and axles
  • Chassis and running gear
  • Front suspension
  • Rear suspension
  • Steering
  • Brake system
  • Body and interior
  • Exterior (external elements)
  • Interior (internal elements)
  • Doors, locks and windows
  • Electrical equipment
  • Equipment and devices
  • Heater and air conditioner
  • Cruise control
  • Headlights and lighting
  • Electrical circuits
MitsubishiMan.ru © 2018–2026 • Mobile version • Articles about Mitsubishi • Contacts • Sitemap: EN BG BY UA RS HR RO PL SK HU • Site search • Bookmark
Colt 2 and 3 (1983-1993) · Colt 4 and 5 (1991-2003) · Colt 5 (1995-2003) · Lancer 3 and 5 (1984-1992) · Lancer 9 (2000-2007) · Galant 5 (1983-1989) · Galant 6 and 7 (1987-1998) · L200 4 (2005-2014) · Outlander 1 (2003-2008) · Pajero 1 and 2 (1982-1999) · Pajero 4 (2006-2021) · Carisma (1995-2004) · Space Star (1998-2005) ·
This resource sets cookies 🍪 to avoid bothering you with repeated data entry.