
English Русский
Български
Беларускі
Український
Српски
Hrvatski
Română
Polski
Slovenský
Magyar
Articles Bookmark Contacts Sitemap   
Company Audi Company Ford Company Hyundai Company Kia Company Mazda Company Mercedes-Benz Company Nissan
MitsubishiMan.ru


Home Colt Lancer Galant L200 Outlander Pajero Others
Carisma (1995-2004) Space Star (1998-2005)

Hood — removal and installation (Mitsubishi Carisma)

  • Home
  • Mitsubishi
  • Carisma (1995-2004)
  • Body and interior
  • Exterior (external elements)
  • Hood — removal and installation
0
Contents: Removal ⤓ Installation ⤓

Removal


To remove the hood, perform the following operations.

1. Open the hood and place a clean rag under the corners of the hood to protect the vehicle's paintwork when removing it.

2. If the engine compartment light is on, disconnect the electrical connector from the lamp.
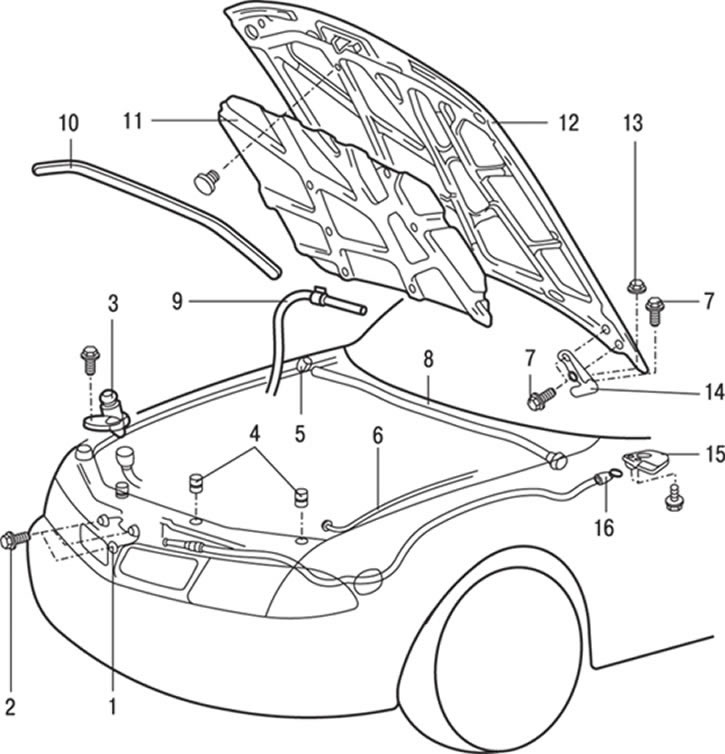


Fig. 17.1. Hood: 1 – hood lock; 2 – bolt (9 Nm); 3 – hood limit switch (cars with anti-theft system); 4 – buffers; 5 – hood side seal; 6 – hood stop; 7 – bolt (12 Nm); 8 – hood seal; 9 – windshield washer hose connection; 10 – hood seal (cars with air conditioning); 11 – hood soundproofing; 12 – hood; 13 – nut (12 Nm); 14 – hood hinge; 15 – hood lock drive handle; 16 – hood lock drive cable


3. Unscrew three bolts 2 (Fig. 17.1) and remove hood lock 1.

4. In the car interior, unscrew the two self-tapping screws and remove the hood lock drive handle 15.

5. Pull up and remove the hood seals 8 or 10.

6. Remove the hood side seal 5 by pulling it up and turning it.

7. Unscrew the buffers 4.

8. Loosen the bolt and remove the hood stop 6.

9. Remove the sound insulation 11 from the hood.


10. Unscrew and remove limit switch 3 of the hood (cars with an anti-theft system).

11. Disconnect the windshield washer hose 9.

12. Using a marker, mark the position of the hinges on the hood. Ask an assistant to support the hood, then unscrew the bolts securing the left and right hood hinges and, being careful, remove the hood 12.

[The original was published on the website MITSUBISHIMAN]

13. If necessary, remove the windshield wiper panel trim.

14. Unscrew the bolts and remove the hood hinge 14.

15. If it is necessary to remove the hood lock drive cable, first remove the mudguard liner (on the driver's side).

16. Using a screwdriver blade as a lever, remove the cable and its fastener.

17. While working inside the vehicle, disconnect the cable from the hood release lever and the cable housing from the bracket.

18. Remove the cable sealing ring from the engine compartment bulkhead and cable 16 into the engine compartment.

Installation


Installation is carried out in the reverse order of removal, taking into account the following.

1. Before installing the hood lock and handle, apply consistent grease to their moving parts.

2. If a new hood is to be installed, reinstall all removable parts onto it.
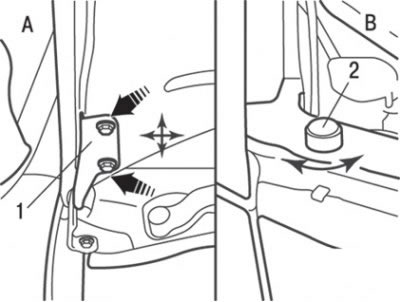


Fig. 17.2. Adjusting the clearance around the perimeter and height of the hood: A – moving the rear part of the hood; B – height adjustment of the front part of the hood; 1 – hood hinge; 2 – rubber buffer


3. Close the hood and check its position relative to adjacent surfaces. Adjust the position of the hood so that when the hood is closed, the gap around the perimeter of the hood is the same on all sides. To adjust, loosen the hood hinge bolts and, moving the hood, adjust its position (Fig. 17.2). To adjust the front of the hood in height, screw in or unscrew the rubber buffers.
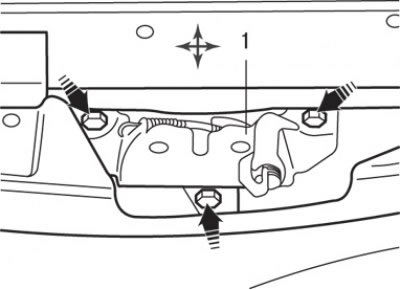


Fig. 17.3. Directions of movement when adjusting the position of the hood lock (1)


4. Adjust the position of the cable so that when the hood release lever is released, the cable has a slight sag. Check that the hood lock opens when an assistant pulls the hood release lever. If necessary, adjust by loosening the lock mounting bolts and moving it, then tighten the bolts to a torque of 9 N·m (Fig. 17.3).
This article is available at: russian, bulgarian, belarusian, ukrainian, serbian, croatian, romanian, polish, slovak, hungarian
This article was reviewed by: Dmitry Vasiliev
Share with friends:
◀ Previous
Carisma: Exterior (external elements)
Next ▶

Repair of significant body damage
Repair of minor body damage
General information about the car body
Technical data of the body
Front wing — removal and installation
Fuel tank filler flap
Front bumper — removal and installation
Front bumper repair
Rear bumper — removal and installation
Similar materials for other Mitsubishi models

➤ Hood — removal and installation Mitsubishi Colt 4 and 5 (1991-2003)
➤ Removal and installation/adjustment of the engine… Mitsubishi Lancer 3 and 5 (1984-1992)
➤ Hood — opening and closing Mitsubishi Galant 6 and 7 (1987-1998)
➤ Adjusting the hood Mitsubishi L200 4 (2005-2014, diesel)
➤ Hood — opening and closing Mitsubishi Outlander 1 (2003-2008)
➤ Opening and closing the hood Mitsubishi Pajero 1 and 2 (1982-1999)
Link in different formats to this article
Comments and feedback from visitors
No comments yet


Add up two numbers 24 + 47


Carisma (1995-2004) 
  • General information
  • User manual
  • Maintenance
  • Power unit
  • Petrol engines 4G9
  • Diesel engines FBQT
  • Diesel engines F9Q
  • Cooling system
  • Injection system (MPI)
  • Injection system (GDI)
  • Engine electrical equipment
  • Transmission
  • Clutch
  • Mechanical gearbox
  • Automatic gearbox
  • Chassis and running gear
  • Steering
  • Brake system
  • Front suspension and shafts
  • Rear suspension
  • Body and interior
  • Exterior (external elements)
  • Interior (internal elements)
  • Doors, locks and windows
  • Air conditioner
  • Electrical equipment
  • Equipment and devices
  • Headlights and lighting
  • Electrical circuits
Space Star (1998-2005) 
  • General information
  • User manual
  • Maintenance
  • Power unit
  • Petrol engines 4G9
  • Petrol engines 4G1
  • Diesel engines F9Q1
  • Cooling system
  • Fuel injection system GDI
  • Fuel injection system MPI
  • Diesel supply system F9Q1
  • Ignition system
  • Diesel preheating
  • Transmission
  • Clutch
  • Mechanical gearbox
  • Automatic gearbox
  • Chassis and running gear
  • Suspension and drive shafts
  • Brake system
  • Steering
  • Body and interior
  • Exterior (external elements)
  • Interior (internal elements)
  • Doors, locks and windows
  • Heating and air conditioning
  • Electrical equipment
  • Power devices
  • Equipment and devices
MitsubishiMan.ru © 2018–2026 • Mobile version • Articles about Mitsubishi • Contacts • Sitemap: EN BG BY UA RS HR RO PL SK HU • Site search • Bookmark
Colt 2 and 3 (1983-1993) · Colt 4 and 5 (1991-2003) · Colt 5 (1995-2003) · Lancer 3 and 5 (1984-1992) · Lancer 9 (2000-2007) · Galant 5 (1983-1989) · Galant 6 and 7 (1987-1998) · L200 4 (2005-2014) · Outlander 1 (2003-2008) · Pajero 1 and 2 (1982-1999) · Pajero 4 (2006-2021) · Carisma (1995-2004) · Space Star (1998-2005) ·
This resource sets cookies 🍪 to avoid bothering you with repeated data entry.