



Removal
- Disconnect the cable from the negative battery terminal.
- Discharge the refrigerant from the air conditioning system.
- Remove the lower engine compartment splash shield.
- On a vehicle with a 4G9 engine, remove the power steering pump.
Note: In Figure 18.26*1 bolts and nuts with flange are marked, and *2- bolts and nuts with washers.
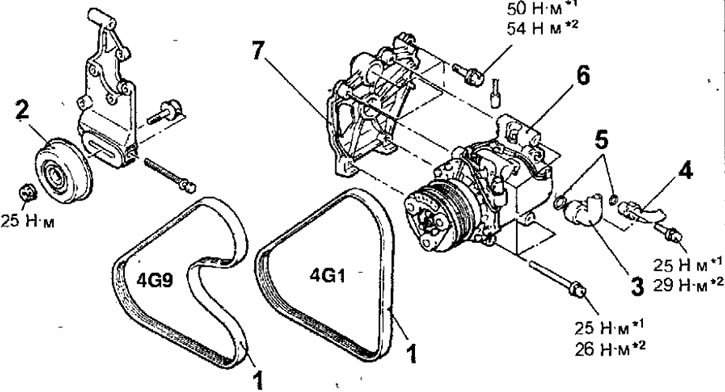
Fig. 18.26. Air conditioning compressor: 1 - air conditioning compressor drive belt; 2 - belt tensioner pulley (engine 4G9); 3 - suction hose; 4 - discharge hose; 5 - sealing ring; 6 - air conditioning compressor; 7 - air conditioning compressor bracket
- Loosen the tension of the air conditioning compressor drive belt by loosening bolt A on a vehicle with a 4G1 engine or nut A on a vehicle with a 4G9 engine (Fig. 18.27).
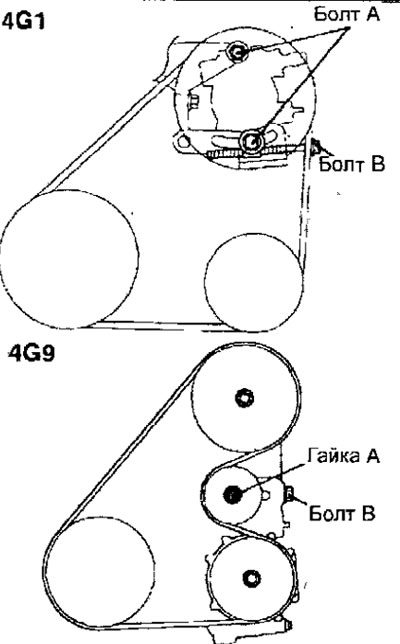
Fig. 18.27. Location of bolts and nuts for adjusting the tension of the air conditioner compressor drive belt
- Loosen adjusting bolt B.
- Remove the air conditioning compressor drive belt.
- On a vehicle with a 4G9 engine, remove the A/C compressor drive belt tensioner pulley.
- Disconnect the suction hose and discharge hose from the air conditioning compressor. When disconnecting the hoses from the compressor, immediately cover the openings in the compressor and the hoses with appropriate caps to prevent moisture from entering the air conditioning system.
- Remove the bolts and remove the compressor. When removing the compressor, be careful not to spill compressor oil.
Installation
- If a new compressor is to be installed, adjust the compressor oil volume in it according to the procedure below, then install the compressor (maintain the compressor oil balance in the air conditioning system).
- Drain the oil from the removed compressor and measure its volume (X).
- Drain the oil (Y) from the new compressor, calculated according to the formula below, and install the compressor.
120 ml - X ml = Y ml
Notes: Y ml shows the amount of compressor oil remaining in the tubes, condenser, evaporator, etc.
When replacing the following elements at the same time as the compressor, subtract the calculated volume of oil for each element of their volume Y ml and drain this volume from the new compressor.
Condenser: 15 ml
Evaporator: 60 ml
Suction hose: 10ml
Receiver: 10 ml
- Further installation is carried out in the reverse order of removal, taking into account the following.
- Replace the sealing rings and lubricate them with SUN PAG 56 compressor oil (see fig. 18.25).
- Install the compressor drive belt and adjust its tension.
Checking the temperature sensor
- With the air conditioner compressor turned off, use an ohmmeter to check the conductivity between the contacts of the temperature sensor connector (Fig. 18.28). If there is no conductivity, replace the temperature sensor.
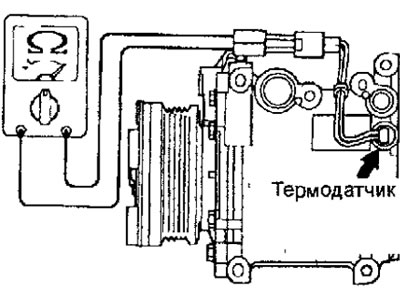
Fig. 18.28. Checking the conductivity between the sensor connector contacts
[The original article is on the website: mitsubishiman]