



Contents: Removal ⤓ Installation ⤓
Removal
- Disconnect the cable from the negative battery terminal.
- Drain the coolant from the cooling system.
- Remove the heater, fan and air conditioning control unit.
- Remove the center floor console and rear footwell air duct.
- Remove the glove box.
- Remove the lower panel from the passenger side of the instrument panel.
- Remove the center air duct.
Note: In Figure 18.16 *1 bolts and nuts with flange are marked, and *2- bolts and nuts with washers.
[The original article is on the website: www.MitsubishiMan.ru]
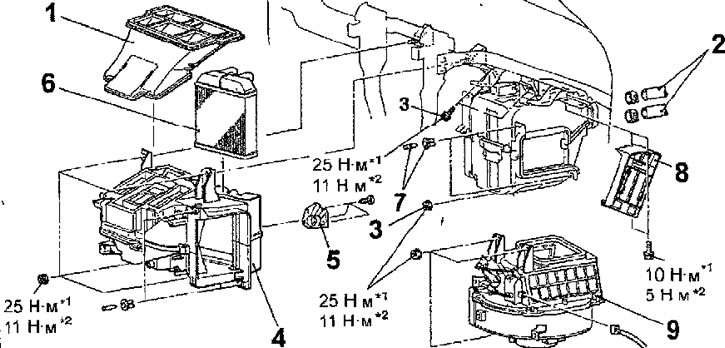
Fig. 18.16. Heater and fan: 1 - central - air duct; 2 - heater hoses; 3 - bolts and nuts for fastening the evaporator; 4 - heater unit; 5 - plate; 6 - heater radiator; 7 - retainer; 8 - lid; 9 - Fan unit
- Disconnect the coolant supply and return hoses from the heater core. Drain any remaining coolant from the hoses and heater core, being careful not to let coolant come into contact with electrical components.
- Remove the clamps, unscrew the nuts and remove the heater unit.
- Remove the bolts, remove the plate, separate the heater unit housing and remove the heater radiator.
- Loosen the nuts, disconnect the connector and remove the fan unit.
Installation
- Installation is carried out in the reverse order of removal.