



2. Close the high and low pressure valves of the measuring manifold.
3. Connect the charging hose (blue) to the low pressure valve and the filling hose (red) to the high pressure valve of the measuring manifold (Fig. 18.7).
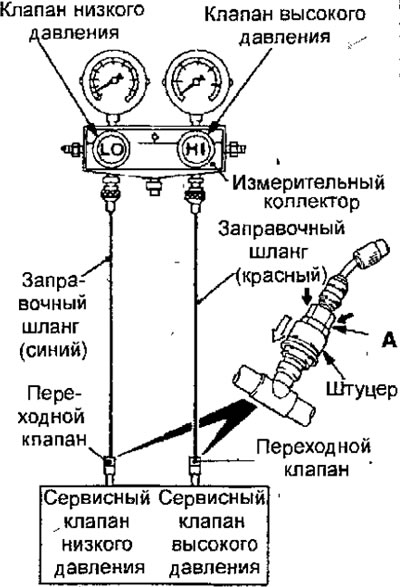
Fig. 18.7. Checking the operational characteristics
4. Install the low pressure quick release fitting on the hose (blue) and the high pressure quick release fitting on the filling hose (red).
5. Connect the appropriate quick-release fittings to the low and high pressure service valves.
Caution: To install the quick-connect fitting, press the coupling part A firmly towards the service valve until it clicks into place. After connecting the quick-connect fitting, run your hand along the hose to ensure there are no kinks.
6. Start the engine.
7. Set the air conditioner mode switches to the following positions:
- air conditioner switch: ON position;
- ventilation mode selection knob: FACE position;
- temperature control: MAXIMUM COOLING position;
- air supply mode: RECIRCULATION position;
- fan: FAST position (high speed).
8. Increase the engine speed to 1000 min⁻¹ with the compressor electromagnetic clutch engaged.
9. Warm up the engine with the doors and windows closed.
10. Insert the thermometer into the ventilation grille and measure the temperature of the air supplied to the passenger compartment for 20 minutes (Fig. 18.8).
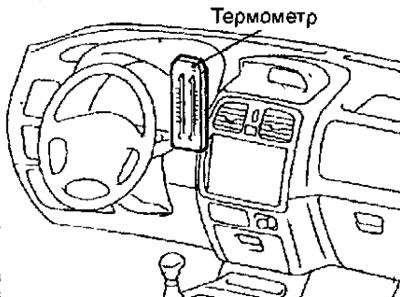
Fig. 18.8. Measuring the temperature of the air supplied to the cabin
11. Record the temperature of the air entering the cabin.
Note: If the electromagnetic clutch starts to turn off, record the temperature before it turns off.