
English Русский
Български
Беларускі
Український
Српски
Hrvatski
Română
Polski
Slovenský
Magyar
Articles Bookmark Contacts Sitemap   
Company Audi Company Ford Company Hyundai Company Kia Company Mazda Company Mercedes-Benz Company Nissan
MitsubishiMan.ru


Home Colt Lancer Galant L200 Outlander Pajero Others
Carisma (1995-2004) Space Star (1998-2005)

Air conditioning system refill (Mitsubishi Space Star)

  • Home
  • Mitsubishi
  • Space Star (1998-2005)
  • Body and interior
  • Heating and air conditioning
  • Air conditioning system refill
0
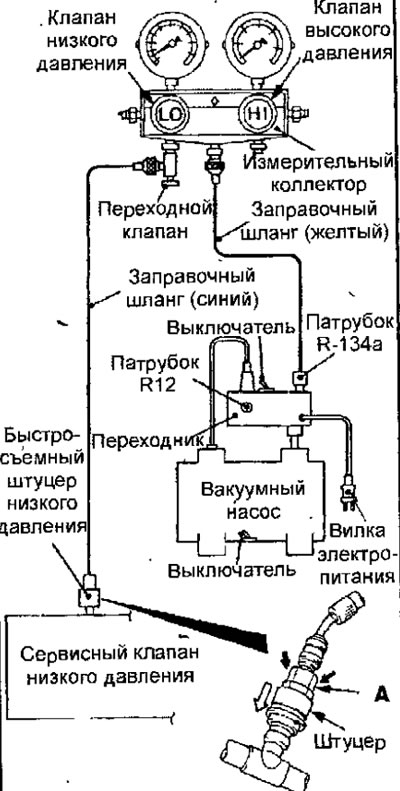
1. With the valve handles turned all the way out (valves closed), install the transition valve to the low pressure fitting of the measuring manifold (Fig. 18.3)


Fig. 18.3. Connecting special equipment when filling the air conditioning system
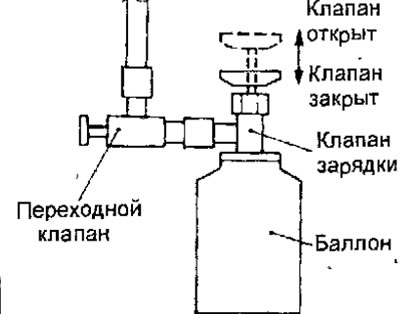


Fig. 18.4. Connecting the cylinder to the charging valve


2. Connect the filling hose (blue) to the transition valve.

3. Connect the low pressure quick release fitting to the filling hose (blue).

4. Connect the low pressure quick release fitting to the low pressure service valve.

Warnings.
  • To connect the quick-release fitting, press the coupling part A firmly towards the service valve until it clicks into place.
  • When connecting a quick-release fitting, run your hand along the hose, pressing down on it to ensure there are no kinks.

The text of the article was taken from the website MitsubishiMan.ru


5. Close the high and low pressure valves on the measuring manifold.

6. Connect the vacuum pump adapter to the vacuum pump.

7. Connect the plug and power cord to the adapter.

8. Connect the charging hose (yellow) to the R-134a connection port of the vacuum pump adapter.

9. Close the handle of the transition valve (the valve is open).

10. Open the low pressure valve of the measuring manifold.

11. Turn on the vacuum pump switch.

12. To start the vacuum pump, turn the vacuum pump adapter switch towards the R-134a fitting.

13. Pump down to a vacuum of 100 kPa (the process takes about 10 minutes).

14. Turn off the vacuum pump adapter switch and wait 5 minutes.

15. Check for leaks. The system is in good condition if the vacuum does not decrease.

Warning: If the vacuum drops, check that all connections are tight and then repeat the pumping procedure from step 12.


16. Open the filling valve completely and insert it into the filling cylinder.

17. Unscrew the handle of the transition valve (the valve is closed), remove it from the measuring manifold and connect it through the filling valve to the filling cylinder.

18. Tighten the filling valve handle (valve closed) to pierce a hole in the filling cylinder.

19. To fill the system with refrigerant, unscrew the handle of the filling valve (valve open) and screw in the handle of the transition valve (valve open).

20. If the refrigerant does not enter the system, unscrew the handle of the transition valve (the valve is closed).

21. Check for refrigerant leaks using a leak detector. If refrigerant leaks are detected, retighten all connections and repeat the charging procedure, starting with the refrigerant recovery operation (item 12).


22. Start the engine.

23. Turn on the air conditioner and set the air temperature control knob to maximum cooling (MAX. COOL).

24. Set the engine crankshaft speed to 1500 min⁻¹.

25. To fill the required volume of refrigerant, turn the handle of the transition valve (the valve is open).

26. After completing filling the system with refrigerant, unscrew the handle of the transition valve until it stops (the valve is closed).

27. Screw the filling valve handle all the way in (valve closed). Disconnect the low pressure quick-release fitting from the low pressure service valve.
This article is available at: russian, bulgarian, belarusian, ukrainian, serbian, croatian, romanian, polish, slovak, hungarian
This article was reviewed by: Miroslav Rakov
Share with friends:
◀ Previous
Space Star: Heating and air conditioning
Next ▶

Checking the compressor electromagnetic clutch
Checking the refrigerant level through the sight glass
Heating, ventilation and air conditioning system
Topping up from a cylinder when the refrigerant level is low
Air Conditioning Compressor Lubricant Oil
Performance check
Checking the fan relay
Replacing the cabin air filter
Similar materials for other Mitsubishi models

➤ Description of the operation of the air conditioning system Mitsubishi Colt 4 and 5 (1991-2003)
➤ Air conditioning system refill Mitsubishi Lancer 9 (2000-2007, petrol)
➤ Heating, ventilation and air conditioning system Mitsubishi Galant 6 and 7 (1987-1998)
➤ Ventilation, heating and air conditioning system Mitsubishi L200 4 (2005-2014, diesel)
➤ Filling the air conditioning system with oil Mitsubishi Outlander 1 (2003-2008)
➤ Air conditioning system Mitsubishi Pajero 4 (2006-2021)
Link in different formats to this article
Comments and feedback from visitors
No comments yet


Add up two numbers 16 + 42


Carisma (1995-2004) 
  • General information
  • User manual
  • Maintenance
  • Power unit
  • Petrol engines 4G9
  • Diesel engines FBQT
  • Diesel engines F9Q
  • Cooling system
  • Injection system (MPI)
  • Injection system (GDI)
  • Engine electrical equipment
  • Transmission
  • Clutch
  • Mechanical gearbox
  • Automatic gearbox
  • Chassis and running gear
  • Steering
  • Brake system
  • Front suspension and shafts
  • Rear suspension
  • Body and interior
  • Exterior (external elements)
  • Interior (internal elements)
  • Doors, locks and windows
  • Air conditioner
  • Electrical equipment
  • Equipment and devices
  • Headlights and lighting
  • Electrical circuits
Space Star (1998-2005) 
  • General information
  • User manual
  • Maintenance
  • Power unit
  • Petrol engines 4G9
  • Petrol engines 4G1
  • Diesel engines F9Q1
  • Cooling system
  • Fuel injection system GDI
  • Fuel injection system MPI
  • Diesel supply system F9Q1
  • Ignition system
  • Diesel preheating
  • Transmission
  • Clutch
  • Mechanical gearbox
  • Automatic gearbox
  • Chassis and running gear
  • Suspension and drive shafts
  • Brake system
  • Steering
  • Body and interior
  • Exterior (external elements)
  • Interior (internal elements)
  • Doors, locks and windows
  • Heating and air conditioning
  • Electrical equipment
  • Power devices
  • Equipment and devices
MitsubishiMan.ru © 2018–2026 • Mobile version • Articles about Mitsubishi • Contacts • Sitemap: EN BG BY UA RS HR RO PL SK HU • Site search • Bookmark
Colt 2 and 3 (1983-1993) · Colt 4 and 5 (1991-2003) · Colt 5 (1995-2003) · Lancer 3 and 5 (1984-1992) · Lancer 9 (2000-2007) · Galant 5 (1983-1989) · Galant 6 and 7 (1987-1998) · L200 4 (2005-2014) · Outlander 1 (2003-2008) · Pajero 1 and 2 (1982-1999) · Pajero 4 (2006-2021) · Carisma (1995-2004) · Space Star (1998-2005) ·
This resource sets cookies 🍪 to avoid bothering you with repeated data entry.