



Contents: General description ⤓ Heat supply to the feet ⤓ Outside air intake ⤓ Air cooling ⤓ Air drying ⤓ Automatic air conditioning system ⤓ Important tips for using air…⤓ Air Conditioner Refrigerant and…⤓ What to do if the air conditioner is…⤓
General description
The heater and air conditioner only operate when the engine is running. The heater's operation is directly related to the engine coolant temperature, so operate the heater when the engine is sufficiently warm. The amount of air passing through the heater can be adjusted by changing the fan speed.
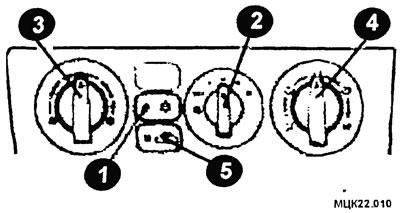
Controls
1 - Air conditioning switch; 2 - Fan switch; 3 - temperature control knob; 4 - mode selection knob; 5 - ventilation mode selection lever.
Air conditioning switch
Press the button and the air conditioner (which performs the functions of cooling and dehumidifying the air) will start working. At the same time, the indicator lamp of the air conditioner turns on. When you press the button again, the air conditioner turns off.
After cooling begins, steam may appear from the air outlet for the first few minutes. This is simply the result of the sudden cooling of moist air.
CAUTION: When using the air conditioner, the engine idle speed increases. This should be taken into account and care should be taken when starting off.
Fan switch
The fan has four rotation speeds to regulate the intensity of the air flow.
Under normal conditions, the fan should be set to speed one or two.
Temperature control knob
The heater does not operate when the knob is turned all the way to the left. As the knob is turned to the right, the temperature of the air coming out of the heater gradually increases.
Mode selection knob
Main directions of air flow:
 Position "towards the face". Air enters only the upper part of the cabin.
 Feet/Face Position Air flows to the upper part of the cabin and to the feet.
 Position "to the feet". Air is supplied to the feet in the front and rear parts of the cabin.
 Position "to the feet/window defrost". Air is supplied to the feet in the front and rear of the cabin to the windshield and to the door windows.
 "Windshield blowing" position. Air is supplied only to the windshield and door windows.
Where does the air go:
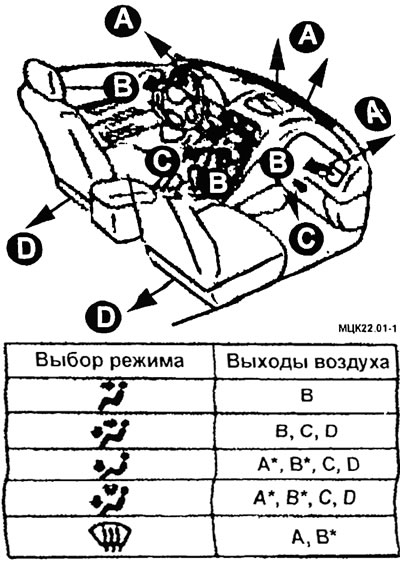
- A: From the front and side glass blowing holes.
- B: from the central and side ventilation holes.
- C: from under the dashboard.
- D: from under the front seat.
- *: indicates low air flow.
Ventilation mode selection lever
Each time the lever is pressed, the outside air supply and the air recirculation in the cabin change. When the air recirculation in the cabin is on, the indicator lamp lights up.
Outside air supply position: Outside air is supplied to the vehicle interior.
Recirculation position: Recirculates the air in the passenger compartment. Use this position when the outside air contains a lot of dust and other contaminants.
CAUTION: The recirculation mode, especially in cold weather, should only be used for short periods of time to avoid excessive fogging of the windows.
Heat supply to the feet
Set the mode selection knob to the position shown in the figure below and the ventilation mode selection lever to the position for supplying outside air.
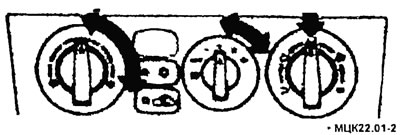
Adjust the air temperature by turning the temperature control knob clockwise or counterclockwise.
Select the fan speed.
Outside air intake
To let outside air into the cabin in hot weather, set the ventilation mode selector lever to the outside air position and the temperature control knob to the position shown in the figure. Make sure the temperature control knob is in the far left position. Select the desired fan speed.
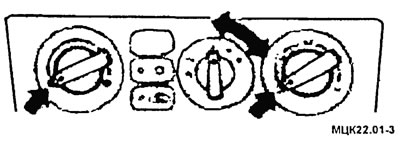
CAUTION: Turn the mode selector knob clockwise, the air flow will be directed to the feet and windshield.
Air cooling
Set the mode selector knob to the position shown in the figure. Set the ventilation mode selector lever to the outside air supply position and turn on the air conditioner. Adjust the temperature by turning the temperature control knob clockwise or counterclockwise. Select the desired fan speed.
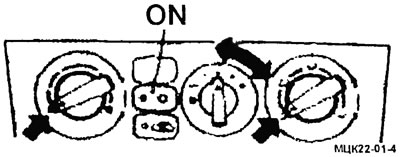
CAUTION: If the outside air contains dust or other contaminants, or if strong cooling is required, set the ventilation mode selector lever to the interior air recirculation position and the temperature control knob to the extreme left position.
Air drying
Turn on the air conditioner and set the ventilation mode selector lever to the outside air supply position. Set the mode selector knob to the position shown in the figure. Adjust the temperature by turning the temperature control knob clockwise or counterclockwise. Select the fan speed.
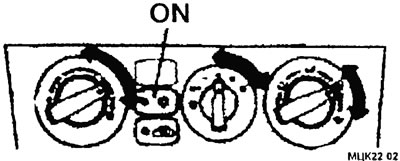
Automatic air conditioning system
When you press the AUTO button and select the desired temperature, the air conditioner will start operating automatically, cooling or heating the air to the desired temperature.
If necessary, you can control the air conditioner manually.
The air conditioning system can only function when the engine is running.
The vehicle is equipped with a photo sensor, an outside air temperature sensor and an interior temperature sensor.
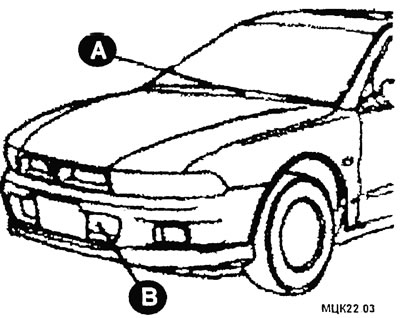
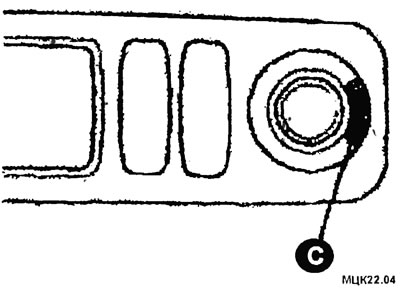
A - photo sensor; B - outside air temperature sensor; C - cabin air temperature sensor.
Do not place any objects on the surface of the sensors, as this may interfere with their operation.
The set temperature and selected air conditioning modes remain in memory even after the engine is turned off. However, if the cable from the battery is disconnected, all data stored in the memory will be erased and the temperature will be automatically set to 25°C (AUTO).
Working with the air conditioning system in automatic mode
Under normal conditions, use the system in automatic mode by performing the following operations:
Press the "AUTO" key.
The indicator will light up and the air conditioning system will automatically control the air supply vents or ventilation mode selection, fan speed and air conditioner on/off. A - Air flow indicator.
Turn the "TEMP" dial (1,2) to set the desired temperature. The temperature can be selected within the range from 17°C to 32°C. When turning the dial to the right, the temperature gradually increases.
B - indication of the selected temperature/outside air temperature. Press the "OUT TEMP" key (3) and the outside temperature indication will appear on the display. Pressing this key again will restore the previous indication of the selected temperature. If the outside air temperature is below 0°C, a warning signal will sound and the outside air temperature indication will change to white.

CAUTION: Under normal conditions, set the temperature to approximately 25°C. When the vehicle is stationary or in some other cases where the outside air temperature sensor is exposed to heat from the engine compartment or sunlight reflected from the road surface, the display may show a temperature higher than the actual temperature.
If necessary, press the key. Each time you press this key, the mode changes from ECO to O and turns off; the indication changes according to the mode change. ECO - this mode is used at low humidity. The air conditioner compressor operates in energy saving mode.
O - this mode is effective when it is necessary to dehumidify the air.
The air conditioner compressor operates in the cooling and dehumidifying mode.
Operating the air conditioning system manually
When pressing any keys other than AUTO, TEMP and ECO, the AUTO indicator goes out and the system function associated with the pressed key is switched off. To return to fully automatic operation, press the AUTO key again.
Changing the selected mode
If necessary, press the air outlet selection key. Press the key and air will begin to flow from other holes.
Important tips for using air conditioner
Park your car in the shade. Parking in the open under the hot sun will cause the interior to become very hot and will take longer to cool down. If you had to park in the sun, open the windows for the first few minutes of air conditioning operation to remove hot air from the interior.
Keep windows closed during normal air conditioning use. Allowing outside air to enter through open windows will reduce cooling efficiency.
Too much cooling is harmful to health. The air temperature in the cabin should be only 5-6°C lower than the temperature of the unfriendly air.
When using the air conditioning system, make sure that the air intake opening in front of the windshield is not blocked by anything, such as leaves. A buildup of leaves in the air intake chamber can reduce air flow and block the opening for water to drain from the chamber.
Air Conditioner Refrigerant and Lubricant Recommendations
If the air conditioner's performance has noticeably decreased, a refrigerant leak may be the cause. Contact your authorized dealer to have the system checked. The air conditioning system in your vehicle uses HFC-143a refrigerant and SUN-PAG56 lubricating oil. Using another refrigerant and oil will cause serious damage to the system, requiring replacement of the entire air conditioning system in your vehicle. Venting refrigerant into the atmosphere is not recommended. The refrigerant used in your vehicle is not harmful to the earth's ozone layer.
What to do if the air conditioner is not used for a long time?
The air conditioner should be run for at least five minutes each week, even in cold weather. This is to ensure proper lubrication of the compressor's internal parts and to keep the air conditioner in good working order. If this is not done, the system may emit an unusual odor. The appearance of an odor does not indicate a breakdown of the system.