



Warning: Do not remove the radiator cap when the engine is hot, as escaping steam can cause severe burns. Cover the radiator cap with a thick rag and slowly unscrew the cap until you hear the escaping steam hiss. Once the steam has stopped escaping, slowly unscrew and remove the cap from the radiator.
Removal
- Disconnect the cable from the negative battery terminal.
- Drain the coolant from the cooling system.
- Remove the timing belt of the gas distribution mechanism drive.
- Remove the timing belt idler pulley.
- Unscrew the bolts and remove the rear timing belt cover (Fig. 5.15).
- Remove the bolts and water pump.
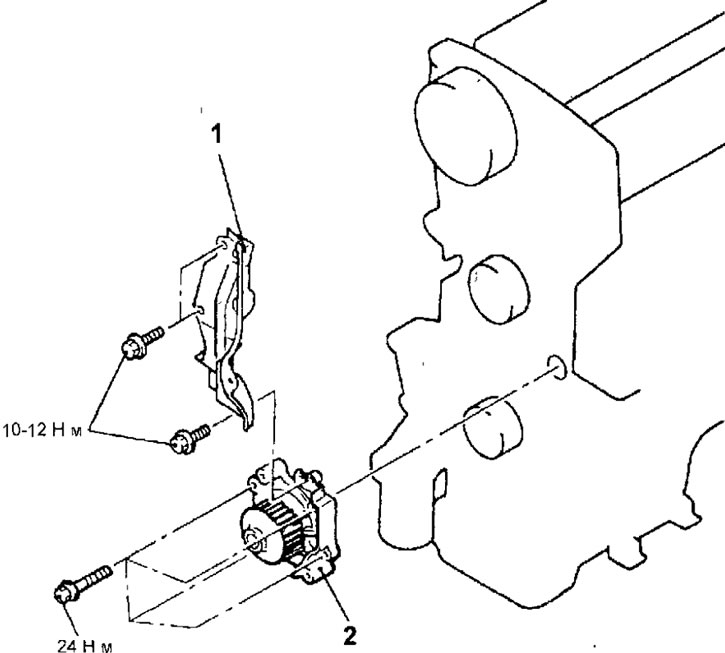
Fig. 5.15. Water pump of the 4G9 engine: 1-rear timing belt cover; 2 - water pump
Examination
- Inspect each part for cracks, damage or wear and replace the pump assembly if necessary.
- Turn the water pump shaft and check for smooth rotation and no noise.
- Check for coolant leaks from the pump. If there is a leak, the pump seal is faulty. Replace the water pump if necessary.
Installation
- Installation is carried out in the reverse order of removal, taking into account the following.
- Clean the mating surfaces of the water pump and cylinder block.
- Apply a layer of sealant to the water pump mating surface (Fig. 5.16).
Sealant: Mitsubishi Genuine Part # MD970389
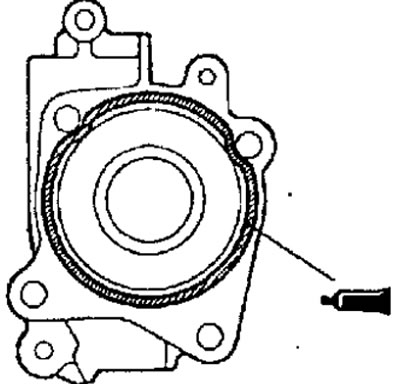
Fig. 5.16. Places of application of sealant on the mating surface of the water pump
- Install the water pump and secure with bolts, tightening them to the required torque.
Tightening torque: 24 Nm
- Install the rear timing belt cover and secure with bolts, tightening them to the required torque.
Tightening torque: 10-12 Nm
- Install the timing belt idler pulley.
- Install the timing belt to drive the gas distribution mechanism.
- Fill the cooling system with the required amount of the required coolant.
- Connect the cable to the negative terminal of the battery.
- Start the engine and check for leaks in the cooling system.
- Check the coolant level.