



Thermostat for cars with 4G9 and 4G1 engines
Note: Disassembling the thermostat may result in its malfunction and reduced efficiency of the engine cooling system.
Removal
- Disconnect the cable from the negative battery terminal.
- Drain the coolant from the cooling system.
- Remove the air filter.
- Place alignment marks on the hose and clamp, loosen the clamp and disconnect the hose from the thermostat housing inlet pipe (Fig. 5.10).
- Remove the bolts and the intake manifold and thermostat.
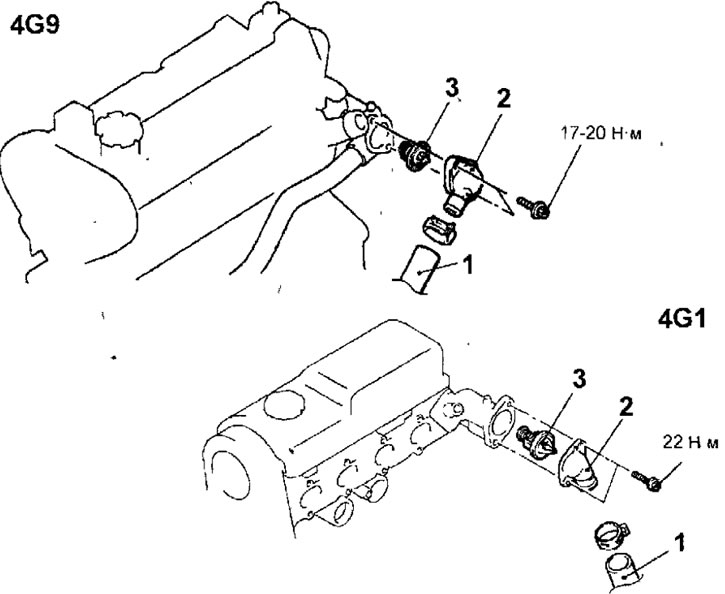
Fig. 5.10. Thermostat for cars with 4G9 and 4G1 engines: 1 - hose; 2 - thermostat housing inlet pipe; 3 - thermostat
Examination
- Hang the thermostat on a thread in a transparent vessel with water (Fig. 5.11). Insert a thermometer into the water, heat the vessel with water and observe the thermostat valve. Determine the temperature of the beginning of opening and full opening of the thermostat valve.
Thermostat valve opening start temperature:
- gasoline engines 4G9 - 85±1.5°C
- petrol engines 4G1 - 88°C
- gasoline engines 4G93 (GDI) - 82+1.5°C
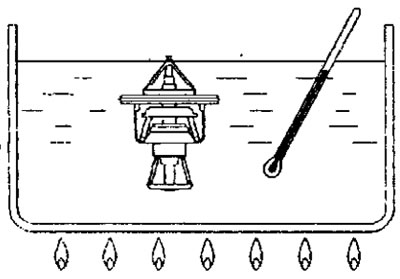
Fig. 5.11. Heating a thermostat in a transparent vessel with water
- Check the opening stroke of the thermostat valve at its maximum opening (Fig. 5.12). To measure the valve stroke, measure the distance from the bottom plane of the valve to the thermostat housing when the latter is fully closed and then fully open, then calculate the valve stroke.
Temperature of full opening of thermostat valve:
- petrol engines 4G9 - 98°C
- petrol engines 4G1 - 100°C
- gasoline engines 4G93(GDI) - 95°C
Thermostat valve stroke:
- petrol engines 4G9 - not less than 8.5 mm
- petrol engines 4G1 - not less than 8.0 mm
- petrol engines 4G93 - not less than 8.5 mm
The original article was published on MitsubishiMan.ru
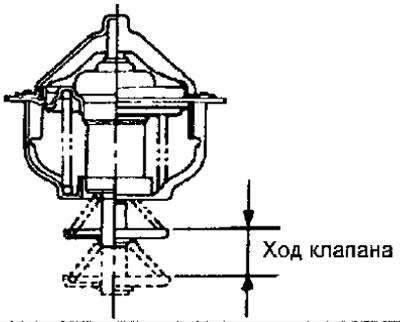
Fig. 5.12. Thermostat valve stroke measurement location
Installation
- Installation is carried out in the reverse order of removal, taking into account the following.
- Install the thermostat so that its air vent is located on top, without damaging the thermostat rubber seal (Fig. 5.13).
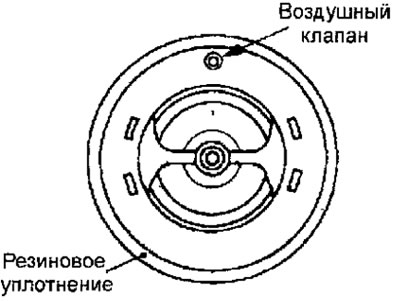
Fig. 5.13. Thermostat installation position on cars with gasoline engines
Warning: Make sure that the thermostat rubber seal is not exposed to engine oil or grease. Also, do not bend or scratch the thermostat rubber seal during installation.
- Place the hose on the branch pipe so that its end reaches the protrusion on the branch pipe.
- Secure the hose with a clamp, aligning the marks on the hose and clamp.
- Fill the cooling system with coolant.
- Connect the cable to the negative terminal of the battery.
- Start the engine and check for leaks in the cooling system.
Thermostat for diesel car F9Q1
Note: Disassembling the thermostat may result in its malfunction and reduced efficiency of the engine cooling system.
Removal
- Disconnect the cable from the negative battery terminal.
- Drain the coolant from the cooling system.
- Remove the air filter.
- Place alignment marks on the hose and clamp, loosen the clamp and disconnect the hose from the thermostat housing inlet pipe (Fig. 5.14).
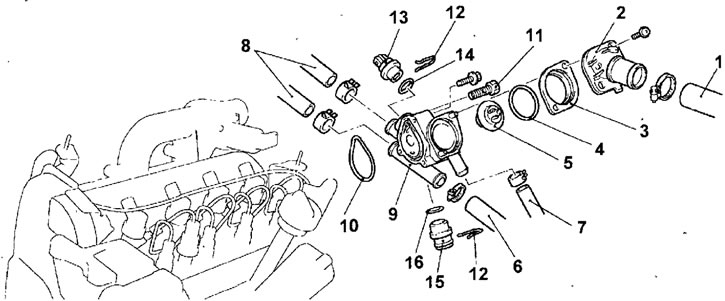
Fig. 5.14. Thermostat of a car with a diesel engine F9Q1: 1 - Upper radiator hose; 2 - thermostat housing pipe; 3 - gasket; 4 - sealing ring; 5 - thermostat; 6 — cooling system hose; 7 - lower radiator hose; 8 — heater hoses; 9 - thermostat housing; 10 - sealing ring; 11 - cooling system air bleed screw; 12 - clamp; 13 - coolant temperature sensor; 14 - sealing ring; 15 - cork; 16 - sealing ring
- Remove the bolts and thermostat housing pipe, gasket, sealing ring and thermostat.
- Loosen the clamp and disconnect the coolant hose from the thermostat housing.
- Place alignment marks on the hose and clamp, loosen the clamp and disconnect the hose from the thermostat housing.
- Disconnect the connector from the coolant temperature sensor.
- Remove the clamp and coolant temperature sensor and O-ring.
- Loosen the clamps and disconnect the heater hoses from the thermostat housing.
- Remove the bolts and thermostat housing and sealing ring.
Installation
- Installation is carried out in the reverse order of removal, taking into account the following.
- When installing, replace all O-rings with new ones.
- Place the hoses on the fittings so that their ends reach the protrusions on the fittings.
- Secure the hoses with clamps, aligning the marks on the hoses and clamps.
- Fill the cooling system with coolant.
- Install the air filter.
- Connect the cable to the negative terminal of the battery.
- Start the engine and check for leaks in the cooling system.