



- ATF Dexron or Dexron-II.
Replacement
- Replacement should be done on a cold gearbox.
- Raise the car horizontally.
- If present, remove the crankcase and gearbox guard
- Inspect the gearbox for oil leaks.
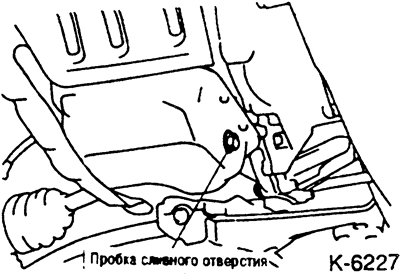
Unscrew the oil drain plug and drain the oil. Drain the oil as slowly as possible.
- Remove the oil pan
- Check the oil filter for clogging and damage.
- Remove the magnet from the oil pan and clean it.
- Clean the inside of the oil pan, as well as the mating surfaces of the oil pan and gearbox.
- Place the magnet into the oil pan.
- Install the oil pan with a new gasket and tighten the mounting bolts to 10 Nm.
- Screw in the drain plug and tighten to 35 Nm.
Place a funnel with a mesh on the dipstick tube. It is important that the funnel has a mesh to prevent any dirt from getting into the box.
Pour about 4 liters of gearbox oil into the box (for cars produced from 1.84 to 8.88: 2.5 liters) and check using the oil dipstick.
Note: The total capacity itself is 6 l (for cars from 1.84 to 8.88: 5.8 l), but when changing the oil, only 4.5 l is required (for cars from 1.84 to 8.88: 2.8 l), since the remaining amount of oil remains in the torque converter.
- Start the engine and let it idle for at least 2 minutes.
- Then, with the handbrake engaged, go through all the gear engagement positions and set the shift lever to position N.
- With the engine running, measure the oil level in the gearbox and top up to the COLD mark.
- Warm up the engine while driving and measure the oil level in the gearbox while the engine is running. The oil level should now be between the two HOT marks. Otherwise, adjust the oil level. Note: The oil level should not be below the mark corresponding to the current temperature, otherwise the gearbox may break down. If the level is above the mark, the gearbox may overheat and the oil may spill out. If the level is too high, suck out the excess oil.
- Insert the dipstick all the way. Check that the dipstick is securely seated so that dirt cannot get into the gearbox.