English Русский
Български
Беларускі
Український
Српски
Hrvatski
Română
Polski
Slovenský
Magyar
Articles Bookmark Contacts Sitemap   
Company Audi Company Ford Company Hyundai Company Kia Company Mazda Company Mercedes-Benz Company Nissan
MitsubishiMan.ru


Home Colt Lancer Galant L200 Outlander Pajero Others
Pajero 4 (2006-2021) Pajero 1 and 2 (1982-1999)

Replacing the fuel filter (Mitsubishi Pajero 1)

  • Home
  • Pajero
  • 1 (1982-1999)
  • General information
  • Maintenance
  • Replacing the fuel filter
0
Contents: Carburetor engines ⤓ Injection engines ⤓ Diesel ⤓

Fuel filter for carburetor and injection engines
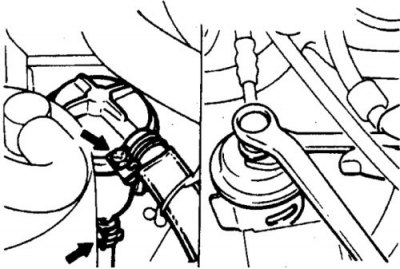


On the left is the fuel filter on carburetor engines.
On the right is the fuel filter on injection engines.


Fuel filter for 2.6L engines
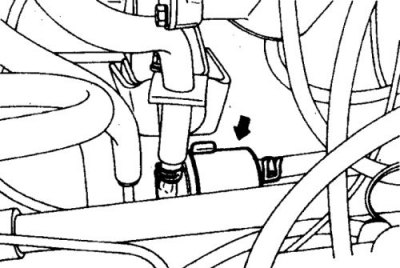


The fuel filter is indicated by an arrow.

On carburetor engines, the filter is mounted on the frame channel in series with the fuel line and is secured to the hoses with clamps.

Injector engines use a high-pressure filter, which is also mounted on the frame channel and connected to the line through union fittings.

Before removing the filter, decompress the fuel system (see subsection 8.2.1). If the filter is heavily contaminated, remove and rinse the tank. To access the filters, it is recommended to lift the vehicle.


Carburetor engines


Hose connection diagram
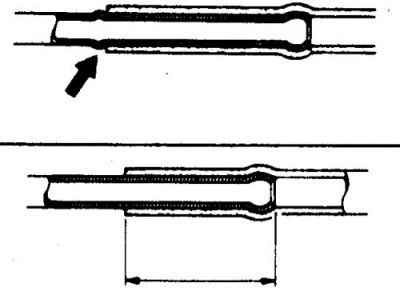


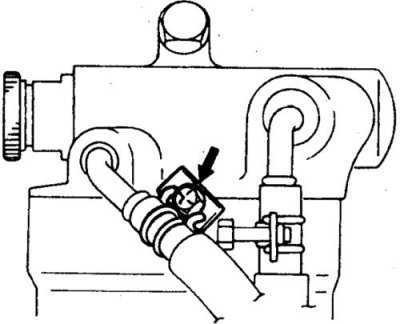
The hose should go beyond the branch pipe (indicated by the arrow) not less than 25 mm.

1. Disconnect the battery from ground.

2. Loosen the clamps.

3. Disconnect the hoses and remove the filter from the bracket.

4. Check the condition of the hoses, replace if necessary.

5. Installation is carried out in reverse order. Connect the hoses in the required order.

Injection engines


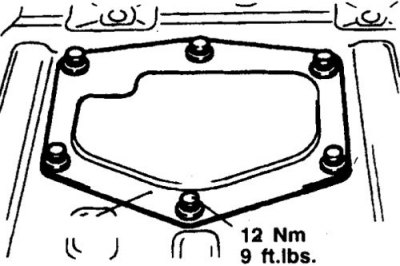
Please note! Some vehicles are equipped with a fuel pump hatch, which can be accessed by removing the cargo area carpet and floor covering. Remove the hatch, disconnect the connector and start the engine to burn off the remaining fuel. After these measures, the pressure in the fuel system will decrease.


Fuel pump hatch


Replacement


1. Perform decompression (see subsection 8.2.1).


2. Disconnect the battery from ground.

3. Remove the air filter.

4. Unscrew the fitting bolts and disconnect the hoses.

The article is based on data from the website mitsubishiman.ru

5. Loosen the mounting bolt and remove the filter.

6. Installation is carried out in reverse order. Tighten the bolts of the outlet and inlet hose fittings to 24–34 and 34 N·m, respectively.

Diesel


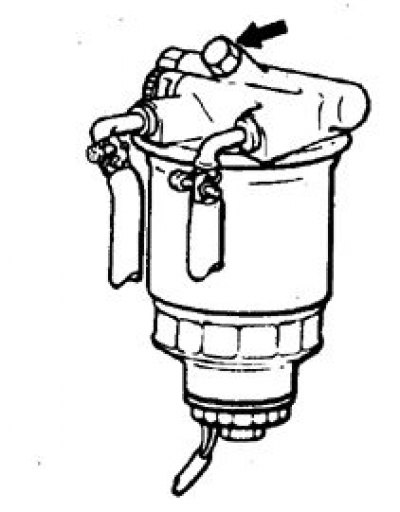
The replaceable fuel filter element is installed in a tank, which is mounted in the engine compartment.

Fuel pump wires
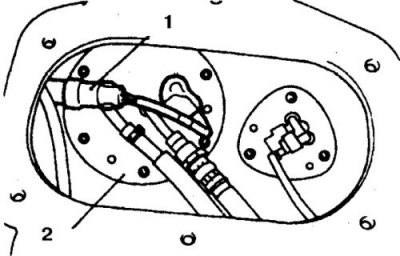


1. Connector
2. Fuel pump


Diesel fuel filter
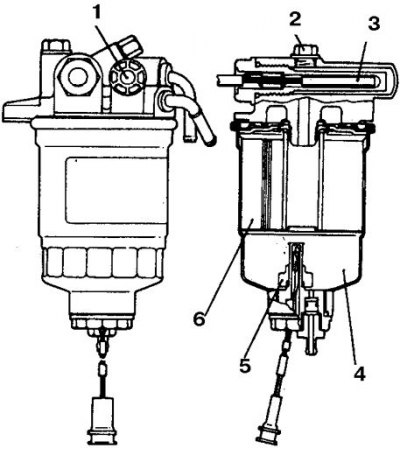


1. Manual fuel pump; 2. Fuel temperature sensor; 3. Heater; 4. Sedimentation tank (moisture separator); 5. Water level sensor; 6. Filter element


Correct position of the clamp


1. Mark and disconnect the connectors from the filter tank.


2. Lay down a rag and carefully disconnect the hoses.

3. Loosen the mounting bolts and remove the filter tank.

4. Remove the bracket and shield from the tank.
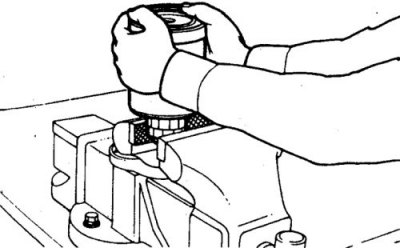


5. Unscrew the filter from the tank by hand.

Remove the water level sensor and plug from the filter element.

6. It is recommended to replace the filter element. You can limit yourself to thoroughly washing it in kerosene.

7. Installation is carried out in reverse order. Tighten the water level sensor and plug to 9 and 4 Nm, respectively. Remove air from the system in the following order:
  • release the air bleed plug;
  • unscrew the plug of the manual pump lever and pull out the lever;
  • pump fuel until air bubbles disappear, tighten the plug;
  • continue pumping fuel until you feel the lever move stiffly;
  • push and fold the lever.

Removal moisture from a diesel fuel filter


When the water level indicator light in the sump lights up, the moisture must be removed from the fuel filter.
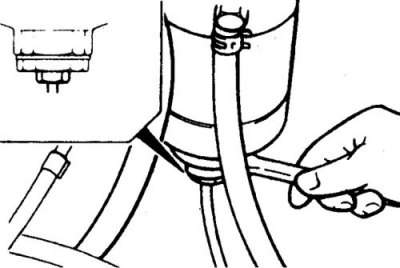

1. Unscrew the drain plug at the bottom of the filter.
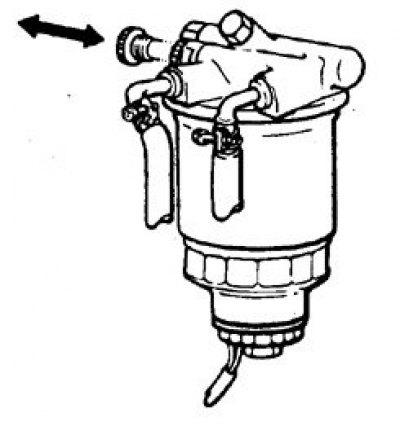


2. Unscrew the plug of the manual pump lever and pull out the lever.

3. Continue pumping fuel until no more water comes out.

4. Slide and fold the lever.
This article is available at: russian, bulgarian, belarusian, ukrainian, serbian, croatian, romanian, polish, slovak, hungarian
This article was reviewed by: Arseny Pavlov
Share with friends:
◀ Previous
Pajero 1 and 2: Maintenance
Next ▶

Replacing the engine air filter
Filling tanks
Maintenance frequency
Crankcase ventilation valve (petrol engines)
Battery care
Drive Belts — Checking and Adjusting Tension
Cooling system hoses
Checking CV joint boots
Similar materials for other Mitsubishi models

➤ Removal water from the fuel filter, replacing the fuel… Mitsubishi Colt 4 and 5 (1991-2003)
➤ Removal Water from a Diesel Fuel Filter / Replacing a Fuel… Mitsubishi Lancer 3 and 5 (1984-1992)
➤ Replacing the fuel filter Mitsubishi Galant 6 and 7 (1987-1998)
➤ Replacing the fuel filter Mitsubishi L200 4 (2005-2014, diesel)
➤ Fuel selection Mitsubishi Outlander 1 (2003-2008)
➤ Replacing the fuel filter Mitsubishi Carisma (1995-2004)
Link in different formats to this article
Comments and feedback from visitors
No comments yet


Add up two numbers 17 + 26


Pajero 4 (2006-2021) 
  • General information
  • User manual
  • Troubleshooting
  • Maintenance
  • Technical specifications
  • Power unit
  • Engine repair
  • Cooling system
  • Lubrication system
  • Fuel system
  • Engine management system
  • Intake and exhaust system
  • Engine electrical equipment
  • Transmission
  • Clutch
  • Manual gearbox
  • Automatic gearbox
  • Drive shafts
  • Chassis and running gear
  • Front suspension
  • Rear suspension
  • Brake system
  • Steering
  • Body and interior
  • Exterior (external elements)
  • Interior (internal elements)
  • Doors, locks and windows
  • Body dimensions
  • Electrical equipment
  • Safety system (SRS)
  • Air conditioner
  • Equipment and devices
  • Electrical diagrams
Pajero 1 and 2 (1982-1999) 
  • General information
  • User manual
  • Seats and seat belts
  • Instruments and controls
  • Driving and operation
  • Maintenance
  • Power unit
  • Gasoline engines
  • Diesel engines
  • Ignition system
  • Engine electrical equipment
  • Cooling and lubrication system
  • Power and exhaust system
  • Fuel system (gasoline)
  • Fuel system (diesel)
  • Transmission
  • Clutch
  • Mechanical gearbox
  • Automatic gearbox
  • Drive shafts and axles
  • Chassis and running gear
  • Front suspension
  • Rear suspension
  • Steering
  • Brake system
  • Body and interior
  • Exterior (external elements)
  • Interior (internal elements)
  • Doors, locks and windows
  • Electrical equipment
  • Equipment and devices
  • Heater and air conditioner
  • Cruise control
  • Headlights and lighting
  • Electrical circuits
MitsubishiMan.ru © 2018–2026 • Mobile version • Articles about Mitsubishi • Contacts • Sitemap: EN BG BY UA RS HR RO PL SK HU • Site search • Bookmark
Colt 2 and 3 (1983-1993) · Colt 4 and 5 (1991-2003) · Colt 5 (1995-2003) · Lancer 3 and 5 (1984-1992) · Lancer 9 (2000-2007) · Galant 5 (1983-1989) · Galant 6 and 7 (1987-1998) · L200 4 (2005-2014) · Outlander 1 (2003-2008) · Pajero 1 and 2 (1982-1999) · Pajero 4 (2006-2021) · Carisma (1995-2004) · Space Star (1998-2005) ·
This resource sets cookies 🍪 to avoid bothering you with repeated data entry.