



Contents: Automatic hub locking mechanism…⤓ Hub parts with automatic locking…⤓ Automatic hub locking mechanism parts ⤓ Disassembly and assembly ⤓
Automatic hub locking mechanism device (1983-98)
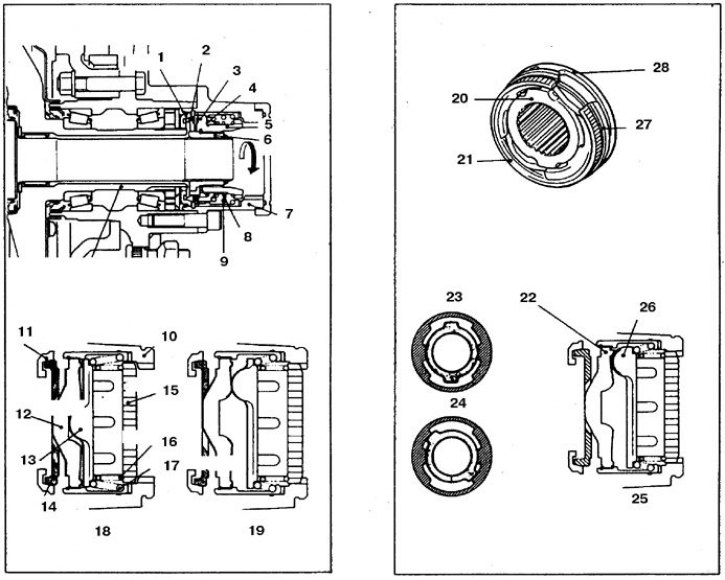
1, 11. Brake B; 2, 14, 21. Brake A; 3, 12,27. Thrust ring A; 4, 13, 26, 28. Cam; 5, 15. Sliding gear; 6, 20. Drive gear; 7, 10. Body; 8, 16. Shear spring; 9, 17. Return spring; 18, 23. Wheel unlocked; 19, 24. Blocked; 22. Tongue of thrust ring A; 25. The cam is engaged with the tongue of the thrust ring
Hub parts with automatic locking mechanism
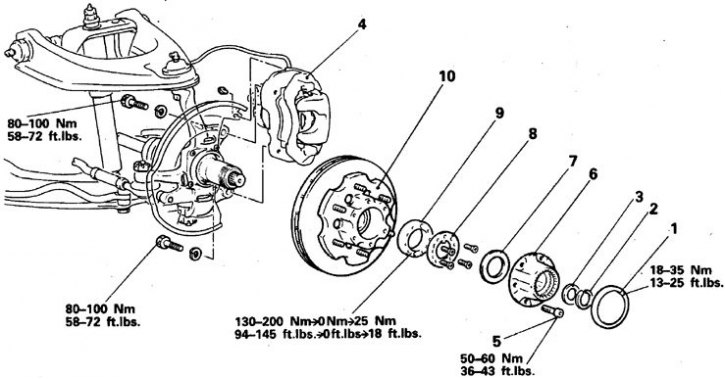
1. Cap; 2. Retaining ring; 3. Washer; 4. Front brake; 5. Bolts; 6. Locking mechanism; 7. Washer; 8. Lock washer; 9. Lock nut; 10. Front hub
Automatic hub locking mechanism parts
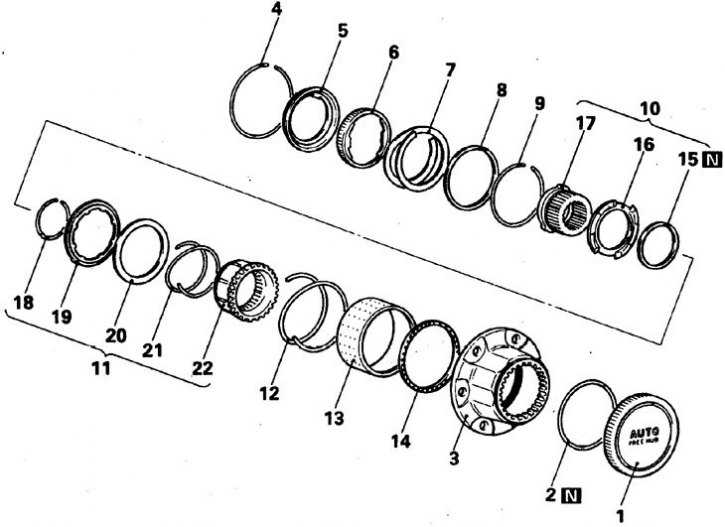
1. Cap; 2. Ring; 3. Body; 4, 9. Split ring; 5. Brake B; 6. Brake A; 7. Brake spring; 8. Retaining ring; 10. Pinion block; 11. Sliding gear block; 12. Return spring; 13. Thrust sleeve B; 14. Bearing; 15. Pinion retaining ring; 16. Thrust ring A; 17. Drive gear; 18. Sliding gear ring; 19. Cam; 20. Holder; 21. Spring; 22. Sliding gear
Disassembly and assembly
1. Unlock the hub by moving the transfer case lever to position 2H and reverse 1–2 m.
2. Remove the front wheels.
3. Remove the hub cap, if necessary, loosen the cap with an oil filter wrench, wrapping it with a rag.
4. Remove the retaining ring from the axle shaft and remove the washer.
5. Unscrew the 6 bolts and remove the release mechanism.
6. Using a flat, thin tool, remove the split ring by releasing the brake (B).
7. Remove brake A, brake B and spring.
8. Remove the mechanism housing retaining ring.
9. Using the MB990811-01 press, lightly press the drive gear and remove the split ring of the B holder (the stroke of the press must be at least 40 mm, i.e. the length of the spring extension, and the force must not exceed 20 kgf).
10. Slowly release the pressure and remove the drive gear, sliding gear and spring. First make sure that thrust ring A is not stuck on bushing B.
11. Remove thrust sleeve B and bearing.
12. Remove the retaining ring (subject to replacement), remove thrust ring A and drive gear.
13. Remove the sliding pinion retaining ring. To do this, press the cam and, with the spring depressed, remove the ring.
14. Next remove the cam, spring retainer, spring and sliding gear.
15. Assembly is carried out in reverse order, taking into account the following.
16. Apply SAE J310A or NLGI N3 grease into the grooves of the thrust sleeve B and brake B.
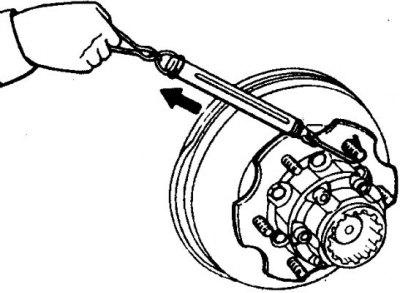
17. Before installing the assembled locking mechanism, check the hub turning force using a dynamometer attached to the wheel stud.
18. Lubricate the contact areas of the locking mechanism housing and the hub with 3M ART N 8661 or N 8663 sealant or equivalent.
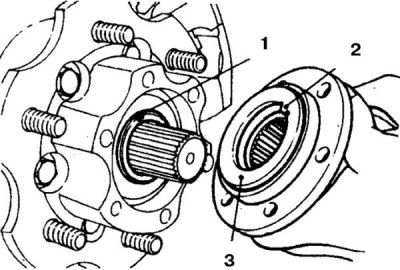
19. Install the housing, aligning the protrusion on brake B with the groove on the steering knuckle journal (1 – groove, 2 – protrusion, 3 – brake B).
20. Tighten the hub bolts to 50–60 N·m and measure the hub turning force again. The force difference should not exceed 1 Nm, otherwise disassemble and reassemble the locking mechanism.
21. Tighten the connections to the required torques.
22. Tighten the cap to a torque of 18–35 N·m.