
English Русский
Български
Беларускі
Український
Српски
Hrvatski
Română
Polski
Slovenský
Magyar
Articles Bookmark Contacts Sitemap   
Company Audi Company Ford Company Hyundai Company Kia Company Mazda Company Mercedes-Benz Company Nissan
MitsubishiMan.ru


Home Colt Lancer Galant L200 Outlander Pajero Others
Pajero 4 (2006-2021) Pajero 1 and 2 (1982-1999)

Disassembling and replacing CV joint covers (Mitsubishi Pajero 1)

  • Home
  • Pajero
  • 1 (1982-1999)
  • Transmission
  • Drive shafts and axles
  • Disassembling and replacing CV joint covers
0
Contents: Double-offset CV joint parts of the…⤓ Double-offset CV joint parts of the…⤓ Double-offset CV joint device ⤓ Replacement of CV joint covers ⤓

Double-offset CV joint parts of the right half-shaft
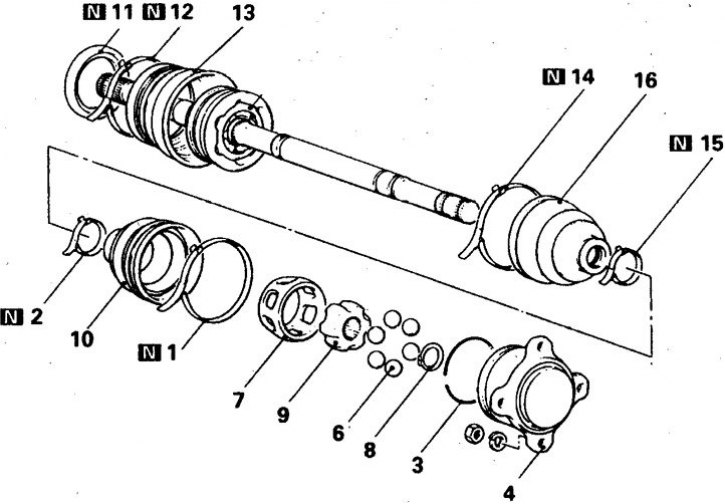


1. Clamp A; 2. Clamp B; 3. Spring ring; 4. Outer ring; 6. Balls; 7. Separator; 8. Retaining ring; 9. Inner ring; 10. Cover; 11. Dust cover; 12. Flight of the protective case; 13. Protective case body; 14. Clamp A; 15. Hamut B; 16. CV joint cover type Bierfield


Double-offset CV joint parts of the left half-axle
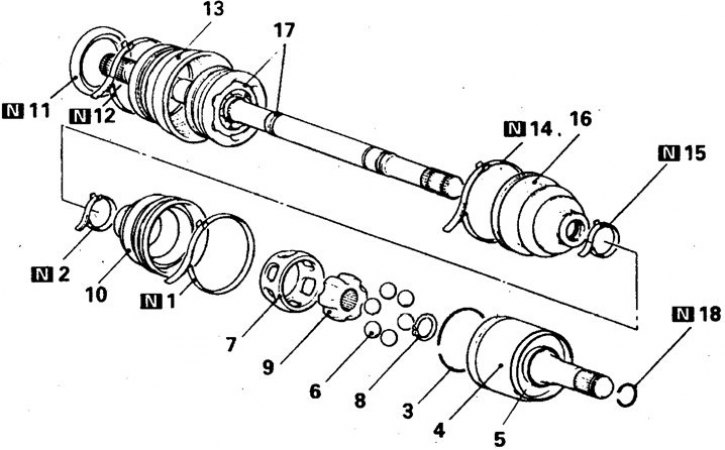


1. Clamp A; 2. Clamp B; 3. Spring ring; 4. Outer ring; 5. Dust cover; 6. Balls; 7. Separator; 8. Retaining ring; 9. Inner ring; 10. Cover; 11. Dust cover; 12. Tape of the protective case of the cover; 13. Protective case body; 14. Clamp A; 15. Clamp B; 16. Outer CV joint cover type Bieriild; 17. Outer CV joint half shaft type Bieriild; 18. Spring ring


The assembly is performed in the following sequence: (by item numbers) 17–16–14–15–2–10–1–7–9–8– –6–5–4–3–18–13–12–11

Double-offset CV joint device
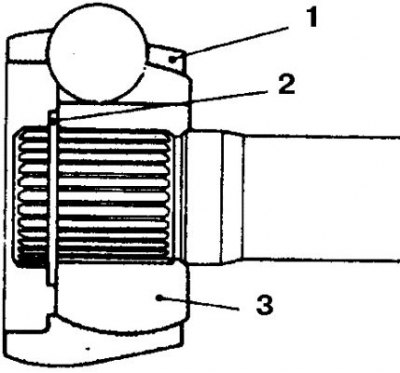


1. Separator; 2. Retaining ring; 3. Inner ring


The vehicles in question are equipped with detachable CV joints, axial type DOJ (double-offset) or TJ (tripod), – from the inside and non-separable, – BJ (type Bierfield) or RJ (type Rzeppa), - from the outside.

The material was borrowed from the website: mitsubishiman.ru

Regularly check the condition of the CV joint covers; if there is even the slightest visible damage, replace the covers immediately.

When disassembling the CV joints, the boot clamps and spring rings should be replaced. Keep in mind that these parts are not interchangeable for models of different years of production and when purchasing them, you should indicate the catalog code.

CV joint type Tripod


1. Remove the large and small clamps and remove the hinge boot by sliding it along the axle shaft.

2. Carefully remove the hinge sleeve.

3. Remove the retaining ring and remove the crosspiece, wash it, but do not disassemble it.
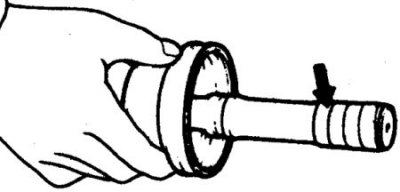


4. Remove the crosspiece, wrapping the axle shaft splines with electrical tape, and remove the boot.


5. Check the condition of the parts.

6. Assemble and install the hinge in reverse order.

7. Lubricate the crosspiece with the grease supplied in the repair kit.

Double-offset CV joint


8. Disassembly and assembly are performed in accordance with the item numbers (see picture Details of Double-offset CV joint of left half-axle).

9. When disassembling, mark the initial relative positions of the separator and the inner race of the CV joint and the axle shaft, which you will align during assembly.

10. Lubricate the cage and the joint separator with the grease supplied in the repair kit, install the balls.
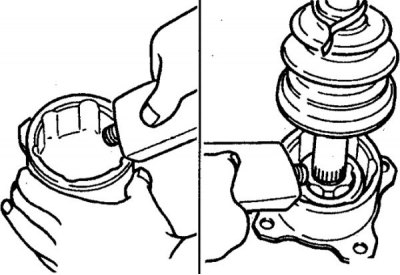


11. Fill the outer race with grease approximately 1/3 full, install the retaining ring and assemble the CV joint. Fill the back of the joint or the boot with the remaining grease.

Replacement of CV joint covers


1. The procedure for replacing the inner CV joint boot is practically no different from the disassembly procedure (see above).

2. The outer CV joint boot is removed after removing the inner CV joint and removing the clamps.

3. When assembling, place approximately 1/2 of the grease in the hinge and 1/2 in the new cover.

4. Replace the cover clamps.
This article is available at: russian, bulgarian, belarusian, ukrainian, serbian, croatian, romanian, polish, slovak, hungarian
This article was reviewed by: Arseny Pavlov
Share with friends:
◀ Previous
Pajero 1 and 2: Drive shafts and axles
Next ▶

Front axle gearbox — removal and installation
Front axle shafts and front axle seals
Automatic release hub
Manual release hub
Front Drive Axle Design
Axles, bearings and seals of the rear gearbox
Adjusting the axial play of the rear axle shaft
Rear axle gearbox — removal and installation
Rear axle gearbox oil seal — removal and installation
Removal and installation the rear axle
Similar materials for other Mitsubishi models

➤ Cleaning and replacing the air filter Mitsubishi Colt 4 and 5 (1991-2003)
➤ Checking the ball joint protective covers Mitsubishi Lancer 9 (2000-2007, petrol)
➤ Replacing the protective covers of the steering gear… Mitsubishi Galant 6 and 7 (1987-1998)
➤ Replacing the coolant Mitsubishi L200 4 (2005-2014, diesel)
➤ Replacing bulbs in headlights and taillights Mitsubishi Outlander 1 (2003-2008)
➤ Replacing the protective cover of the ball joint of the… Mitsubishi Carisma (1995-2004)
Link in different formats to this article
Comments and feedback from visitors
No comments yet


Add up two numbers 33 + 39


Pajero 4 (2006-2021) 
  • General information
  • User manual
  • Troubleshooting
  • Maintenance
  • Technical specifications
  • Power unit
  • Engine repair
  • Cooling system
  • Lubrication system
  • Fuel system
  • Engine management system
  • Intake and exhaust system
  • Engine electrical equipment
  • Transmission
  • Clutch
  • Manual gearbox
  • Automatic gearbox
  • Drive shafts
  • Chassis and running gear
  • Front suspension
  • Rear suspension
  • Brake system
  • Steering
  • Body and interior
  • Exterior (external elements)
  • Interior (internal elements)
  • Doors, locks and windows
  • Body dimensions
  • Electrical equipment
  • Safety system (SRS)
  • Air conditioner
  • Equipment and devices
  • Electrical diagrams
Pajero 1 and 2 (1982-1999) 
  • General information
  • User manual
  • Seats and seat belts
  • Instruments and controls
  • Driving and operation
  • Maintenance
  • Power unit
  • Gasoline engines
  • Diesel engines
  • Ignition system
  • Engine electrical equipment
  • Cooling and lubrication system
  • Power and exhaust system
  • Fuel system (gasoline)
  • Fuel system (diesel)
  • Transmission
  • Clutch
  • Mechanical gearbox
  • Automatic gearbox
  • Drive shafts and axles
  • Chassis and running gear
  • Front suspension
  • Rear suspension
  • Steering
  • Brake system
  • Body and interior
  • Exterior (external elements)
  • Interior (internal elements)
  • Doors, locks and windows
  • Electrical equipment
  • Equipment and devices
  • Heater and air conditioner
  • Cruise control
  • Headlights and lighting
  • Electrical circuits
MitsubishiMan.ru © 2018–2026 • Mobile version • Articles about Mitsubishi • Contacts • Sitemap: EN BG BY UA RS HR RO PL SK HU • Site search • Bookmark
Colt 2 and 3 (1983-1993) · Colt 4 and 5 (1991-2003) · Colt 5 (1995-2003) · Lancer 3 and 5 (1984-1992) · Lancer 9 (2000-2007) · Galant 5 (1983-1989) · Galant 6 and 7 (1987-1998) · L200 4 (2005-2014) · Outlander 1 (2003-2008) · Pajero 1 and 2 (1982-1999) · Pajero 4 (2006-2021) · Carisma (1995-2004) · Space Star (1998-2005) ·
This resource sets cookies 🍪 to avoid bothering you with repeated data entry.