English Русский
Български
Беларускі
Український
Српски
Hrvatski
Română
Polski
Slovenský
Magyar
Articles Bookmark Contacts Sitemap   
Company Audi Company Ford Company Hyundai Company Kia Company Mazda Company Mercedes-Benz Company Nissan
MitsubishiMan.ru


Home Colt Lancer Galant L200 Outlander Pajero Others
Pajero 4 (2006-2021) Pajero 1 and 2 (1982-1999)

Replacing the front universal joint (Mitsubishi Pajero 1)

  • Home
  • Pajero
  • 1 (1982-1999)
  • Transmission
  • Drive shafts and axles
  • Replacing the front universal joint
0
Contents: Cardan joint parts ⤓ Location of the crosspiece bearing…⤓ Assembly ⤓

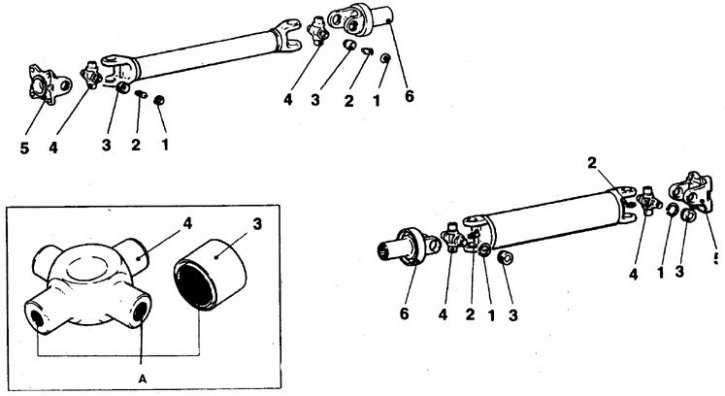
Cardan joint parts


1. Retaining ring; 2. Butter dish; 3. Bearing; 4. Crosspiece neck; 5. Flange fork; 6. Sliding spline joint fork; A. Lubricate


Excess lubrication is not allowed, otherwise the bearing will not fully fit onto the crosspiece and a significant error in the selection of retaining rings by thickness is possible

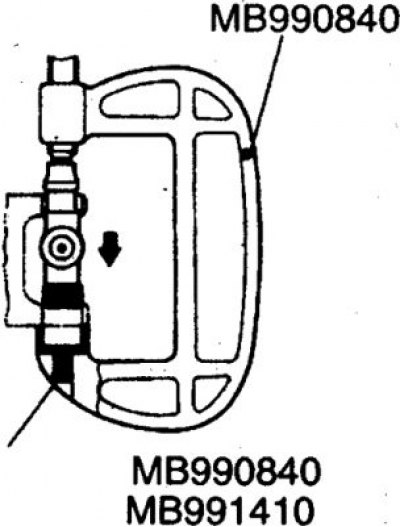
Device for disassembling cardan joints: for the front shaft - MB990840, for the rear shaft - MB991410


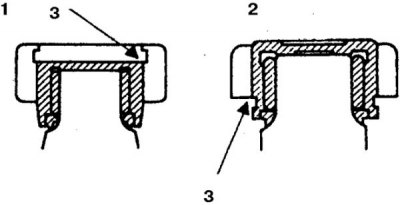
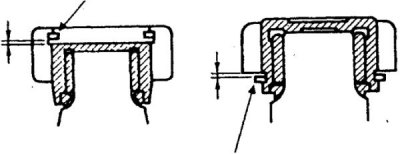
Location of the crosspiece bearing retaining rings


1. On the front shaft crosspiece; 2. On the crosspiece of the rear shaft; 3. Groove for the ring


1. Apply relative orientation marks to both forks to avoid disturbing the balance during assembly.


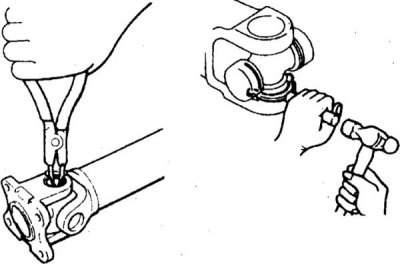
2. Remove the retaining rings that secure the crosspiece bearing cups (front shaft – left, rear shaft – right).

3. To remove the crosspiece you will need a clamp, an insert and a mandrel. The diameter of the insert must be slightly smaller than the hole in the fork to push out the bearing, and the diameter of the mandrel must ensure that the pressed out bearing falls out.

4. Press out the other pair of crosspiece bearings in the same way.

Assembly


1. Apply fresh SAE J310A NLGI N₂ EP grease to the new bearings, lubricating the journals of the new crosspiece, the needles and the lips of the oil seal.

2. Insert the bearing cups into the opposite holes in the cardan fork, install the crosspiece and press both bearing cups into the cardan fork so that the retaining ring can be inserted.

3. When pressing in, the crosspiece must be centered relative to the bearings.

4. Similarly, press in the remaining 2 crosspiece bearings of the other fork, aligning the marks on the forks.

5. Insert the bearing retaining ring on one side, then turn the joint over and press the opposite bearing cup, insert the opposite retaining ring.


6. Check the gap between the second inserted ring and the groove. If the gap exceeds 0.06 mm, replace the retaining rings (front shaft - left, rear - right). The thickness of the rings on both sides should be the same.
This article is available at: russian, bulgarian, belarusian, ukrainian, serbian, croatian, romanian, polish, slovak, hungarian
This article was reviewed by: Arseny Pavlov
Share with friends:
◀ Previous
Pajero 1 and 2: Drive shafts and axles
Next ▶

Front propeller shaft and crosspieces — removal and installation
Front and rear oil seals — removal and installation
Transfer case — design description
Rear propeller shaft and crosspieces — removal and installation
Replacing the rear cardan joint
Front Drive Axle Design
Manual release hub
Automatic release hub
Similar materials for other Mitsubishi models

➤ Replacing the front brake pads Mitsubishi Colt 4 and 5 (1991-2003)
➤ Removal and installation the wishbone / Replacing the ball… Mitsubishi Lancer 3 and 5 (1984-1992)
➤ Replacing the front crankshaft oil seal Mitsubishi Galant 6 and 7 (1987-1998)
➤ Replacing the oil in the front (4WD) and rear axle gearbox Mitsubishi L200 4 (2005-2014, diesel)
➤ Front fog light switch Mitsubishi Outlander 1 (2003-2008)
➤ Checking and replacing front disc brake pads Mitsubishi Carisma (1995-2004)
Link in different formats to this article
Comments and feedback from visitors
No comments yet


Add up two numbers 49 + 26


Pajero 4 (2006-2021) 
  • General information
  • User manual
  • Troubleshooting
  • Maintenance
  • Technical specifications
  • Power unit
  • Engine repair
  • Cooling system
  • Lubrication system
  • Fuel system
  • Engine management system
  • Intake and exhaust system
  • Engine electrical equipment
  • Transmission
  • Clutch
  • Manual gearbox
  • Automatic gearbox
  • Drive shafts
  • Chassis and running gear
  • Front suspension
  • Rear suspension
  • Brake system
  • Steering
  • Body and interior
  • Exterior (external elements)
  • Interior (internal elements)
  • Doors, locks and windows
  • Body dimensions
  • Electrical equipment
  • Safety system (SRS)
  • Air conditioner
  • Equipment and devices
  • Electrical diagrams
Pajero 1 and 2 (1982-1999) 
  • General information
  • User manual
  • Seats and seat belts
  • Instruments and controls
  • Driving and operation
  • Maintenance
  • Power unit
  • Gasoline engines
  • Diesel engines
  • Ignition system
  • Engine electrical equipment
  • Cooling and lubrication system
  • Power and exhaust system
  • Fuel system (gasoline)
  • Fuel system (diesel)
  • Transmission
  • Clutch
  • Mechanical gearbox
  • Automatic gearbox
  • Drive shafts and axles
  • Chassis and running gear
  • Front suspension
  • Rear suspension
  • Steering
  • Brake system
  • Body and interior
  • Exterior (external elements)
  • Interior (internal elements)
  • Doors, locks and windows
  • Electrical equipment
  • Equipment and devices
  • Heater and air conditioner
  • Cruise control
  • Headlights and lighting
  • Electrical circuits
MitsubishiMan.ru © 2018–2026 • Mobile version • Articles about Mitsubishi • Contacts • Sitemap: EN BG BY UA RS HR RO PL SK HU • Site search • Bookmark
Colt 2 and 3 (1983-1993) · Colt 4 and 5 (1991-2003) · Colt 5 (1995-2003) · Lancer 3 and 5 (1984-1992) · Lancer 9 (2000-2007) · Galant 5 (1983-1989) · Galant 6 and 7 (1987-1998) · L200 4 (2005-2014) · Outlander 1 (2003-2008) · Pajero 1 and 2 (1982-1999) · Pajero 4 (2006-2021) · Carisma (1995-2004) · Space Star (1998-2005) ·
This resource sets cookies 🍪 to avoid bothering you with repeated data entry.