



Contents: Lifting a car ⤓ Lowering the car ⤓
1. Stop the vehicle on a level, solid, horizontal surface.
2. Turn on the hazard warning lights and turn the ignition key to the LOCK position.
3. Put the car on the parking brake, engage first gear (in a manual transmission) or move the automatic transmission selector lever to position P (park).
4. Install an emergency stop sign, flashing signal light, etc. at the distance prescribed by the Road Traffic Regulations and ask passengers to exit the vehicle.
5. To prevent spontaneous movement of the vehicle raised with a jack, place a shoe or stop (A) under the wheel located diagonally from the wheel being replaced (B).
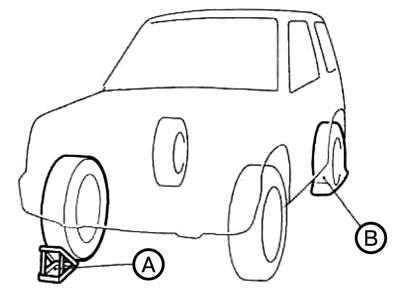
Caution: When lifting the vehicle with a jack, it is necessary to place a stop shoe under the corresponding wheel. If a vehicle raised on a jack moves, the jack may slip, causing an accident.
Note:
- The thrust shoe shown in the illustration is not included with the vehicle. However, it is recommended to keep such a shoe in the car and use it when necessary.
- If there is no chock, use a rock or other object large enough to hold the wheel in place.
6. Prepare the spare tire, jack and jack handle.
7. Place a jack under one of the support points on the vehicle shown in the figure. Position the jack at the point closest to the wheel being replaced.
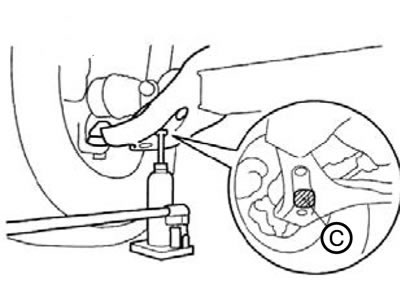
C. Front jacking point
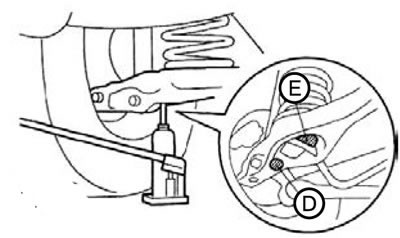
D. Rear jacking point
Note:
- As a rule, the jack should be installed at point (D). However, if the distance to the road surface does not allow this, install the jack at point (E).
- The jack should only be installed at the points shown in the figure. If the jack is installed in the wrong place, it may dent the car body or fall, resulting in injury.
- Do not install the jack on an uneven or soft surface. On an unsafe surface, the jack may slip and cause injury to people. Place the jack only on a level, solid surface. Before installing the jack, make sure there is no sand or small gravel under its base.
Lifting a car
1. Using the jack handle, turn the release valve (F) clockwise until it stops.
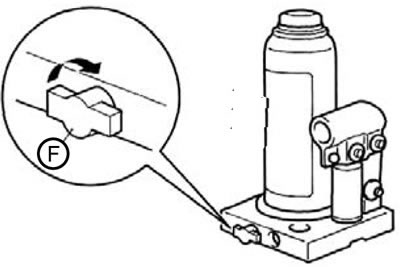
2. Insert the handle into the jack bracket and hook the lock (G) on the end of the jack handle onto the clamp (H) of the bracket.
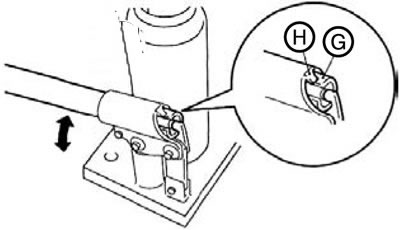
3. Pump the jack handle up and down until the jack stop touches the stop point on the car body. Make sure that the jack is in secure contact with the car body. Raise the car by pumping the jack handle up and down.
Lowering the car
1. Insert the protrusion (I) on the end of the jack handle into the valve (J) of the jack.
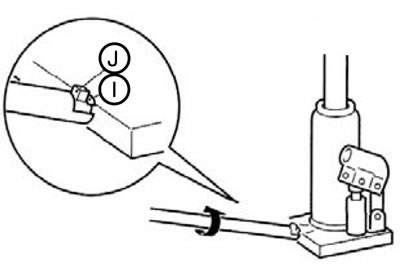
2. While turning the jack handle, slowly turn the release valve counterclockwise to lower the plunger and remove the jack.
3. Press the stem all the way in and tighten the release valve by turning it clockwise.
4. Place the jack, jack handle and tool kit back in place.
Attention:
- The outlet valve should be opened slowly. If opened quickly, the vehicle will drop sharply and the jack may jump out from under it and cause serious injury.
- If you loosen the release valve too much (2 turns or more), turning it counterclockwise will cause the oil to leak out of the jack and it will become unusable.
- When lowering the vehicle, close the exhaust valve slowly; otherwise, the valve may be damaged.
Note:
- Sometimes it can be difficult to release the jack support after lowering the vehicle. In this case, rock the car to lower the piston rod.
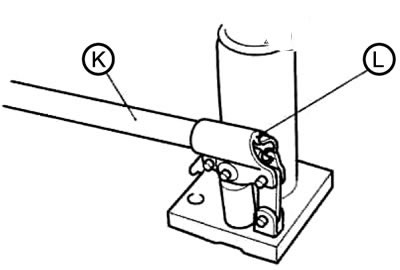
- If the jack is difficult to remove by hand, insert the jack handle (K) into the bracket (L), and then remove the jack using the handle.
Attention:
- As soon as the wheel is off the ground, stop lifting the vehicle. It is dangerous to lift the car higher.
- It is prohibited to stand under a vehicle raised on a jack
- It is forbidden to push a raised vehicle or leave it on a jack for a long time: this is extremely dangerous.
- Only use the jack supplied with your vehicle.
- The jack may only be used to change a wheel.
- There should be no passengers in the vehicle being lifted with a jack.
- Do not start the engine or leave it running if the vehicle is raised on a jack.
- It is prohibited to rotate the raised wheel. Wheels remaining on the ground may spin, which could cause the vehicle to fall off the jack.
(The text of the article was obtained from the website: «mitsubishiman.ru»)