



1. Stop the vehicle on a level, solid, horizontal surface.
2. Turn on the hazard warning lights and turn the ignition key to the LOCK position.
3. Put the car on the parking brake, engage first gear (in a manual transmission) or move the automatic transmission selector lever to position P (park).
4. Install an emergency stop sign, flashing signal light, etc. at the distance prescribed by the Road Traffic Regulations and ask passengers to exit the vehicle.
5. To prevent spontaneous movement of the vehicle raised with a jack, place a shoe or stop (A) under the wheel located diagonally from the wheel being replaced (B).
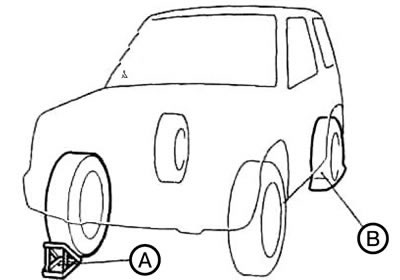
Caution: When lifting the vehicle with a jack, it is necessary to place a stop shoe under the corresponding wheel. If a vehicle raised on a jack moves, the jack may slip, causing an accident.
Note:
- The thrust shoe shown in the illustration is not included with the vehicle. However, it is recommended to keep such a shoe in the car and use it when necessary.
- If there is no chock, use a rock or other object large enough to hold the wheel in place.
6. Prepare the spare tire, jack, jack handle and wheel lug wrench.
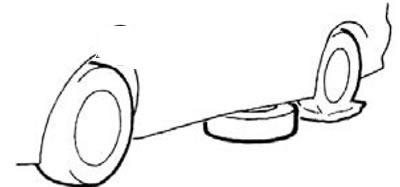
Note: Place the spare tire under the vehicle next to the flat tire. This will be an additional safety measure in case the jack slips.
7. Using a wheel wrench, loosen the wheel nuts. You should not completely loosen the nuts.
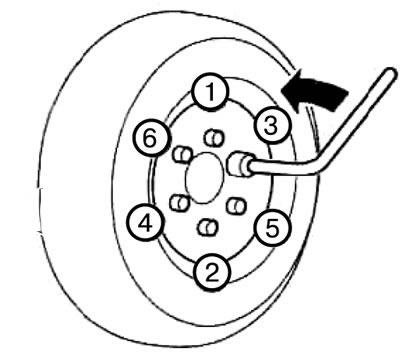
Note: Loosen the wheel nuts in the order shown in the figure.
8. As described in the section "Lifting the vehicle with a jack", find the jack stop point closest to the flat tire. Install the jack and raise the vehicle until the tire is slightly off the ground.
9. Using a wrench, completely loosen the wheel mounting nuts, then remove the wheel.
Caution: When replacing, handle the wheel carefully to avoid scratching the surface of the wheel rim.
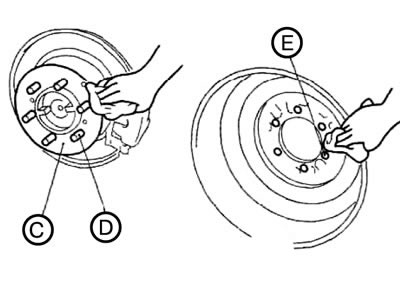
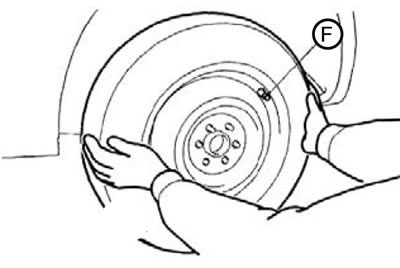
10. Clean the surface of the wheel hub (C), hub bolts (D) and wheel rim mounting holes (E) from dirt and install the spare wheel.
The material was borrowed from the website: MitsubishiMan.ru
Attention:
- When installing the spare wheel, the valve (F) must face outward. If the valve (F) is not visible, the wheel is installed upside down.
- Driving with the spare tire installed upside down may cause damage to the vehicle and cause an accident.
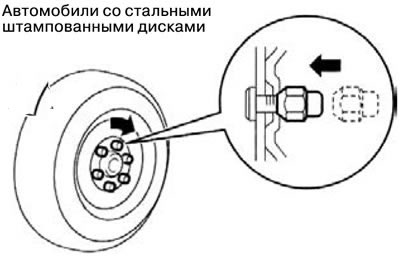
11. If the car is equipped with wheels with stamped steel disks, the conical wheel nuts should be screwed on with the conical surfaces facing inward; tighten them by hand until they are firmly attached to the disc.
If the vehicle is equipped with alloy wheels, the wheel nuts should be tightened by hand beforehand (flange nuts), so that their flanges touch the wheel rim; there should be no gap left.
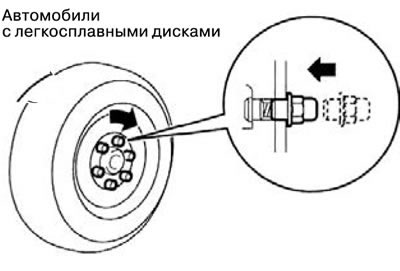
Caution: Do not apply grease to wheel studs or nuts as the greased parts will be over tightened.
Note:
- A steel wheel can be used temporarily by securing it with flange nuts, but an alloy wheel with a suitable tyre should be fitted as soon as possible.
- When replacing all four wheel rims with steel ones, cone nuts must be installed.
12. Slowly lower the vehicle until the wheel touches the ground, then tighten the nuts in the sequence shown in the illustration in two or three stages until all nuts are securely tightened. Tightening torque: from 98 to 118 N·m (achieved by applying a force of 370 to 430 N (35-40 kg) to the end of the wheel lug wrench supplied with the vehicle).
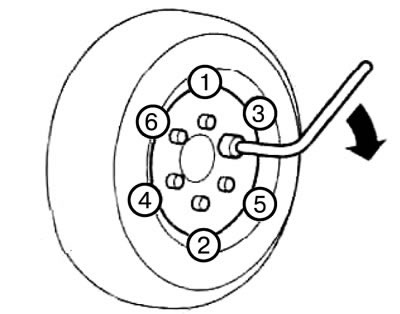
Caution: Do not press the wheel lug wrench with your foot or use a pipe as an extension to increase the force on the wrench, as this will cause the nuts to be tightened too much.
13. Lower the vehicle completely and remove the jack. Then put the jack, jack handle, wheel lug wrench and wheel chocks back in place and secure the flat tire in place of the spare. A faulty tyre should be repaired as soon as possible.
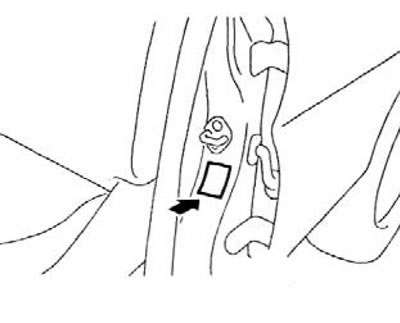
14. Check the air pressure in the tire. The nominal pressure is indicated on the plate on the door (see picture).
Attention:
- The spare tire pressure should be checked periodically and maintained at the specified level.
- After changing a wheel and driving about 1000 km, tighten the wheel nuts to make sure they have not become loose.
- If the steering wheel vibrates after replacing a wheel, it is recommended to check the wheel balance.
- It is prohibited to install tires of different types and to use tires whose size does not correspond to that specified in the technical specifications of the vehicle. This leads to increased wear and deterioration of handling.