
English Русский
Български
Беларускі
Український
Српски
Hrvatski
Română
Polski
Slovenský
Magyar
Articles Bookmark Contacts Sitemap   
Company Audi Company Ford Company Hyundai Company Kia Company Mazda Company Mercedes-Benz Company Nissan
MitsubishiMan.ru


Home Colt Lancer Galant L200 Outlander Pajero Others
Pajero 4 (2006-2021) Pajero 1 and 2 (1982-1999)

Spare wheel (Mitsubishi Pajero 4)

  • Home
  • Pajero
  • 4 (2006-2021)
  • General information
  • User manual
  • Spare wheel
0
Contents: Removal the spare tire ⤓ Installing the spare tire in place ⤓
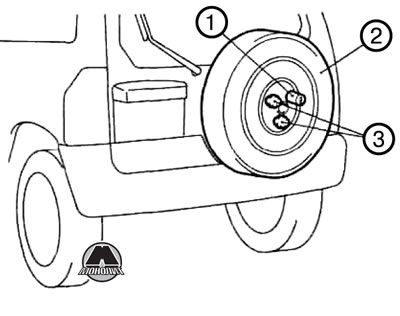
The spare wheel is mounted on the outside of the tailgate.


1. Countersunk bolt for securing the spare wheel. 2. Spare wheel. 3. Spare wheel mounting bolt.


Attention:
  • When removing or securing the spare tire, hold it firmly.
  • Wear gloves before removing the spare tire. Removing the spare tire with bare hands can cause injury to your fingers.
  • Check the pressure in your spare tire regularly to ensure it is ready for installation if necessary. Driving with insufficient tire pressure can lead to an accident. If you have to drive with under-inflated tyres, reduce your speed and restore the prescribed tyre pressure as soon as possible. Maintaining the maximum prescribed air pressure in the spare tire will ensure that the tire is always ready for use in all conditions (city traffic, high-speed travel, loads of varying weight, etc.).


Removal the spare tire


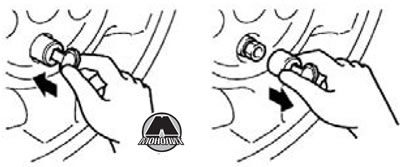
1. To unscrew the countersunk bolt, insert the ignition key into the locking cylinder and remove the cover with the key inserted by pulling it towards you.


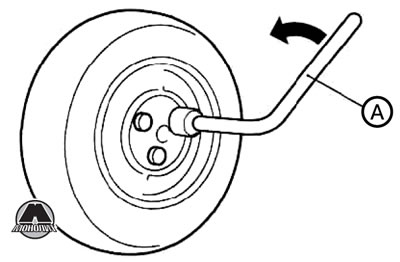
2. Loosen the spare wheel mounting bolts using the wheel lug wrench (A) and remove the spare wheel.


Installing the spare tire in place


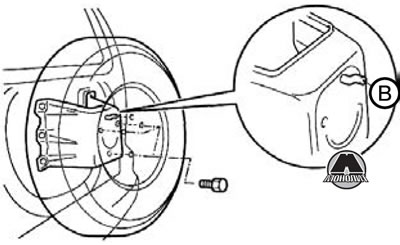
1. Place the spare wheel on the pin (B) and secure with bolts, aligning the holes in the wheel rim with the holes in the bracket.

Use a wheel lug wrench to tighten the spare wheel nuts securely.


2. To lock the countersunk bolt, place the cover with the ignition key inserted into the cylinder as far as possible on the lock bolt, and then lock it by removing the ignition key.
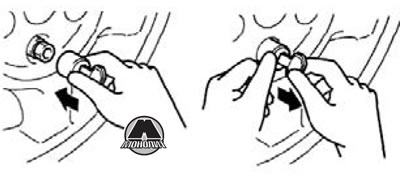


Caution: The spare wheel must be securely fastened while the vehicle is in motion. After replacing the flat tire, install it in place of the spare tire and tighten the mounting nuts securely using a wheel wrench.
This article is available at: russian, bulgarian, belarusian, ukrainian, serbian, croatian, romanian, polish, slovak, hungarian
This article was reviewed by: Miroslav Rakov
Share with friends:
◀ Previous
Pajero 4: User manual
Next ▶

Lifting a car with a jack
Tool kit, jack and jack handle
Bleeding the fuel filter (diesel vehicles only)
Bleeding the fuel system (diesel vehicles only)
Engine overheating
Wheel replacement
Towing a car
Actions in case of unstable engine operation after replacing the battery
Driving in difficult conditions
Replacing fuses
Similar materials for other Mitsubishi models

➤ Spare wheel Mitsubishi Colt 2 and 3 (1983-1993)
➤ Spare wheel Mitsubishi Lancer 3 and 5 (1984-1992)
➤ Purchase of spare parts Mitsubishi Galant 6 and 7 (1987-1998)
➤ Checking tire wear and wheel alignment Mitsubishi L200 4 (2005-2014, diesel)
➤ Spare wheel Mitsubishi Outlander 1 (2003-2008)
➤ Steering wheel adjustment Mitsubishi Carisma (1995-2004)
Link in different formats to this article
Comments and feedback from visitors
No comments yet


Add up two numbers 29 + 50


Pajero 4 (2006-2021) 
  • General information
  • User manual
  • Troubleshooting
  • Maintenance
  • Technical specifications
  • Power unit
  • Engine repair
  • Cooling system
  • Lubrication system
  • Fuel system
  • Engine management system
  • Intake and exhaust system
  • Engine electrical equipment
  • Transmission
  • Clutch
  • Manual gearbox
  • Automatic gearbox
  • Drive shafts
  • Chassis and running gear
  • Front suspension
  • Rear suspension
  • Brake system
  • Steering
  • Body and interior
  • Exterior (external elements)
  • Interior (internal elements)
  • Doors, locks and windows
  • Body dimensions
  • Electrical equipment
  • Safety system (SRS)
  • Air conditioner
  • Equipment and devices
  • Electrical diagrams
Pajero 1 and 2 (1982-1999) 
  • General information
  • User manual
  • Seats and seat belts
  • Instruments and controls
  • Driving and operation
  • Maintenance
  • Power unit
  • Gasoline engines
  • Diesel engines
  • Ignition system
  • Engine electrical equipment
  • Cooling and lubrication system
  • Power and exhaust system
  • Fuel system (gasoline)
  • Fuel system (diesel)
  • Transmission
  • Clutch
  • Mechanical gearbox
  • Automatic gearbox
  • Drive shafts and axles
  • Chassis and running gear
  • Front suspension
  • Rear suspension
  • Steering
  • Brake system
  • Body and interior
  • Exterior (external elements)
  • Interior (internal elements)
  • Doors, locks and windows
  • Electrical equipment
  • Equipment and devices
  • Heater and air conditioner
  • Cruise control
  • Headlights and lighting
  • Electrical circuits
MitsubishiMan.ru © 2018–2026 • Mobile version • Articles about Mitsubishi • Contacts • Sitemap: EN BG BY UA RS HR RO PL SK HU • Site search • Bookmark
Colt 2 and 3 (1983-1993) · Colt 4 and 5 (1991-2003) · Colt 5 (1995-2003) · Lancer 3 and 5 (1984-1992) · Lancer 9 (2000-2007) · Galant 5 (1983-1989) · Galant 6 and 7 (1987-1998) · L200 4 (2005-2014) · Outlander 1 (2003-2008) · Pajero 1 and 2 (1982-1999) · Pajero 4 (2006-2021) · Carisma (1995-2004) · Space Star (1998-2005) ·
This resource sets cookies 🍪 to avoid bothering you with repeated data entry.