
English Русский
Български
Беларускі
Український
Српски
Hrvatski
Română
Polski
Slovenský
Magyar
Articles Bookmark Contacts Sitemap   
Company Audi Company Ford Company Hyundai Company Kia Company Mazda Company Mercedes-Benz Company Nissan
MitsubishiMan.ru


Home Colt Lancer Galant L200 Outlander Pajero Others
Pajero 4 (2006-2021) Pajero 1 and 2 (1982-1999)

Technical operations on the car (Mitsubishi Pajero 4)

  • Home
  • Pajero
  • 4 (2006-2021)
  • Power unit
  • Lubrication system
  • Technical operations on the car
0
Contents: Checking the condition of the engine…⤓ Checking the oil level ⤓ Engine oil change ⤓ Replacing the oil filter ⤓ Checking engine oil pressure ⤓

Checking the condition of the engine oil


1. Slowly remove the dipstick and check the oil level.

2. It is necessary to make sure that the oil has sufficient viscosity, and also to check the absence of coolant and fuel impurities in the oil and the degree of contamination.

Checking the oil level


1. Check that the engine oil level is between the Minimum and Maximum marks on the dipstick.
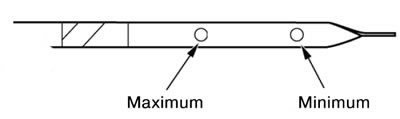


Note: Measurements must be taken when the vehicle is on a flat surface and several minutes have passed since the vehicle engine was stopped.


2. If necessary, add oil to the upper mark on the dipstick by unscrewing the filler cap.

Note: To optimize this procedure, all steps should be performed at an ambient temperature of 20°C.


Caution: Never exceed the MAX mark on the oil dipstick.


Engine oil change


1. Start the engine and warm it up to a coolant temperature of 80-90°C.

2. Remove the oil filler cap.

3. To drain the oil, unscrew the drain plug.


Caution: Be careful as the oil may be hot.


4. Insert a new drain plug sealing ring as shown in the figure, and then tighten the plug to the specified torque.

Note: Install the drain plug sealing ring in the direction shown in the figure.
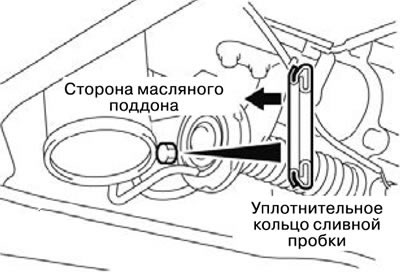


5. Fill the engine with oil of the required quality.

Required oil (according to API classification):
  • 6G7 - class SG or higher;
  • 4M4 - class CD or higher.

Total volume (including oil filter and oil cooler):
  • 6G7 - 4.9 l
  • 4M4 - 9.3 l

6. Replace the oil filler cap.

7. Check the oil level.

Replacing the oil filter


1. Start the engine and let it warm up until the coolant temperature reaches 80-90°C.

2. Remove the engine oil filler cap.

3. Remove the drain plug to drain the oil.

Caution: Be careful as the oil may be hot.


4. To remove the oil filter, use the appropriate special tool specified in the table.

Caution: For vehicles with a 6G7 engine, oil that is still inside the oil filter may leak out of the oil groove and onto the starter. To prevent this, the oil from inside the filter must be gradually removed during removal of the oil filter.


5. Clean the filter mating surface of the oil filter bracket.
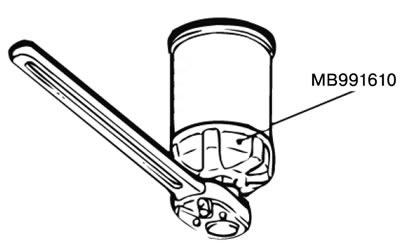


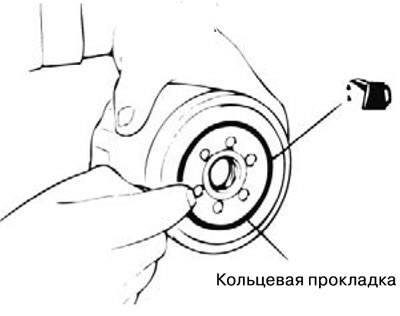
6. Lubricate the O-ring of the new oil filter with a small amount of engine oil.

7. Once the oil filter O-ring contacts the flange, use the special tool specified in the table to tighten the filter to the specified torque.

8. Install the drain plug and add engine oil (see "Changing the engine oil").

9. Press the accelerator pedal 2-3 times and check for oil leaks from under the filter.


Checking engine oil pressure


1. Check the engine oil level.

2. Using a special repair tool, remove the engine oil pressure sensor; if necessary, disconnect the switch contact.

Note: The threaded surface of the engine oil pressure switch is coated with sealant, which must be taken into account to avoid damage to the switch during dismantling.
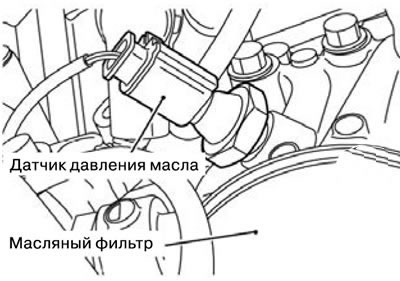


3. Install a pressure gauge to measure engine oil pressure.

4. Start the engine and warm it up.

5. After warming up the engine, check the engine oil pressure to ensure it complies with the values specified in the specification.

Default value:
  • in idle mode - not less than 29 kPa;
  • at an engine speed of 3500 rpm - 294-686 kPa.

6. Remove the engine oil pressure gauge.

7. Apply a layer of sealant to the threaded surface of the engine oil pressure switch.

8. Using a special repair tool, tighten the engine oil pressure switch to the specified tightening torque.

Caution: Do not start the engine for one hour after installing the engine oil pressure switch.
This article is available at: russian, bulgarian, belarusian, ukrainian, serbian, croatian, romanian, polish, slovak, hungarian
This article was reviewed by: Miroslav Rakov
Share with friends:
◀ Previous
Pajero 4: Lubrication system
Next ▶

Equipment and tools
Lubrication system — lubricants
Lubrication System — Recommended Precautions
Removal the engine oil cooler
Installing an engine oil cooler
Similar materials for other Mitsubishi models

➤ Main technical parameters of engines Mitsubishi Colt 4 and 5 (1991-2003)
➤ Key technical data of engines Mitsubishi Lancer 3 and 5 (1984-1992)
➤ Technical characteristics of the car Mitsubishi Galant 6 and 7 (1987-1998)
➤ Technical characteristics of L200 cars Mitsubishi L200 4 (2005-2014, diesel)
➤ Technical operations on the car Mitsubishi Outlander 1 (2003-2008)
➤ Technical condition of tires Mitsubishi Carisma (1995-2004)
Link in different formats to this article
Comments and feedback from visitors
No comments yet


Add up two numbers 30 + 44


Pajero 4 (2006-2021) 
  • General information
  • User manual
  • Troubleshooting
  • Maintenance
  • Technical specifications
  • Power unit
  • Engine repair
  • Cooling system
  • Lubrication system
  • Fuel system
  • Engine management system
  • Intake and exhaust system
  • Engine electrical equipment
  • Transmission
  • Clutch
  • Manual gearbox
  • Automatic gearbox
  • Drive shafts
  • Chassis and running gear
  • Front suspension
  • Rear suspension
  • Brake system
  • Steering
  • Body and interior
  • Exterior (external elements)
  • Interior (internal elements)
  • Doors, locks and windows
  • Body dimensions
  • Electrical equipment
  • Safety system (SRS)
  • Air conditioner
  • Equipment and devices
  • Electrical diagrams
Pajero 1 and 2 (1982-1999) 
  • General information
  • User manual
  • Seats and seat belts
  • Instruments and controls
  • Driving and operation
  • Maintenance
  • Power unit
  • Gasoline engines
  • Diesel engines
  • Ignition system
  • Engine electrical equipment
  • Cooling and lubrication system
  • Power and exhaust system
  • Fuel system (gasoline)
  • Fuel system (diesel)
  • Transmission
  • Clutch
  • Mechanical gearbox
  • Automatic gearbox
  • Drive shafts and axles
  • Chassis and running gear
  • Front suspension
  • Rear suspension
  • Steering
  • Brake system
  • Body and interior
  • Exterior (external elements)
  • Interior (internal elements)
  • Doors, locks and windows
  • Electrical equipment
  • Equipment and devices
  • Heater and air conditioner
  • Cruise control
  • Headlights and lighting
  • Electrical circuits
MitsubishiMan.ru © 2018–2026 • Mobile version • Articles about Mitsubishi • Contacts • Sitemap: EN BG BY UA RS HR RO PL SK HU • Site search • Bookmark
Colt 2 and 3 (1983-1993) · Colt 4 and 5 (1991-2003) · Colt 5 (1995-2003) · Lancer 3 and 5 (1984-1992) · Lancer 9 (2000-2007) · Galant 5 (1983-1989) · Galant 6 and 7 (1987-1998) · L200 4 (2005-2014) · Outlander 1 (2003-2008) · Pajero 1 and 2 (1982-1999) · Pajero 4 (2006-2021) · Carisma (1995-2004) · Space Star (1998-2005) ·
This resource sets cookies 🍪 to avoid bothering you with repeated data entry.