
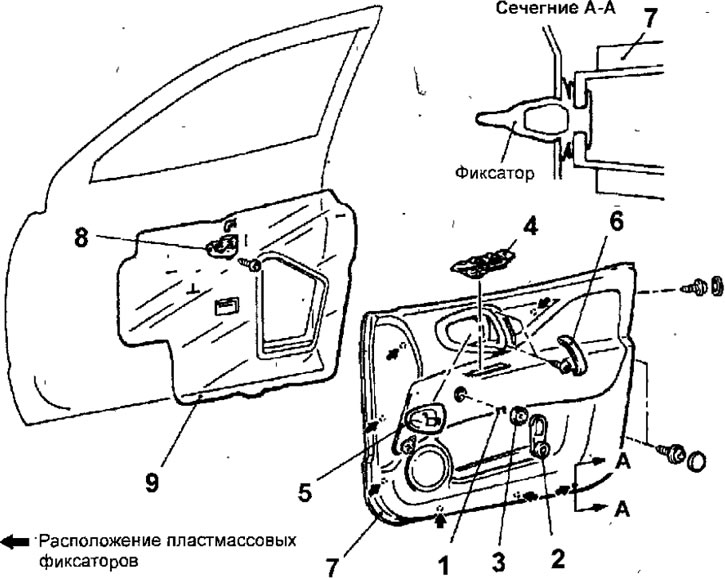
Pic. 17.31. Front door upholstery: 1 - retainer (vehicles without power windows);2 - power window handle (vehicles without power windows); 3 - power window handle socket (vehicles without power windows); 4 - power window switch panel (vehicles with electric windows); 5 - cover; 6 - inner door handle; 7 - door upholstery; 8 - internal handle for opening the door lock; 9 - dust and moisture protective film
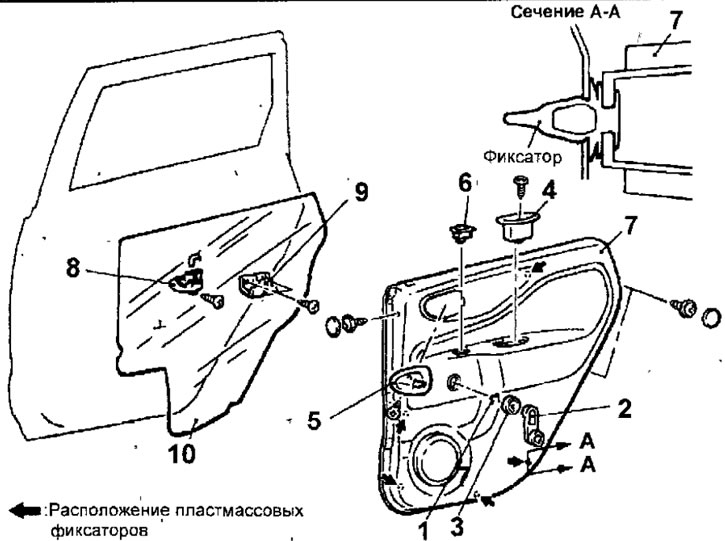
Pic. 17.32. Tailgate upholstery: 1 - retainer (vehicles without power windows); 2 - power window handle (vehicles without power windows); 3 - power window handle socket (vehicles without power windows); 4 - body of the inner door handle (hole for fingers) (vehicles without power windows); 5 - cover; 6 - power window switch (vehicles with electric windows); 7 - door upholstery; 8 - internal handle for opening the door lock; 9 - door handle bracket; 10 - dust and moisture protective film
Removing
- On manual window models, fully close the window and mark the position of the window handle. Release the bracket and remove the handle The bracket is released by inserting a clean cloth between the handle and the door upholstery, and, pulling the fabric against the ends of the bracket, hook the bracket and release it, while pulling the handle towards you so that after releasing the bracket it is removed from the slots of the power window (pic. 17.33).
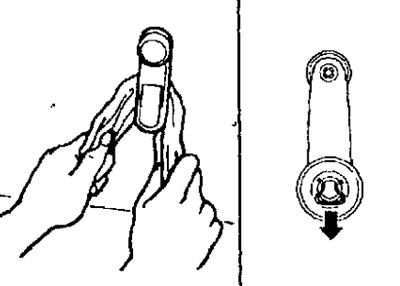
Pic. 17.33. Using a cloth to remove the window handle
- Remove the power window handle socket.
- On vehicles with power windows, use the blade of a screwdriver as a lever to remove the power window switch from the door upholstery, moving it forward and releasing its fastening tabs.
- Remove the cover, remove the screws and remove the inner door handle.
- On the rear door, remove the screw and remove the inner door handle housing (hole for fingers).
- With a door trim remover or a screwdriver with a wide blade around the perimeter, separate the door trim from the door.
- Pass the electrical wires through the dust and moisture protective film as needed. Carefully remove the dust and moisture protective film from the door.
Installation
- Installation is carried out in the reverse order of removal, taking into account the following.
- Apply a coat of 3M sealant ATD No. 8625 to the door before installing the dust and moisture barrier film (pic. 17.34, 17.35).

Pic. 17.34. Place of application of sealant ZM ATD No. 8625 along the perimeter of the dust and moisture protective film of the front door

Pic. 17.35. Place of application of sealant ZM ATD No. 8625 along the perimeter of the dust and moisture protective film of the rear door
Note. Make sure not to seal the water drain holes in the inner panel of the door with sealant.
- Fasten the upholstery with plastic clips with light blows on the door upholstery.
- On models with a manual window regulator close glass of a door and establish the window regulator handle in the situation shown in drawing 17.36.
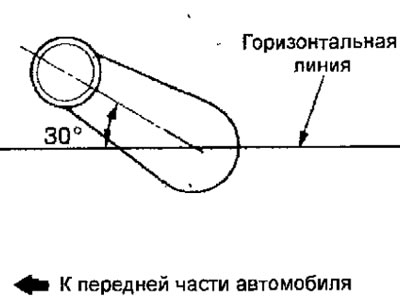
Pic. 17.36. Installation position of the window handle