



Contents: Removal ⤓ Installation ⤓
Removal
1. Disconnect the cable from the negative terminal of the battery.
2. Remove the lower instrument panel trim panel.
3. On a vehicle without SRS, remove the horn switch cover (Fig. 16.11).
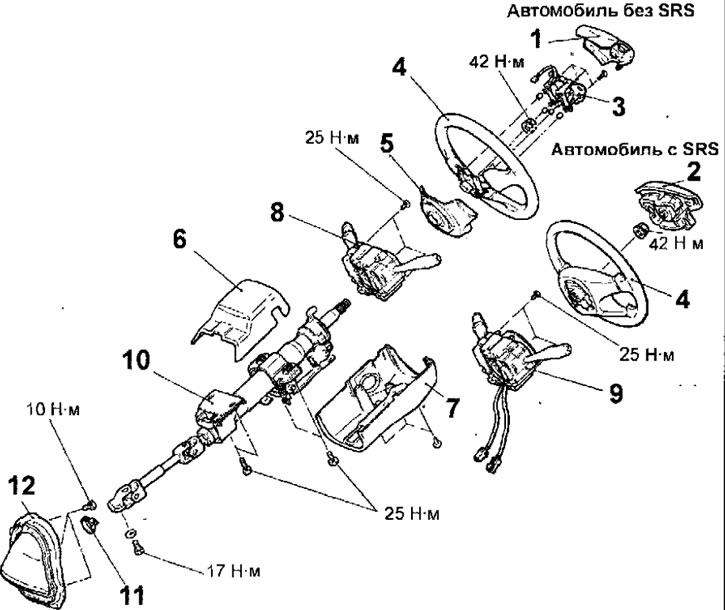
Fig. 16.11. Steering wheel and steering shaft: 1 - Horn switch cover (cars without SRS); 2 - airbag (cars with SRS); 3 - Sound signal switch; 4 - steering wheel; 5 - Lower steering wheel cover (cars without SRS); 6 - Upper steering column cover; 7 - lower steering column cover; 8 - combination switch (cars without SRS); 9 - Spiral wire (cars with SRS); 10 - steering shaft; 11 - clamp; 12 - protective cover assembly
4. On vehicles with SRS, remove the airbag. On vehicles without a driver's airbag, remove the horn button.
5. Unscrew the steering wheel mounting nut. Apply alignment marks to the end of the steering shaft and the steering wheel and remove the steering wheel using a puller (Fig. 16.12). Do not knock on the steering wheel, as this may damage the steering column.
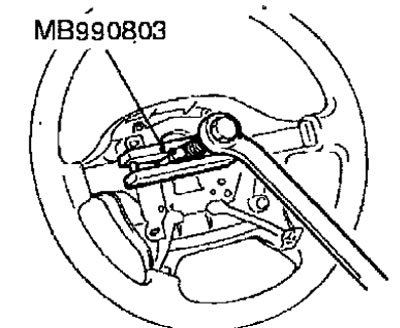
Fig. 16.12. Using a puller to remove the steering wheel
6. Remove the screws and remove the upper and lower steering column covers.
7. Disconnect the electrical connectors from the multi-function switch. Remove the three bolts and remove the multi-function switch.
8. In the reverse order to that shown in Figure 16.13, unscrew the screws securing the spiral wire.
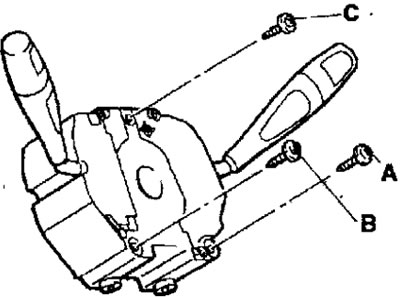
Fig. 16.13. Sequence of tightening the screws for fastening the spiral wire
9. If it is necessary to remove the steering column lock, use a hammer and chisel to break the side walls of the holes in which the heads of the bolts for fastening the steering column lock bracket are recessed (Fig. 16.14). Use a hacksaw for metal to cut grooves in the heads of the cut-off bolts for fastening the steering column lock bracket. Use a flat-blade screwdriver to unscrew the bolts and remove the steering column lock bracket.
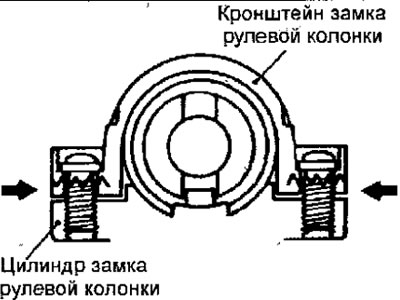
Fig. 16.14. The location of the destruction of the side walls of the holes in which the heads of the bolts for fastening the steering column lock bracket are recessed
Warning: When installing the steering column lock, you must use new shear head bolts.
10. Remove the lock from the steering column (Fig. 16.15).
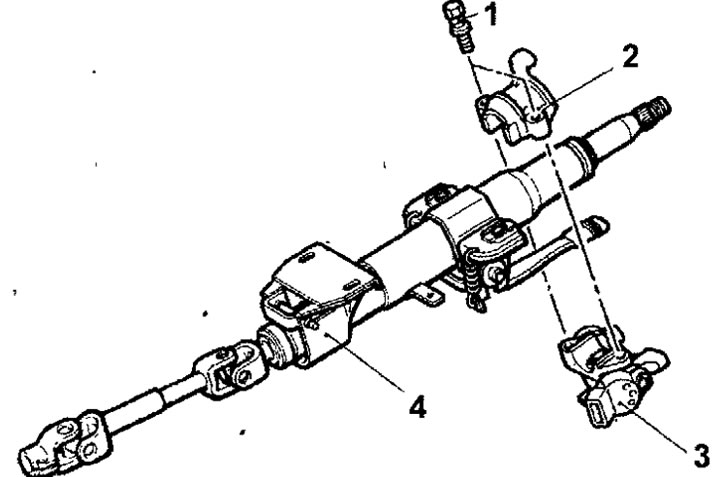
Fig. 16.15. Steering column and steering shaft: 1 - special bolt with shear head; 2 - steering column lock bracket; 3 - steering column lock cylinder; 4 - steering shaft
11. Remove the bolt connecting the steering shaft and the steering gear pinion shaft.
[The text of the article was obtained from the website: MitsubishiMan.ru]
12. Remove the bolts and steering column.
Installation
1. Installation is carried out in the reverse order of removal, taking into account the following.
2. Install the spiral wire and secure with screws, tightening them in the sequence shown in Figure 16.13.
3. When installing the lock and steering column lock bracket into the steering column, temporarily install the lock into the steering column protrusion,
4. Check the operation of the steering column lock and then tighten the special bolts until the bolt heads shear off (Fig. 16.16).
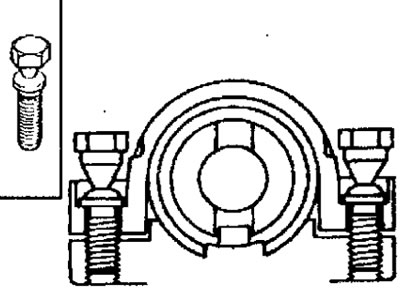
Fig. 16.16. Using new shear-off steering column lock bracket mounting bolts
Warning: When installing the steering column lock, you must use a new steering column lock bracket and special bolts.
5. After setting the wheels to the straight-ahead position, check the position of the steering wheel.