



Clutch Master Cylinder Parts
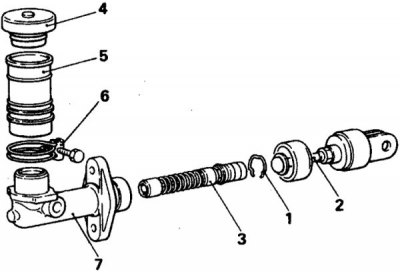
1. Retaining ring; 2. Rod and damper; 3. Piston assembly; 4. Cork; 5. Tank; 6. Clamp; 7. Cylinder
Removal and installation
1. Partially unscrew the bleed nipple on the working cylinder and pump out the fluid.
2. Disconnect the cylinder rod from the pedal.
3. Unscrew the hydraulic drive tube, mounting bolts (nuts) and remove the cylinder.
4. Installation is carried out in reverse order.
5. Tighten the connections to the following torques: mounting bolts – 14 Nm, pipe union nut – 15 Nm, transfer case bolts – 12 Nm.
6. Fill with fluid and remove air from the hydraulic drive.
Disassembly
1. Remove the master cylinder.
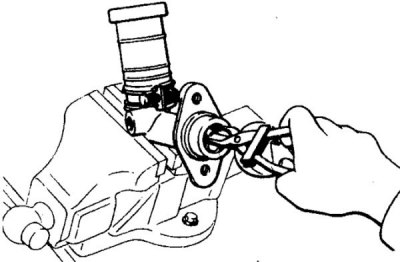
2. Remove the retaining ring.
3. Remove the cover and pusher.
4. Remove the piston assembly.
5. Loosen the clamp and remove the tank.
6. Check the condition of the cylinder surface, the presence of corrosion and scratches, check the cleanliness of the cylinder holes.
7. Check the cylinder diameter in two mutually perpendicular directions and the piston diameter. If there is a gap (difference in diameters) exceeds 0.15 mm at any point, then replace the cylinder and piston. It is prohibited to remove the spring and other parts from the piston.
(The source of the article is available at: «MITSUBISHIMAN.ru»)
8. Assembly is carried out in reverse order.
9. Lubricate the piston and cylinder with brake fluid and install the piston.
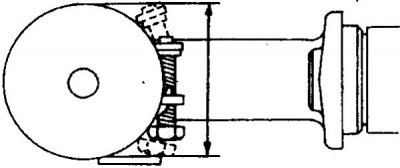
10. Orient the clamp so that the screw is in the indicated sector.
11. Tighten the cylinder mounting nuts to a torque of 10–15 N·m.
12. Remove air from the hydraulic drive.