



Removal
To remove the wheel cylinder, perform the following operations sequentially.
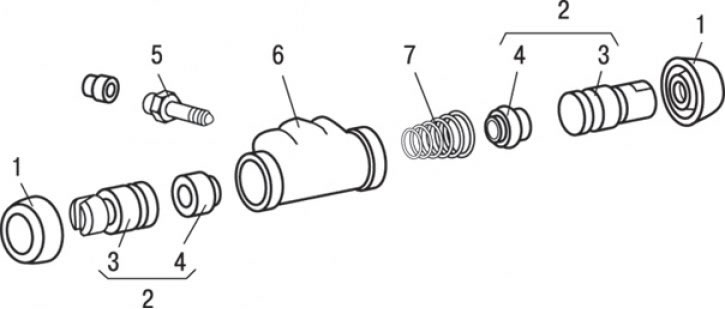
Fig. 14.34. Working brake cylinder: 1 – anther; 2 – piston assembly; 3 – piston; 4 – piston sealing rings; 5 – bleed nipple (8 Nm); 6 – working cylinder body; 7 – spring
1. Remove dust cover 1 (Fig. 14.34).
2. Remove pistons 2 as an assembly.
3. Remove the sealing rings 4 from the pistons.
4. Remove spring 7.
5. Unscrew the bleed nipple 5.
Examination
Check the walls of the working cylinder and piston for damage or rust. If any abnormalities are found, replace the working brake cylinder assembly.
Installation
Installation is carried out in the reverse order of removal, taking into account the following.
1. Before assembly, flush the piston and cylinder with alcohol or recommended brake fluid.
2. Lubricate the piston sealing rings and special tool with brake fluid.
3. Place the piston seal ring on the special mandrel so that the sharp edge faces upward, then, lowering it along the mandrel, install it into the piston groove.
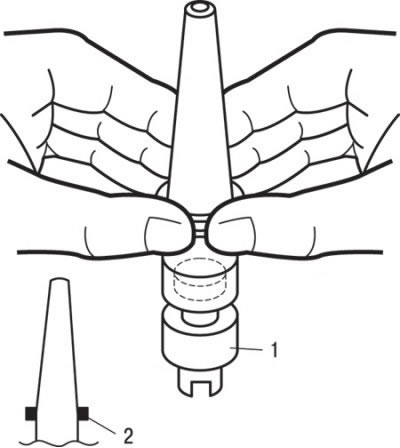
Fig. 14.35. Using the mandrel (1) to install the sealing ring (2) on the piston of the working brake cylinder
Caution! To avoid twisting or distorting the piston seal ring during installation, lower it slowly and carefully, in one motion without stopping (Fig. 14.35). The sharp edge of the piston seal ring should be located on top.