



Contents: Instrument cluster ⤓ Control lamps ⤓
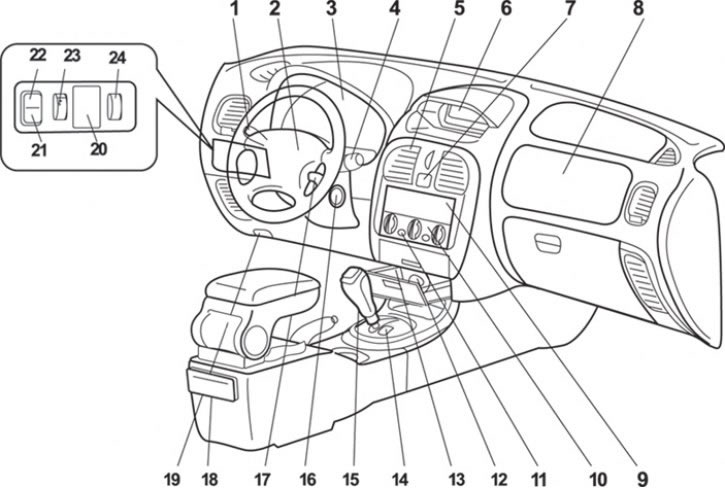
Fig. 1.13. Controls: 1 – Combined headlight/exterior lighting/direction indicator/headlight washer switch; 2 – Driver airbag/horn switch; 3 – instrument cluster; 4 – Windscreen wiper and washer switch; 5 – central nozzles of the ventilation and heating system of the passenger compartment; 6 – Multifunctional central display/digital clock; 7 – Hazard warning light switch; 8 – Front passenger airbag; 9 – radio receiver; 10 – Heating/Air Conditioning Control Panel; 11 – Rear window defroster switch; 12 – cigarette lighter; 13 – ashtray; 14 – INVECS-II 4A/T automatic transmission mode switch; 15 – gear shift lever or automatic transmission selector; 16 – ignition switch; 17 – Cruise control lever; 18 – ashtray for rear passengers
The arrangement of controls is shown in Fig. 1.13.
Instrument cluster
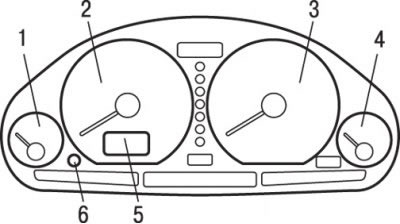
Fig. 1.14. Instrument cluster: 1 – fuel level indicator; 2 – speedometer; 3 – tachometer; 4 – coolant temperature indicator; 5 – trip meter/trip counter (odometer); 6 – reset button (zeroing) of the daily mileage counter readings
The arrangement of control and measuring instruments in the instrument cluster is shown in Fig. 1.14.
The upper portion of the display shows the trip meter readings. This portion of the display will then show the distance displayed on the display before the ignition switch (lock) was last turned to the "OFF" position.
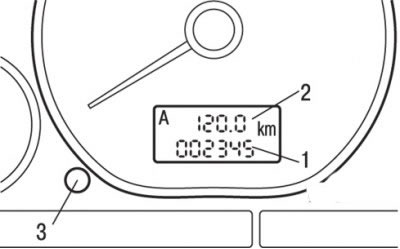
Fig. 1.15. Location of the odometer (1), trip meter (2) and trip meter reset button (3)
The display operating modes are changed in the order indicated below by lightly pressing (less than 1 s) button 3 (Fig. 1.15) to reset (zero) the daily mileage counter readings.
Trip meter (odometer)
The odometer shows the total distance traveled by the vehicle.
Daily mileage counter (Tripmeter)
The trip meter display has two modes. The trip meter shows the distance traveled during a single trip or over a certain period of time.
To reset the counter readings, press the reset button and hold it down for more than 1 second. Only the reading currently displayed on the display will be reset.
Note: The maximum trip meter reading in any mode is 999.9 km.
If the wires have been disconnected from the battery terminals for an extended period of time, the readings of both trip meters stored in memory will be reset.
Attention! While driving, watch the tachometer readings. Its needle, which shows the engine crankshaft speed, should not enter the red zone (the zone where the maximum permissible speed is exceeded).
Warning! Do not start driving if the fuel level is below the permissible level; if the fuel is completely used up, the catalytic converter may be damaged.
Immediately after refueling, you must wait for some time until the correct fuel level is displayed after turning the ignition key.
Warning! If the pointer of the indicator entered the red zone of the color scale while the engine was running, this may indicate that the engine is overheating. Stop the car immediately in a safe place and eliminate the cause of overheating. During the trip, make sure that the coolant temperature remains within the normal range.
Control lamps
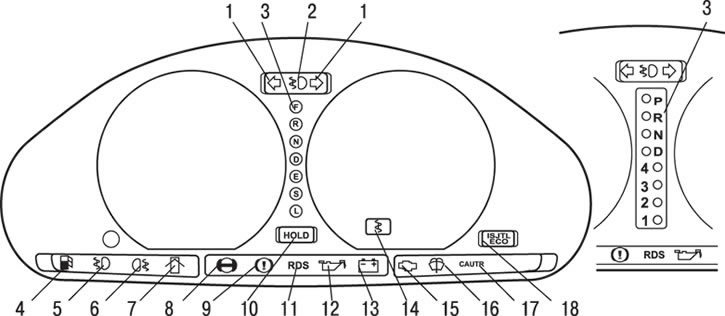
Fig. 1.16. Control lamps: 1 – direction indicator/hazard warning lights; 2 – high beam indicator lamp; 3 – Automatic transmission indicator lamp (only for vehicles with automatic transmission, the "N" lamp is also used as an indicator lamp for the automatic transmission); 4 – Low fuel level indicator lamp; 5 – Front fog lights indicator lamp; 6 – Rear fog light indicator lamp; 7 – Door open indicator light; 8 – Anti-lock brake system (ABS) malfunction indicator lamp; 9 – brake system indicator lamp; 10 – Automatic transmission HOLD mode control lamp (only for vehicles with INVECS-II 4A/T automatic transmission); 11 – SRS (airbag system) additional passive safety system malfunction indicator lamp; 12 – Engine oil pressure warning light; 13 – Battery charging indicator lamp; 14 – Traction Control Light (TCL); 15 – Engine malfunction indicator lamp; 16 – Low fluid level indicator lamp in windshield washer reservoir; 17 – Cruise control indicator lamp (automatic cruise control system); 18 – GDI™ ECO' indicator lamp; 19 – Glow plug indicator lamp (only for vehicles with diesel engines); 20 – Engine overheating indicator lamp (only for vehicles with diesel engines)
The control lamps are located in the instrument cluster (Fig. 1.16).
 Direction indicator lamps (green)
These indicator lamps flash simultaneously with the direction indicators.
Excessively rapid flashing of the indicator lamps indicates a poor connection in the turn signal circuit or a burnt out turn signal lamp.
The hazard warning lights are green.
When you press the hazard warning light switch, all direction indicators start flashing.
 High beam indicator lamp (blue)
The indicator lamp lights when the high beam headlights are on.
 Low Fuel Warning Light (Yellow)
This lamp lights up when the fuel level in the fuel tank reaches the minimum permissible value (approximately 9 l). When the lamp lights up, it indicates the need to refuel.
Attention! On vehicles with an exhaust gas catalytic converter, do not allow the fuel level to fall below the minimum permissible level. If the fuel is completely consumed, it may cause damage to the exhaust gas catalytic converter.
Note: If the diesel engine fails due to complete fuel consumption, it may not be possible to start it even after refueling. This happens because air has entered the fuel system, so it is necessary to remove the air from it.
 Front fog light indicator lamp (green)
The lamp lights up when the front fog lights are on.
 Rear fog light indicator lamp (yellow)
The lamp lights when the rear fog light is on.
 Door open indicator light (red)
The lamp lights up when one of the side doors or the rear (fifth) door is not closed or is not closed tightly.
 Brake system warning light (red)
When the ignition key is in the "ON" position, the lamp comes on in the following cases:
- – parking brake engaged;
- – the brake fluid level in the brake system hydraulic reservoir drops below the minimum permissible level.
Warning! In the following cases, there is a risk of reduced braking efficiency or loss of vehicle stability when braking abruptly. Therefore, do not drive at high speed and avoid abrupt braking. It is best to stop the vehicle in a safe place and contact your nearest authorized Mitsubishi dealer.
Attention! 1. The brake system indicator lamp does not light when the vehicle is braked with the parking brake or does not go out when the brake is released.
Attention! 2. The brake system indicator lamp lights up while the vehicle is moving.
If the braking system does not work or its effectiveness has decreased, then it is necessary to stop the car as follows:
- – press the brake pedal with more force than usual;
- – if the service brake system does not work, then, in order to stop the car, reduce the speed of the car, braking with the engine, and slowly pull the parking brake lever up. At the same time, press the brake pedal to turn on the brake lights to warn drivers behind you about braking.
Note: In some cases, immediately after starting the engine or when pressing the brake pedal again, noise from the operating devices of the brake system (ABS hydraulic unit) may be heard from the engine compartment. This is normal and should not cause concern. In fact, this noise indicates the normal operation of these units.
 Battery discharge indicator lamp (red)
The lamp comes on when the ignition key is in the "ON" position and goes out after the engine starts.
Caution! If the indicator lamp remains on after starting the engine, there is a malfunction in the charging system. In this case, stop the vehicle immediately in a safe place and contact the nearest authorized Mitsubishi dealer.
 Engine malfunction indicator light (yellow)
This light is part of the on-board self-diagnosis system that monitors and controls the engine management, automatic transmission and emission control systems. If the self-diagnosis system detects a malfunction in one of these systems, the check engine light will illuminate or flash. Normally, when the light is on, the vehicle can be driven and does not require towing, but you should have the vehicle checked by an authorized Mitsubishi dealer as soon as possible. The light will also illuminate when the ignition key is turned to the "ON" position, and should go out after a few seconds. If this does not happen, have the vehicle checked by an authorized Mitsubishi dealer.
Caution! 1. Extended driving with the check engine light on may worsen the damage to the emission control system. It may also affect fuel economy and vehicle handling.
Caution! 2. If the indicator lamp does not light when the ignition key is turned to the "ON" position, take the vehicle to an authorized Mitsubishi dealer for inspection.
Caution! 3. Avoid driving at high engine speeds if the lamp is on or flashing while the engine is running.
If the vehicle is stationary when the light is on or flashing, you will need to press the brake pedal harder than usual because the idle speed will be higher than normal and a vehicle with an automatic transmission will be more likely to move forward before moving off.
Note: Malfunction codes that occur during vehicle operation (especially those related to exhaust emissions) are stored in the memory of the engine control unit, which services the self-diagnosis system. This data will be erased from the electronic memory of the unit when the wires are disconnected from the battery terminals, which will greatly complicate the rapid diagnosis of vehicle malfunctions. Do not disconnect the wires from the battery terminals if the check engine light comes on.
 Windshield washer fluid low level indicator light (yellow)
The lamp lights up when the washer fluid level in the washer reservoir drops to the minimum permissible level, which corresponds to approximately 0.8 l. If the indicator lamp lights up, fill the washer reservoir with washer fluid as soon as possible.
 Oil pressure warning light (engine) (red)
The lamp lights up when the ignition key is turned to the "ON" position and goes out after the engine starts. If the lamp lights up while the engine is running, it means that the engine oil pressure is below the minimum permissible level. In this case, stop the engine immediately and contact the nearest authorized Mitsubishi dealer.
Caution! 1. If the lamp lights up when the engine oil level is normal, contact your nearest authorized Mitsubishi dealer to have the vehicle checked.
Attention! 2. This control lamp does not show the amount of oil in the engine crankcase. It is determined by the oil level indicator (with the engine off).
The article was taken from the website MITSUBISHIMAN
Attention! 3. Driving with a low engine oil level or with the oil pressure warning light on may result in engine failure (scuffing, seizure, etc.).
 Glow plug heating indicator lamp (only for vehicles with diesel engines) (yellow)
This lamp lights up when the ignition key is turned to the "ON" position. When the glow plugs are hot, the indicator lamp goes out - the engine can be started.
 Engine overheating warning light (diesel vehicles only)
If this indicator light comes on while the engine is running, the engine may be overheating.
Stop the vehicle immediately in a safe place and allow the engine to cool.
While driving, make sure the engine temperature remains within normal limits.
 GDI™ ECO Indicator Light (Green)
This indicator light illuminates when the GDI™ direct injection engine is operating under conditions that maximize fuel economy and minimize carbon dioxide emissions. This light helps you select the most fuel-efficient and environmentally friendly driving mode.
GDI is a registered trademark of Mitsubishi Motors Corporation. GDI stands for direct fuel injection into engine cylinders.