



Contents: Removal ⤓ Installation ⤓
Removal
1. Disconnect the cable from the negative terminal of the battery.
2. Remove the right protective cover.
3. Remove the engine mount bracket.
4. Remove the crankshaft pulley.
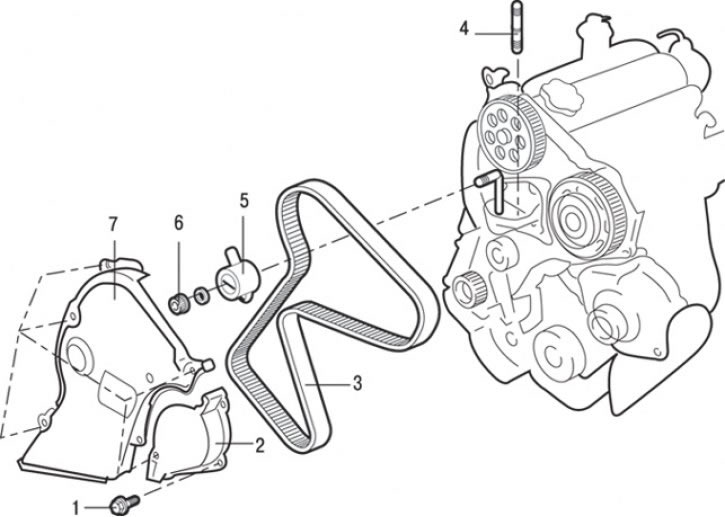
Fig. 4.28. Timing belt of the gas distribution mechanism: 1 – bolt, 9 Nm; 2-front cover of the timing belt; 3 – timing belt of the gas distribution mechanism; 4 – hairpin; 5 – tensioner roller; 6 – nut, 50 Nm; 7 – Front timing belt cover A
5. Unscrew pin 4 (Fig. 4.28).
6. Unscrew the bolts and remove the front cover 2 of the timing belt.
7. Loosen the bolts and remove the front cover 7 of the timing belt.
8. Turn the crankshaft clockwise so that the piston of the 1st cylinder (from the flywheel side) reaches TDC, when the following timing marks coincide:
- on the flywheel and clutch housing;
- on the rear cover of the timing belt and on the camshaft pulley.
Caution: Always turn the crankshaft clockwise only.
9. Place a mark on the fuel injection pump mounting bracket.
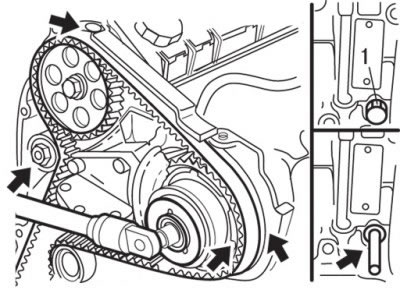
Fig. 4.29. Alignment of marks when setting the piston of the 1st cylinder to TDC and installing an 8 mm locking pin in the threaded hole of the bolt (1)
10. Install the 8 mm locking pin into the threaded hole of bolt 1 (Fig. 4.29) so that it enters the recess of the crankshaft.
11. Loosen the timing belt tensioner lock nut.
12. Remove the timing belt.
Attention! When reusing the timing belt, it is necessary to apply an arrow with chalk on the reverse (non-working) surface of the belt indicating the direction of rotation (right).
13. Unscrew the nut and remove tensioner roller 5 (see Fig. 4.28).
Installation
Installation is carried out in the reverse order of removal, taking into account the following.
1. Turn the crankshaft clockwise so that the camshaft mark is aligned with the mark on the rear timing belt cover.
2. Turn the crankshaft counterclockwise 1/4 turn from TDC of the 1st cylinder and insert the 8 mm locking pin into the recess of the crankshaft (see Fig. 4.29).
3. Align the mark on the fuel injection pump pulley with the mark on its mounting bracket (by turning clockwise).
4. Install the timing belt so that the lines on the timing belt align with the marks on the crankshaft and camshaft pulleys and the fuel injection pump pulley.
5. When installing the timing belt, please note the following:
- direction of belt rotation (see arrow on the reverse non-working surface of the belt);
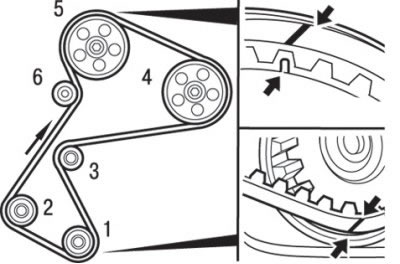
Fig. 4.30. Timing belt routing order on engine pulleys
- the order of laying the drive belt on the pulleys (Fig. 4.30).
6. Install the special tool on the drive belt and drive belt tensioner.
7. Use the M6 bolt to tighten the timing belt.
8. Nominal value – 7.5 mm.
9. Tighten the lock nut to the specified torque.
10. Install the right protective cover.
11. Install the engine mount bracket.
12. Install the crankshaft pulley.
(Original version of the article on the website MitsubishiMan.ru)