
Removing
1. Disconnect a wire from the negative plug of the storage battery.
2. Drain the engine oil from the engine.
3. Remove the pointer (oil dipstick) engine oil level.
4. Remove the protective cover.
5. Remove the right drive shaft.
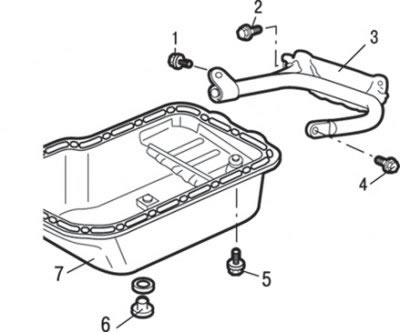
Pic. 4.19. Engine oil pan: 1 - bolt, 39 Nm; 2 - bolt, 22 Nm; 3 - curved stiffener; 4 - bolt, 40 Nm; 5 - bolt, 13 Nm; 6 - drain plug, 25 Nm; 7 - engine crankcase
6. Turn away bolts and remove a bent element of rigidity 3 (pic. 4.19).
7. After unscrewing the bolts securing the pallet, knock down the pallet using a special tool, a brass rod or a plastic hammer.
Attention! Perform this operation carefully so as not to deform the engine sump flange.
8. Turn away a stopper 6 a drain aperture and remove a sealing ring.
Installation
Installation is carried out in the reverse order of removal, taking into account the following.
1. Clean the engine sump with kerosene or a suitable solvent to remove dirt and internal deposits. Clean the mating surfaces of the sump and engine block from the remnants of the old gasket. Check that surfaces are clean and dry.
2. Apply a 4 mm coat of Mitsubishi Genuine Part MD970389 sealant or similar to the engine oil pan flange.
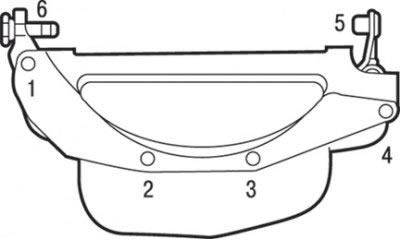
Pic. 4.20. Sequence of pre-tightening the bolts of the bent stiffener
3. Install and pre-tighten the bent stiffener mounting bolts in sequence 1, 2, 3, 4, 5, 6 (pic. 4.20).
4. Finally tighten the mounting bolts to the required torque in the sequence 5, 1, 2, 3, 4, 6 (see fig. 4.20).
5. Fill the engine with engine oil.
6. Install the pointer (oil dipstick) engine oil level.
7. Install the protective cover.
8. Install the right drive shaft.