
English Русский
Български
Беларускі
Український
Српски
Hrvatski
Română
Polski
Slovenský
Magyar
Articles Bookmark Contacts Sitemap   
Company Audi Company Ford Company Hyundai Company Kia Company Mazda Company Mercedes-Benz Company Nissan
MitsubishiMan.ru


Home Colt Lancer Galant L200 Outlander Pajero Others
Galant 6 and 7 (1987-1998) Galant 5 (1983-1989, petrol)

Coolant Temperature Sensor — Checking and Replacing (Mitsubishi Galant 5)

  • Home
  • Galant
  • 5 (1983-1989, petrol)
  • Power unit
  • Cooling and heating
  • Coolant Temperature Sensor — Checking and Replacing
0
Contents: Examination ⤓ Replacement ⤓
Warning: The engine must be completely cool before removing the sensor.


Examination


1. If the coolant temperature gauge does not work, first check the fuses (see Chapter 12).

2. If the temperature gauge shows excessive temperature after some time after the engine is started, refer to the section "troubleshooting" at the beginning of this guide.

3. If the gauge shows overheating immediately after starting a cold engine, disconnect the wire from the coolant temperature sensor. If the gauge reading drops, replace the sensor. If the reading remains high, the gauge wire is shorted to ground or the gauge itself is faulty.
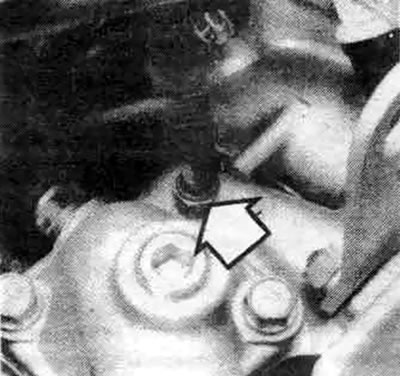


6.3a. The coolant temperature sensor (shown by the arrow) is usually located near the thermostat housing on the intake manifold
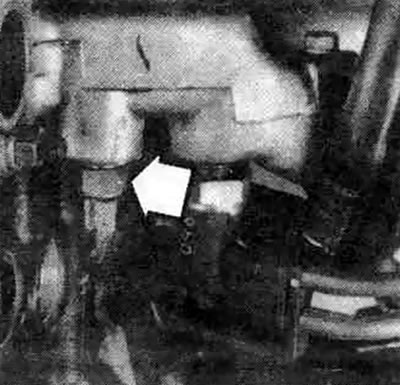


6.3b. On some models, the coolant temperature sensor (shown by the arrow) is located on the back side of the intake manifold, behind the distributor (for convenience, the distributor is removed)


4. If the temperature gauge does not show any readings after the engine has warmed up (after about 10 minutes) and the fuses are OK, turn off the engine. Disconnect the wire from the sensor and, using an auxiliary wire, connect it to ground on the engine. Briefly turn on the ignition without starting the engine. If the gauge shows overheating, replace the sensor.

5. If the indicator still does not work, then the circuit is broken or the indicator is faulty - additional information see Chapter 12.

Replacement


6. When the engine is completely cool, remove the radiator cap to relieve any remaining pressure, clamp the upper radiator hose. Then replace the radiator cap. This procedure helps reduce fluid loss during sensor replacement.

7. Disconnect the electrical connector from the sensor.

8. Prepare the new sensor for installation by applying thread sealant to the threads.

9. Unscrew the sensor from the engine and quickly install a new one so that the fluid does not have time to leak out.

10. Screw the sensor securely and connect the electrical connector.

11. Fill the cooling system with liquid, then start the engine. Make sure there are no leaks and the sensor is working properly.
This article is available at: russian, bulgarian, belarusian, ukrainian, serbian, croatian, romanian, polish, slovak, hungarian
This article was reviewed by: Vladimir Glazunov
Share with friends:
◀ Previous
Galant 5: Cooling and heating
Next ▶

Engine Cooling Fan — Checking and Replacing
Radiator — removal and installation
Thermostat — Checking and Replacing
Antifreeze — General Information
Cooling, heating and air conditioning systems — general information
Coolant reservoir — removal and installation
Water pump — check
Water pump — removal and installation
Air Conditioner and Heater Blower Motor — Removal and Installation
Heater Radiator — Replacement
Similar materials for other Mitsubishi models

➤ Coolant Temperature Sensor — Checking and Replacing Mitsubishi Colt 2 and 3 (1983-1993)
➤ Checking, removing and installing the coolant temperature… Mitsubishi Lancer 3 and 5 (1984-1992)
➤ Checking the coolant level Mitsubishi L200 4 (2005-2014, diesel)
➤ Replacing the coolant Mitsubishi Outlander 1 (2003-2008)
➤ Checking the coolant temperature sensor Mitsubishi Pajero 4 (2006-2021)
➤ Checking the coolant temperature sensor Mitsubishi Carisma (1995-2004)
Link in different formats to this article
Comments and feedback from visitors
No comments yet


Add up two numbers 41 + 30


Galant 6 and 7 (1987-1998) 
  • General information
  • Introduction to guide
  • User manual
  • Driving and operation
  • Maintenance
  • Power unit
  • Dismantling the engine
  • Engine overhaul
  • Cooling and heating
  • Power and exhaust systems
  • Engine electrical equipment
  • Engine management systems
  • Transmission
  • Mechanical gearbox
  • Automatic gearbox
  • Clutch
  • Drive shafts and transfer case
  • Chassis and running gear
  • Brake system
  • Car suspension
  • Steering
  • Body and interior
  • Exterior (external elements)
  • Interior (internal elements)
  • Doors, locks and windows
  • Electrical equipment
  • Equipment and devices
  • Wiring diagrams Galant
  • Wiring diagrams Mirage
  • Wiring diagrams Diamante
Galant 5 (1983-1989, petrol) 
  • General information
  • Troubleshooting
  • Maintenance
  • Power unit
  • Engine repair
  • Engine overhaul
  • Cooling and heating
  • Fuel and exhaust system
  • Engine electrical equipment
  • Reducing exhaust toxicity
  • Transmission
  • Manual gearbox
  • Automatic gearbox
  • Clutch and drive shafts
  • Chassis and running gear
  • Brake system
  • Car suspension
  • Steering
  • Body and interior
  • Exterior (external elements)
  • Interior (internal elements)
  • Doors, locks and windows
  • Electrical equipment
  • Equipment and devices
  • Electrical diagrams
MitsubishiMan.ru © 2018–2026 • Mobile version • Articles about Mitsubishi • Contacts • Sitemap: EN BG BY UA RS HR RO PL SK HU • Site search • Bookmark
Colt 2 and 3 (1983-1993) · Colt 4 and 5 (1991-2003) · Colt 5 (1995-2003) · Lancer 3 and 5 (1984-1992) · Lancer 9 (2000-2007) · Galant 5 (1983-1989) · Galant 6 and 7 (1987-1998) · L200 4 (2005-2014) · Outlander 1 (2003-2008) · Pajero 1 and 2 (1982-1999) · Pajero 4 (2006-2021) · Carisma (1995-2004) · Space Star (1998-2005) ·
This resource sets cookies 🍪 to avoid bothering you with repeated data entry.