



HV electrical wiring
Checking the external condition
1. The condition of the high-voltage wires must be checked every time the spark plugs are replaced.
2. The check begins with a visual inspection of the wire insulation with the engine running. Drive the car into a dark, well-ventilated area, start the engine and check for sparks on the wires. Sparks are a sign of insulation breakdown. Try not to touch moving components in the engine compartment. Make the necessary notes on replacing defective wires, then let the engine cool down and proceed to check the condition of the distributor cap and rotor.
3. Check the spark plug wires one by one to avoid violating the order of their connection during assembly. Usually, there is a corresponding marking on the insulation of branded wires. If there is none, apply it yourself using tape and a marker.
4. Disconnect the high-voltage wire from the spark plug (it is best to use a special tool). Do not pull on the wire itself, only on its tip.
On later models, to gain access to the spark plugs, it is necessary to remove the top cover from the cylinder head cover.
5. Inspect the inside walls of the tip. Corrosion usually appears as a brittle, crusty white coating. If oxidation is severe, replace the wire.
6. Pull the tip back onto the spark plug stem, making sure it fits tightly. If necessary, remove the tip again and bend the terminals inside the rubber boot accordingly.
7. Wipe the entire length of the wire with a clean cloth, completely removing traces of dirt and grease from the surface of the insulation. Inspect the wire insulation for cracks, burn marks, and other damage. Try not to bend the wire at sharp angles to avoid damaging the integrity of the conductor cores inside the insulation.
8. Disconnect the wire from the distributor - again, pull only the tip, not the wire. Check the tip for signs of corrosion, assess the tightness of its fit on the terminal. Reconnect the wire to the distributor.
9. Proceeding in a similar manner, check the condition of all remaining spark plug wires one by one. Make sure that they are securely connected to the spark plugs and distributor terminals.
10. If it is necessary to replace the high-voltage wires (see below), make sure that the replacement wires correspond in size to the parameters of your car's engine. Ready-to-use sets of high-voltage wires, cut to length and equipped with tips, are always available in Mitsubishi branded car accessory stores and service centers. Remove and replace the wires one by one to avoid disrupting the ignition sequence.
Measuring resistive resistance
1. The resistive resistance of the high-voltage wiring is checked using an ohmmeter. Excessive specific resistance of spark plug wires is the cause of misfires and failures when starting the engine in conditions of high atmospheric humidity.
2. The measurement is made for each wire separately. The ohmmeter is connected between the end terminals of the wire. The procedure for removing and installing high-voltage wires/ignition distributor cap is described below.
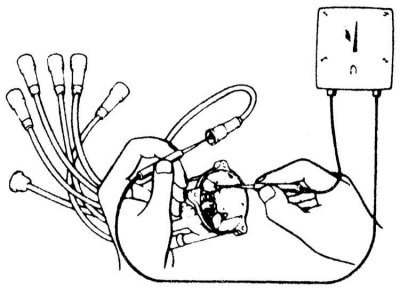 | 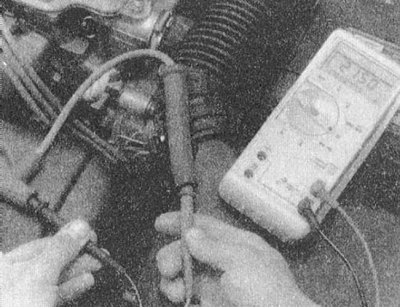 |
3. After taking readings, compare the results with the requirements of the Specifications. The nominal value is 1333÷2000 Ohm/dm. Wires with increased specific resistance are subject to replacement.
Removal and installation
1. Remove the air cleaner air intake sleeve.
2. If the vehicle is equipped accordingly, remove the center cover from the cylinder head cover.
3. Mark the high-voltage wiring using tape, try to remember the route of each wire.
The source of the article is available at (mitsubishiman.ru)
4. Starting with the longest one, disconnect the high voltage wires from the spark plugs and from the coil modules/distributor cap one by one.
5. When installing old electrical wiring in place, carefully follow the order of connecting the wires (see the markings applied before removal).
6. New wires must exactly match those removed from the vehicle in size.
7. Lubricate the protective boots of the high-voltage wire tips with dielectric grease and place the tips on the terminals of the ignition modules/distributor cap. Make sure that the tips are securely fixed.
8. After routing each spark plug wire in accordance with the diagram drawn up during dismantling, connect them to the corresponding spark plugs (start with routing the longest wire and work your way down).
9. Finally, reinstall the air intake sleeve.
Distributor cap and runner
1. Disconnect the negative cable from the battery.
If your car stereo system is equipped with a security code, make sure you have the correct combination to activate the audio system before disconnecting the battery!
2. Mark and disconnect the electrical wiring from the distributor cap (see above).
3. Loosen the mounting screws/release the fasteners and remove the cover from the distributor housing.
4. Mark the installation position of the runner and remove it from the distributor shaft.
5. It is good practice to replace the distributor cap and rotor, regardless of their condition, whenever new high voltage wires are installed. If using old components, carefully clean the contact surfaces of their terminals and measure the resistance between the wires and the cap (see above). If necessary, replace the cap and/or wires.
6. If replacing the distributor cap and runner is not included in the work plan, thoroughly wash the removed components with soapy water and dry them (using compressed air if possible). Make sure that after wiping the components with a rag, there are no stuck or stuck fibers or lint particles left on them.
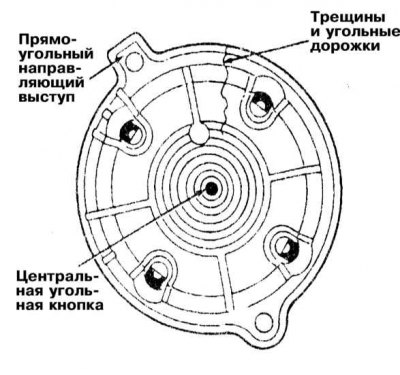
7. Carefully inspect the distributor cap for cracks, chipped terminal linings, burn marks, carbon tracks and other defects; assess the condition of the central button of the contact electrodes/terminals.
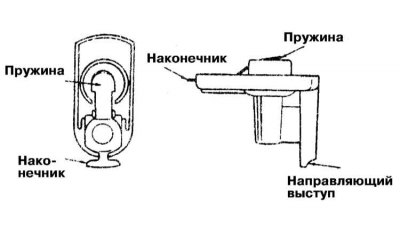
8. Assess the condition of the working tip and runner spring.
9. Install the components in the reverse order of their dismantling. When installing a new distributor cap, transfer the high-voltage wires from the old one to it, connecting them strictly in a certain order to avoid disrupting the ignition order - try not to disconnect all the wires at the same time, transfer them one by one.
The firing order is specified in Specifications at the beginning of this Chapter. On most models, the protective projection (lining) of the terminal for connecting the spark plug wire of the first cylinder on the distributor cap is marked accordingly.