



Cars with differential without locking device
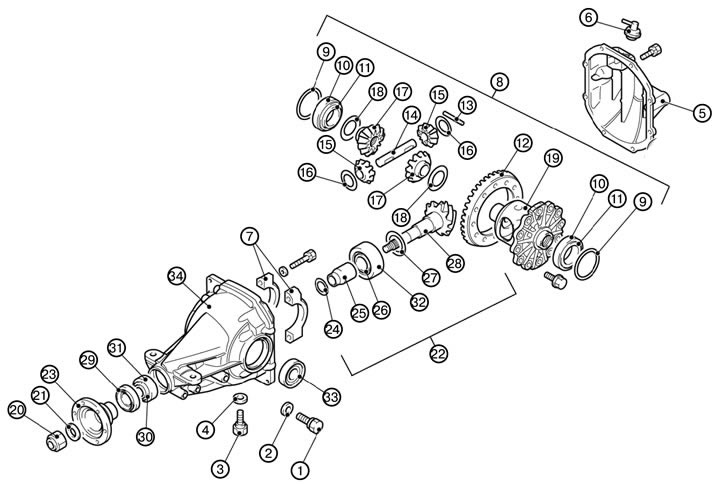
1. Conduct a check before disassembling.
Note: Check in the same manner as for the front differential.
- Standard play of the drive gear: 0.13 - 0.18 mm.
- Standard side gear clearance: 0.01 - 0.25 mm.
2. Remove the filler plug (1).
3. Remove the gasket (2).
4. Remove the drain plug (3).
5. Remove the seal (4).
6. Remove the differential cover (5).
7. Remove the ventilation plug (6). 8. Remove the bearing cover (7).
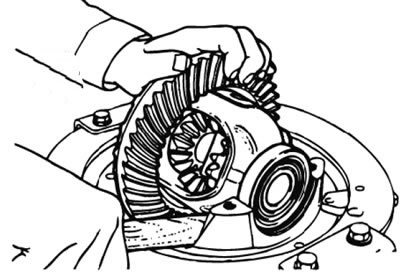
9. Remove the differential housing (8).
Caution: Be careful when removing the differential housing to avoid dropping it and damaging the washers and outer bearing races on the differential side.
1) Remove the differential housing using a wooden hammer handle.
Note: Do not mix bearing shims when disassembling the differential.
10. Remove the side bearing washer (9).
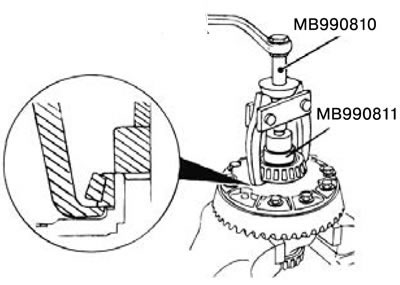
11. Remove the outer ring of the side bearing (10).
12. Remove the inner ring of the side bearing (11).
1) When removing the inner ring of the side bearing, use the special tool MB990810 and the special tool MB991407.
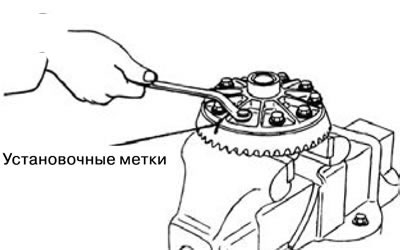
13. Remove the drive gear (12).
1) Apply timing marks to the differential housing and pinion gear.
2) Loosen the drive gear mounting bolts diagonally and remove the drive gear.
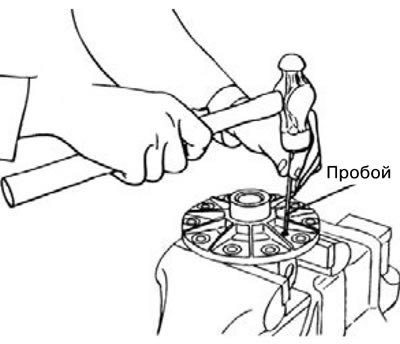
14. Remove the locking pin (13).
1) Remove the locking pin using a punch.
15. Remove the gear shaft (14).
16. Remove the drive gear (15).
17. Remove the drive gear washer (16).
18. Remove the side gear (17).
19. Remove the side gear washer (18).
20. Remove the differential housing (19).
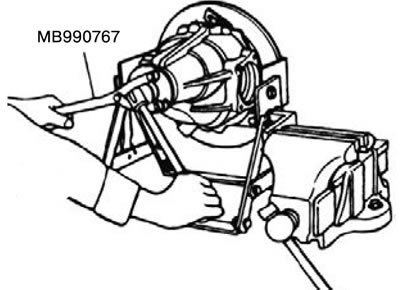
21. Unscrew the lock nut (20).
1) Fix the connecting flange using the special tool MB990767, and then unscrew the lock nut.
22. Remove the washer (21).
23. Remove the drive shaft assembly (22).
[The original article was published on MITSUBISHIMAN.ru]
Caution: The alignment marks on the connecting flange must be applied to the connecting surface of the flange and the front propeller shaft.
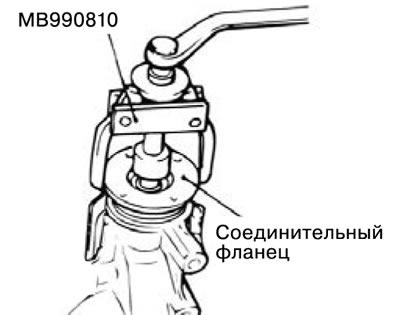
1) Apply alignment marks on the drive shaft and connecting flange.
2) Remove the drive shaft together with the special tool MB990810.
24. Remove the connecting flange (23).
25. Remove the front ring of the drive shaft (to adjust the torque) (24).
26. Remove the drive shaft gasket (25).
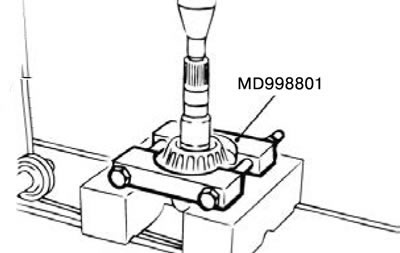
27. Remove the inner ring of the rear bearing of the drive shaft (26).
1) Remove the inner ring of the rear bearing of the drive shaft using special tool MD998801.
28. Remove the rear ring of the drive shaft (to adjust the shaft height) (27).
29. Remove the drive shaft (28).
30. Remove the oil seal (29).
31. Remove the inner ring of the front bearing of the drive shaft (30).
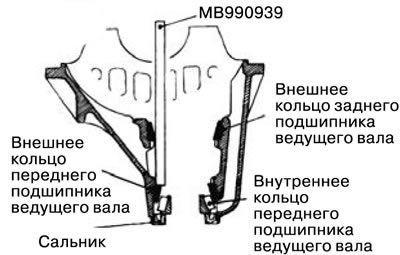
32. Remove the outer ring of the front bearing of the drive shaft (31).
1) Remove the outer ring of the front bearing of the drive shaft using special tool MB990939.
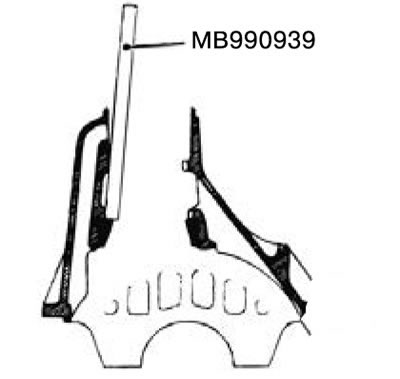
33. Remove the outer ring of the rear bearing of the drive shaft (32).
1) Remove the outer ring of the rear bearing of the drive shaft using special tool MB990939.
34. Remove the oil seal (33).
35. Remove the differential cup (34).
Cars with differential locking device
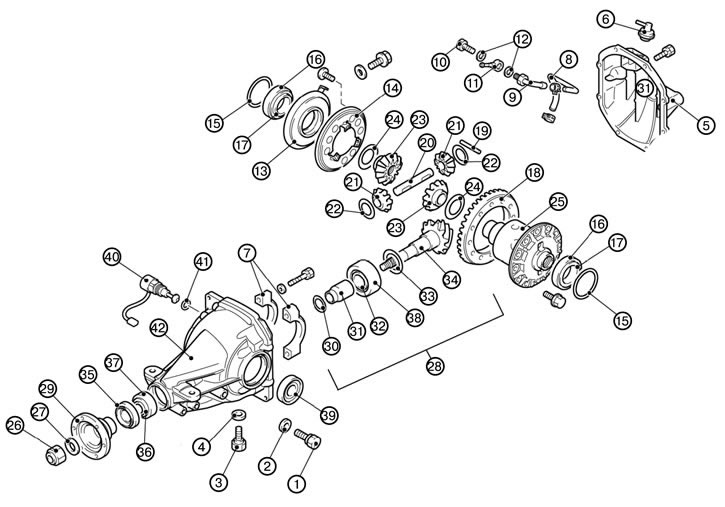
1. Conduct a check before disassembling.
Note: Check in the same manner as for the front differential.
- Standard play of the drive gear: 0.13 - 0.18 mm.
- Standard side gear clearance: 0.01 - 0.25 mm.
2. Remove the filler plug (1).
3. Remove the gasket (2).
4. Remove the drain plug (3).
5. Remove the seal (4).
6. Remove the differential cover (5).
7. Remove the ventilation plug (6).
8. Remove the bearing cover (7).
9. Remove the hose (8).
10. Remove the air tube A assembly O).
11. Unscrew the bolt (10).
12. Remove the air tube B assembly (11).
13. Remove the gasket (12).
14. Remove the drive assembly (13).
15. Remove the pressure plate (14).
16. Remove the side bearing washer (15).
17. Remove the outer ring of the side bearing (16).
18. Remove the inner ring of the side bearing (17).
19. Remove the drive gear (18).
20. Remove the locking pin (19).
21. Remove the gear shaft (20).
22. Remove the drive gear (21).
23. Remove the drive gear washer (22).
24. Remove the side gear (23).
25. Remove the side gear washer (24).
26. Remove the differential housing (25).
27. Unscrew the lock nut (26).
28. Remove the washer (27).
29. Remove the drive shaft assembly (28).
30. Remove the connecting flange (29).
31. Remove the front ring of the drive shaft (to adjust the torque) (30).
32. Remove the drive shaft gasket (31).
33. Remove the inner ring of the rear bearing of the drive shaft (32).
34. Remove the rear ring of the drive shaft (to adjust the shaft height) (33).
35. Remove the drive shaft (34).
36. Remove the oil seal (35).
37. Remove the inner ring of the front bearing of the drive shaft (36).
38. Remove the outer ring of the front bearing of the drive shaft (37).
39. Remove the outer ring of the rear bearing of the drive shaft (38).
40. Remove the oil seal (39).
41. Remove the rear differential lock switch (40).
42. Remove the gasket (41).
43. Remove the differential cup (42).