
English Русский
Български
Беларускі
Український
Српски
Hrvatski
Română
Polski
Slovenský
Magyar
Articles Bookmark Contacts Sitemap   
Company Audi Company Ford Company Hyundai Company Kia Company Mazda Company Mercedes-Benz Company Nissan
MitsubishiMan.ru


Home Colt Lancer Galant L200 Outlander Pajero Others
Colt 5 (1995-2003, petrol) Colt 4 and 5 (1991-2003) Colt 2 and 3 (1983-1993)

Brake booster — checking, removal and installation (Mitsubishi Colt 2)

  • Home
  • Colt
  • 2 (1983-1993)
  • Chassis and running gear
  • Brake system
  • Brake booster — checking, removal and installation
0
Contents: Examination ⤓ Checking for leaks ⤓ Removal ⤓ Installation ⤓

Examination


1. Depress the brake pedal several times with the engine off and check that the brake pedal travel does not change.

2. Press the brake pedal and start the engine. If the pedal drops slightly, the power steering is OK.

Checking for leaks


3. Start the engine and let it run for one or two minutes. Slowly depress the brake pedal several times. If the brake pedal stroke gradually decreases, the servo booster is sealed.

4. Depress the brake pedal while the engine is running, then stop the engine without releasing the brake pedal. If the pedal does not go down within 30 seconds, the servo booster is sealed.

Removal


5. The servo amplifier cannot be repaired. If it fails, it must be replaced.

6. To remove the servo booster, remove the master cylinder.
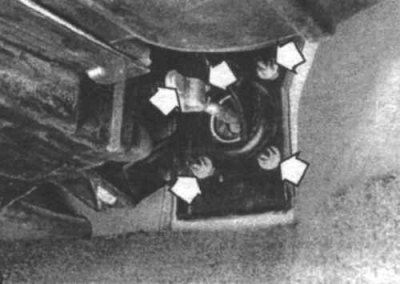


12.7 Remove the pin and retaining bolt, then remove the servo mounting nuts (arrows) (Precis model shown - others are similar). Have an assistant press the brake pedal several times, then fully depress the pedal.


7. Locate the pushrod fork connecting the booster to the brake pedal (12.7).


8. Remove the pin and remove the fork pin.

9. While holding the plug with pliers, loosen the lock nut and disconnect the plug.

[The article was taken from the website: www.mitsubishiman.ru]

10. Disconnect the vacuum hose from the booster.

11. Unscrew the four nuts and remove the washers (12.7).

12. Remove the amplifier from the rear wall of the engine compartment.

Installation


13. Installation is carried out in the reverse order of removal.

14. Measure and adjust the clearance between the master cylinder piston and the servo booster pushrod
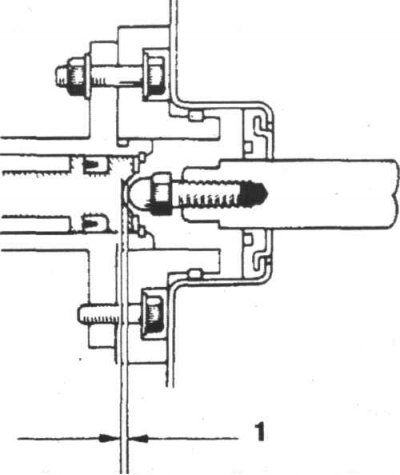


12.14a The clearance between the servo pushrod and the master cylinder piston must be as specified in the specifications section - if the clearance is too small the brake pads will not move away from the disc; if the gap is too large, the brake pedal will have excessive free play

1. Gap
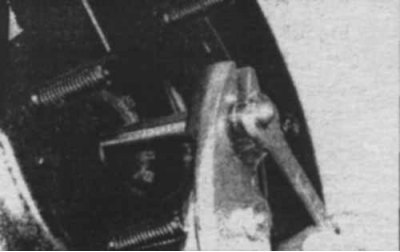


12.14b To adjust the length of the servo booster pushrod, hold the pushrod with pliers and tighten the adjusting nut


Tighten the adjusting nut (arrow) to properly adjust the handbrake lever stroke (Galant model shown) (12.14a and 12.14b) by tightening the adjusting nut at the end of the servo pushrod.

15. After completing the installation of the master cylinder and servo booster, bleed the brake system.
This article is available at: russian, bulgarian, belarusian, ukrainian, serbian, croatian, romanian, polish, slovak, hungarian
This article was reviewed by: Arseny Pavlov
Share with friends:
◀ Previous
Colt 2 and 3: Brake system
Next ▶

Bleeding the brake system
Brake Hoses and Tubes — Checking and Replacing
Pressure relief valve — removal and installation
Brake Master Cylinder — Removal, Overhaul and Installation
Wheel cylinder — removal, overhaul and installation
Handbrake — adjustment
Handbrake cables — replacement
Brake light switch — removal, installation and adjustment
Similar materials for other Mitsubishi models

➤ Checking the operation of the brake booster Mitsubishi Lancer 9 (2000-2007, petrol)
➤ Checking the proper functioning of the brake booster Mitsubishi Galant 6 and 7 (1987-1998)
➤ Checking the brake booster Mitsubishi L200 4 (2005-2014, diesel)
➤ Checking the level of working fluid in the brake hydraulic… Mitsubishi Outlander 1 (2003-2008)
➤ Checking the operation of the brake booster Mitsubishi Pajero 4 (2006-2021)
➤ Checking the functionality of the brake booster check valve Mitsubishi Carisma (1995-2004)
Link in different formats to this article
Comments and feedback from visitors
No comments yet


Add up two numbers 29 + 34


Colt 5 (1995-2003, petrol) 
  • General information
  • User manual
  • Specifications
  • Gasoline engines
  • 4G1 engines until 1995
  • 4G1 engines since 1995
  • Repair of 4G9 engines
  • Cooling system
  • Reduced exhaust gas toxicity
  • Engine electrical equipment
  • Injection system MPI
  • Carburetors
  • Transmission
  • Clutch and drive shafts
  • Manual gearbox F4M21/F5M21
  • Manual gearbox F4M41
  • Automatic gearbox F4A21
  • Automatic gearbox F4A41
  • Chassis and running gear
  • Car suspension
  • Steering
  • Brake system
  • Body
  • Exterior (external elements)
  • Electrical equipment
  • Equipment and devices
  • Electrical circuits
Colt 4 and 5 (1991-2003) 
  • General information
  • Maintenance
  • Power unit
  • Engine in a car
  • Engine repair (gasoline)
  • Engine repair (diesel)
  • Lubrication system
  • Cooling system
  • Carburetor
  • Fuel injection MPI
  • Fuel injection GDI
  • Emission reduction
  • Fuel system (diesel)
  • Ignition system
  • Exhaust system
  • Transmission
  • Clutch
  • Manual gearbox
  • Automatic gearbox
  • Drive shafts
  • Chassis and running gear
  • Chassis malfunctions
  • Front suspension
  • Rear suspension
  • Steering
  • Wheels and tires
  • Brake system
  • Body and interior
  • Body elements
  • Electrical equipment
  • Equipment and devices
  • Power devices
  • Heating and air conditioning
  • Electrical circuits
Colt 2 and 3 (1983-1993) 
  • General information
  • User manual
  • Daily care
  • Maintenance
  • Power unit
  • Engine in a car
  • Engine overhaul
  • Cooling system
  • Heater and air conditioner
  • Power and exhaust system
  • Engine electrical equipment
  • Emission reduction
  • Transmission
  • Mechanical gearbox
  • Automatic gearbox
  • Clutch and axles
  • Chassis and running gear
  • Brake system
  • Car suspension
  • Steering
  • Body and interior
  • Body and elements repair
  • Electrical equipment
  • Equipment and devices
  • Electrical circuits
MitsubishiMan.ru © 2018–2026 • Mobile version • Articles about Mitsubishi • Contacts • Sitemap: EN BG BY UA RS HR RO PL SK HU • Site search • Bookmark
Colt 2 and 3 (1983-1993) · Colt 4 and 5 (1991-2003) · Colt 5 (1995-2003) · Lancer 3 and 5 (1984-1992) · Lancer 9 (2000-2007) · Galant 5 (1983-1989) · Galant 6 and 7 (1987-1998) · L200 4 (2005-2014) · Outlander 1 (2003-2008) · Pajero 1 and 2 (1982-1999) · Pajero 4 (2006-2021) · Carisma (1995-2004) · Space Star (1998-2005) ·
This resource sets cookies 🍪 to avoid bothering you with repeated data entry.