
English Русский
Български
Беларускі
Український
Српски
Hrvatski
Română
Polski
Slovenský
Magyar
Articles Bookmark Contacts Sitemap   
Company Audi Company Ford Company Hyundai Company Kia Company Mazda Company Mercedes-Benz Company Nissan
MitsubishiMan.ru


Home Colt Lancer Galant L200 Outlander Pajero Others
Colt 5 (1995-2003, petrol) Colt 4 and 5 (1991-2003) Colt 2 and 3 (1983-1993)

Generator — disassembly and assembly (Mitsubishi Colt 4)

  • Home
  • Colt
  • 4 (1991-2003)
  • Electrical equipment
  • Power devices
  • Generator — disassembly and assembly
0
Contents: Late models of the generator ⤓ Assembly ⤓
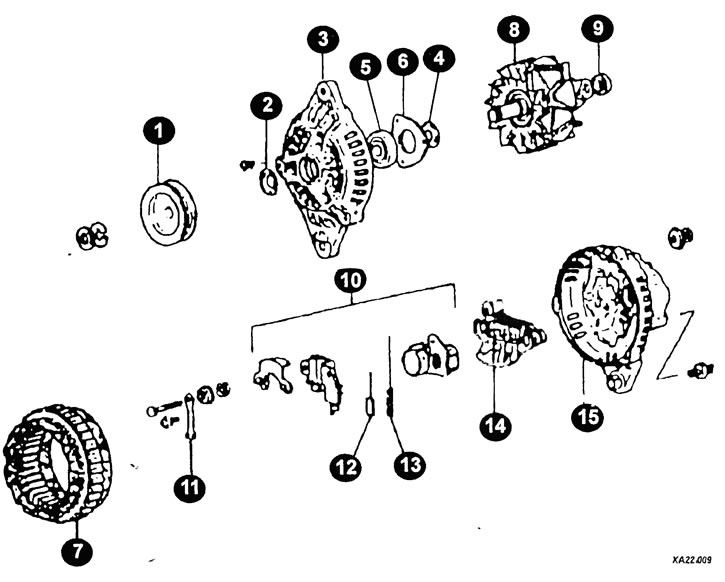

Generator Elements of Early Model Cars
1 - belt pulley; 2, 4 - oil seal; 3 - support flange; 5 - bearing on the drive side; 6 - bearing retaining plate; 7 - stator; 8 _ rotor; 9 - rotor bearing; 10 - brush holder/voltage regulator; 11 - connection terminals; 12 - roller brush; 13 - spring; 14 - rectifier; 15 - back cover.
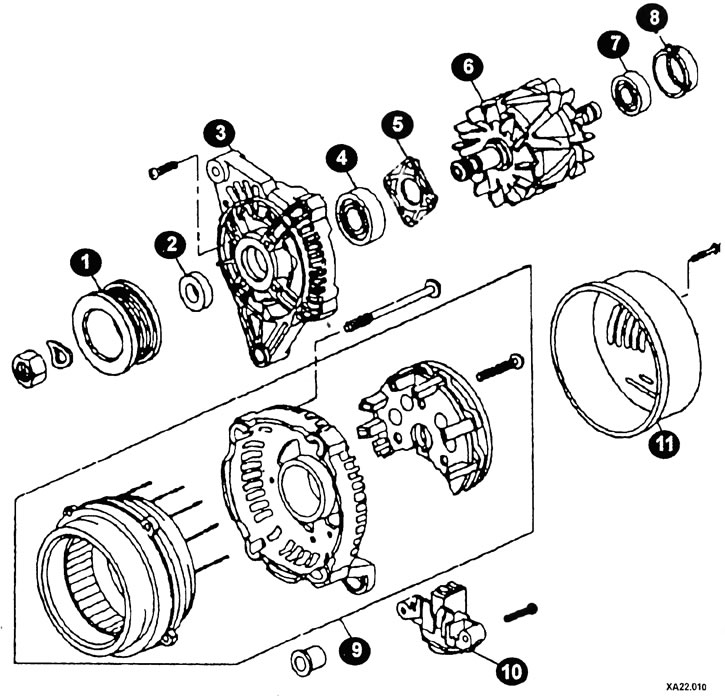


Late model car generator components
1 - pulley; 2 - oil seal; 3 - flange; 4 - bearing; 5 - bearing holder; 6 - stator; 7 - bearing; 8 - bearing cap; 9 - stator with rectifier block; 10 - brush holder; 11 - rear cover of the generator.


Late models of the generator


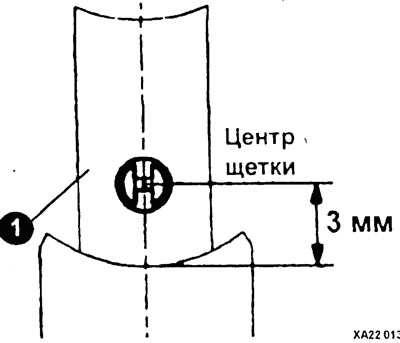
If the brush (1) is worn to the center of the mark (3 mm from the center of the brush holder), replace the brush holder assembly.


Check both rotor bearings for free rotation or replace them. A puller and press tool is required to replace the rear bearing.

Assembly


In early models of the generator:
  • Insert the brushes and springs into the brush holder and solder the leads. Trim the long ends.
  • To prevent solder from penetrating into the brush lead wires during soldering, hold the brush leads with pliers.

Check that the new brushes move easily in the brush holder.

Place the rear part on the rotor and close it. Put on the front support flange with the spacer sleeve and put on the connecting sleeve.

Install the fan impeller with the pulley and spring ring, tightening the nut to 60 Nm.

Insert into the generator housing, bending the ends of the rectifier connection wires so that they do not touch the rotor. Keep the brushes compressed during assembly.

Secure the housing with three through bolts.

Check the ease of rotation of the generator by hand.

Install the generator.

Connect the ground cable to the battery.

If available, set the time on the clock and enter the security code into the radio.

(The text of the article was taken from the website: MitsubishiMan)
This article is available at: russian, bulgarian, belarusian, ukrainian, serbian, croatian, romanian, polish, slovak, hungarian
This article was reviewed by: Nikita Romanov
Share with friends:
◀ Previous
Colt 4 and 5: Power devices
Next ▶

Filling with electrolyte, checking and charging the battery
Maintenance and testing of the battery
General description of the battery
Generator fault diagnostics
General description of the starter
Starter — removal and installation
Starter Relay — Checking and Replacing
Starter fault diagnostics
Similar materials for other Mitsubishi models

➤ Generator — General Information Mitsubishi Lancer 3 and 5 (1984-1992)
➤ Checking, removing and installing the generator Mitsubishi Galant 6 and 7 (1987-1998)
➤ Checking the voltage drop on the generator wire with the… Mitsubishi Outlander 1 (2003-2008)
➤ Generator technical data Mitsubishi Pajero 1 and 2 (1982-1999)
➤ Checking and adjusting the tension of the generator drive… Mitsubishi Carisma (1995-2004)
Link in different formats to this article
Comments and feedback from visitors
No comments yet


Add up two numbers 35 + 30


Colt 5 (1995-2003, petrol) 
  • General information
  • User manual
  • Specifications
  • Gasoline engines
  • 4G1 engines until 1995
  • 4G1 engines since 1995
  • Repair of 4G9 engines
  • Cooling system
  • Reduced exhaust gas toxicity
  • Engine electrical equipment
  • Injection system MPI
  • Carburetors
  • Transmission
  • Clutch and drive shafts
  • Manual gearbox F4M21/F5M21
  • Manual gearbox F4M41
  • Automatic gearbox F4A21
  • Automatic gearbox F4A41
  • Chassis and running gear
  • Car suspension
  • Steering
  • Brake system
  • Body
  • Exterior (external elements)
  • Electrical equipment
  • Equipment and devices
  • Electrical circuits
Colt 4 and 5 (1991-2003) 
  • General information
  • Maintenance
  • Power unit
  • Engine in a car
  • Engine repair (gasoline)
  • Engine repair (diesel)
  • Lubrication system
  • Cooling system
  • Carburetor
  • Fuel injection MPI
  • Fuel injection GDI
  • Emission reduction
  • Fuel system (diesel)
  • Ignition system
  • Exhaust system
  • Transmission
  • Clutch
  • Manual gearbox
  • Automatic gearbox
  • Drive shafts
  • Chassis and running gear
  • Chassis malfunctions
  • Front suspension
  • Rear suspension
  • Steering
  • Wheels and tires
  • Brake system
  • Body and interior
  • Body elements
  • Electrical equipment
  • Equipment and devices
  • Power devices
  • Heating and air conditioning
  • Electrical circuits
Colt 2 and 3 (1983-1993) 
  • General information
  • User manual
  • Daily care
  • Maintenance
  • Power unit
  • Engine in a car
  • Engine overhaul
  • Cooling system
  • Heater and air conditioner
  • Power and exhaust system
  • Engine electrical equipment
  • Emission reduction
  • Transmission
  • Mechanical gearbox
  • Automatic gearbox
  • Clutch and axles
  • Chassis and running gear
  • Brake system
  • Car suspension
  • Steering
  • Body and interior
  • Body and elements repair
  • Electrical equipment
  • Equipment and devices
  • Electrical circuits
MitsubishiMan.ru © 2018–2026 • Mobile version • Articles about Mitsubishi • Contacts • Sitemap: EN BG BY UA RS HR RO PL SK HU • Site search • Bookmark
Colt 2 and 3 (1983-1993) · Colt 4 and 5 (1991-2003) · Colt 5 (1995-2003) · Lancer 3 and 5 (1984-1992) · Lancer 9 (2000-2007) · Galant 5 (1983-1989) · Galant 6 and 7 (1987-1998) · L200 4 (2005-2014) · Outlander 1 (2003-2008) · Pajero 1 and 2 (1982-1999) · Pajero 4 (2006-2021) · Carisma (1995-2004) · Space Star (1998-2005) ·
This resource sets cookies 🍪 to avoid bothering you with repeated data entry.