
English Русский
Български
Беларускі
Український
Српски
Hrvatski
Română
Polski
Slovenský
Magyar
Articles Bookmark Contacts Sitemap   
Company Audi Company Ford Company Hyundai Company Kia Company Mazda Company Mercedes-Benz Company Nissan
MitsubishiMan.ru


Home Colt Lancer Galant L200 Outlander Pajero Others
Colt 5 (1995-2003, petrol) Colt 4 and 5 (1991-2003) Colt 2 and 3 (1983-1993)

Maintenance and testing of the battery (Mitsubishi Colt 4)

  • Home
  • Colt
  • 4 (1991-2003)
  • Electrical equipment
  • Power devices
  • Maintenance and testing of the battery
0
Weekly battery maintenance includes checking the electrolyte level in each cell (can) to ensure that the separator plates are covered with electrolyte to a depth of 6 mm above their top edge.


If the electrolyte level has dropped, add only distilled water. Do not allow overflow. If this has happened or some electrolyte has spilled, wipe it off immediately and rinse the area with water and soda, as the electrolyte is very aggressive, and when in contact with metal, the latter corrodes strongly.

In addition to keeping the battery contacts clean and coated with petroleum jelly, the top cover of the battery, especially the top of the cell cans, should be kept clean and dry. This prevents corrosion and partial self-discharge of the battery due to moisture and dirt.

Every three months, remove the battery and inspect the battery mounting bolts, mounting plate, tray and cables for corrosion (white fluffy deposit on metal, brittle to the touch). If corrosion is found, clean off the deposits with ammonia and coat the cleaned metal with an anti-rust agent or primer.

if there are excess deposits on the top of the battery, this may be due to cracks in the case, which cause electrolyte leaks or overcharging of the battery, which indicates the need to check the voltage regulator in the workshop.
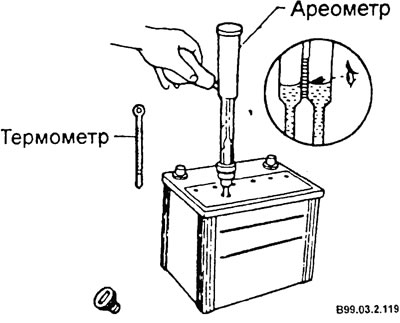


When checking the battery every three months, check the density of the electrolyte using a hydrometer to determine the state of charge of the battery and the condition of the electrolyte.

[The text of the article was taken from the website: www.MitsubishiMan.ru]
  • Fill the hydrometer with electrolyte through a special hole on the battery case. At the same time, measure the temperature of the electrolyte. If the electrolyte level is low, tilt the battery to make the measurement easier.
  • Convert the density of the electrolyte at a given temperature to the density at a standard temperature of 20°C.

Example: electrolyte temperature 35°C measured density 1.230. Reduced density will be 1.240.
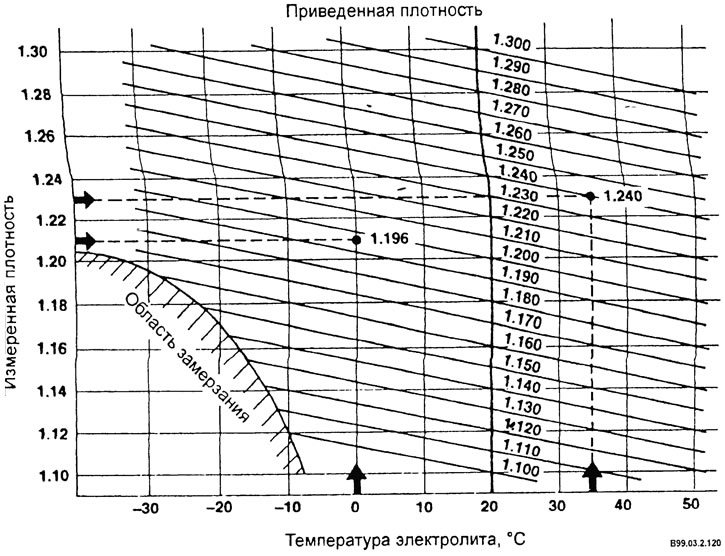


There should be a very small difference between different cans, and if the difference exceeds 0.025 g/cm³, the reasons for this may be the following:


  • loss of electrolyte from a battery caused by splashing or leakage which can lead to a decrease in the specific gravity of the electrolyte when the lack of electrolyte is compensated for by adding distilled water instead of fresh electrolyte;
  • an internal short circuit caused by bending of the plates or something similar will cause the entire battery to malfunction and inevitably fail soon. The density of the electrolyte at various temperatures for a fully charged battery is shown in Table A. The density of the electrolyte of a fully discharged battery at various temperatures is shown in Table B.
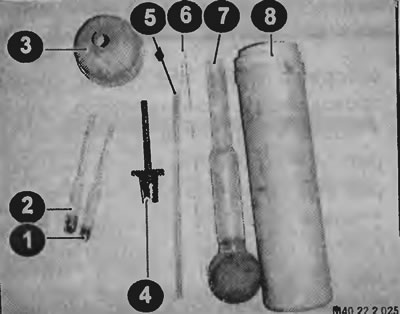


Elements of the device for checking the correction of the density of the battery electrolyte and the density of the coolant (antifreeze)
1 - hydrometer for checking the density of battery electrolyte; 2 - hydrometer for checking the density of the coolant; 3 - funnel; 4 - extension cord; 5 - glass tube; 6 - glass rod; 7 - container with a rubber bulb; 8 - case.


Table A. Electrolyte density (battery fully charged)


Density, g/cm³Temperature,°C
1,26838
1,27232
1,27627
1,28021
1,28416
1,28810
1,2924
1,296-1 5

Table B. Electrolyte density (battery completely discharged)


Density, g/cm³Temperature,°C
1,09838
1,10232
1,10627
1,11021
1,11416
1,11810
1,1224
1,126-1,5
This article is available at: russian, bulgarian, belarusian, ukrainian, serbian, croatian, romanian, polish, slovak, hungarian
This article was reviewed by: Nikita Romanov
Share with friends:
◀ Previous
Colt 4 and 5: Power devices
Next ▶

General description of the battery
Filling with electrolyte, checking and charging the battery
Generator — disassembly and assembly
Generator fault diagnostics
General description of the starter
Starter — removal and installation
Similar materials for other Mitsubishi models

➤ Maintenance work Mitsubishi Lancer 3 and 5 (1984-1992)
➤ Car maintenance technology Mitsubishi Galant 6 and 7 (1987-1998)
➤ General recommendations for carrying out maintenance work Mitsubishi L200 4 (2005-2014, diesel)
➤ Recommendations for engine maintenance and repair Mitsubishi Outlander 1 (2003-2008)
➤ Replacing the remote control battery Mitsubishi Pajero 1 and 2 (1982-1999)
➤ General information about maintenance Mitsubishi Carisma (1995-2004)
Link in different formats to this article
Comments and feedback from visitors
No comments yet


Add up two numbers 25 + 43


Colt 5 (1995-2003, petrol) 
  • General information
  • User manual
  • Specifications
  • Gasoline engines
  • 4G1 engines until 1995
  • 4G1 engines since 1995
  • Repair of 4G9 engines
  • Cooling system
  • Reduced exhaust gas toxicity
  • Engine electrical equipment
  • Injection system MPI
  • Carburetors
  • Transmission
  • Clutch and drive shafts
  • Manual gearbox F4M21/F5M21
  • Manual gearbox F4M41
  • Automatic gearbox F4A21
  • Automatic gearbox F4A41
  • Chassis and running gear
  • Car suspension
  • Steering
  • Brake system
  • Body
  • Exterior (external elements)
  • Electrical equipment
  • Equipment and devices
  • Electrical circuits
Colt 4 and 5 (1991-2003) 
  • General information
  • Maintenance
  • Power unit
  • Engine in a car
  • Engine repair (gasoline)
  • Engine repair (diesel)
  • Lubrication system
  • Cooling system
  • Carburetor
  • Fuel injection MPI
  • Fuel injection GDI
  • Emission reduction
  • Fuel system (diesel)
  • Ignition system
  • Exhaust system
  • Transmission
  • Clutch
  • Manual gearbox
  • Automatic gearbox
  • Drive shafts
  • Chassis and running gear
  • Chassis malfunctions
  • Front suspension
  • Rear suspension
  • Steering
  • Wheels and tires
  • Brake system
  • Body and interior
  • Body elements
  • Electrical equipment
  • Equipment and devices
  • Power devices
  • Heating and air conditioning
  • Electrical circuits
Colt 2 and 3 (1983-1993) 
  • General information
  • User manual
  • Daily care
  • Maintenance
  • Power unit
  • Engine in a car
  • Engine overhaul
  • Cooling system
  • Heater and air conditioner
  • Power and exhaust system
  • Engine electrical equipment
  • Emission reduction
  • Transmission
  • Mechanical gearbox
  • Automatic gearbox
  • Clutch and axles
  • Chassis and running gear
  • Brake system
  • Car suspension
  • Steering
  • Body and interior
  • Body and elements repair
  • Electrical equipment
  • Equipment and devices
  • Electrical circuits
MitsubishiMan.ru © 2018–2026 • Mobile version • Articles about Mitsubishi • Contacts • Sitemap: EN BG BY UA RS HR RO PL SK HU • Site search • Bookmark
Colt 2 and 3 (1983-1993) · Colt 4 and 5 (1991-2003) · Colt 5 (1995-2003) · Lancer 3 and 5 (1984-1992) · Lancer 9 (2000-2007) · Galant 5 (1983-1989) · Galant 6 and 7 (1987-1998) · L200 4 (2005-2014) · Outlander 1 (2003-2008) · Pajero 1 and 2 (1982-1999) · Pajero 4 (2006-2021) · Carisma (1995-2004) · Space Star (1998-2005) ·
This resource sets cookies 🍪 to avoid bothering you with repeated data entry.