



Warning: Wear safety glasses when bleeding the system. If brake fluid gets into your eyes, rinse your eyes with water immediately and consult a doctor.
Note: Bleeding the hydraulic system is done to remove air that has entered the system when it is opened during the removal and installation of hoses, tubes, brake mechanisms or the master brake cylinder.
Conventional brakes (without ABS)
1. If the brake fluid level in the reservoir has dropped significantly, you may need to bleed all four brakes, as air has entered the entire system. In addition, you may need to bleed all brakes if you are working on the master cylinder.
2. If the brake line was disconnected on only one wheel, it is necessary to bleed only that brake mechanism or brake cylinder.
3. If the brake line was disconnected in the section between the master cylinder and one of the brake mechanisms, it is necessary to bleed the part of the system to which this line belongs.
4. Bleed any remaining vacuum from the brake booster by pressing the brake pedal several times with the engine off.
5. Remove the brake fluid reservoir cap and fill the reservoir. Replace the cap.
Note: During bleeding, check the brake fluid level in the reservoir repeatedly to avoid air entering the system due to a drop in fluid level.
6. To bleed the brakes, you will need an assistant, as well as a supply of fresh brake fluid, a clean container partially filled with clean brake fluid, a piece of plastic or rubber hose with a diameter of 5 mm, which fits onto the outlet nipple, and a wrench to open and close the nipple.
7. Start bleeding from the rear left wheel. Open the nipple slightly, then screw it so that it is tightly closed, but at the same time easily and quickly unscrewed.
8. Place one end of the tube on the nipple and immerse the other end in a container with brake fluid.
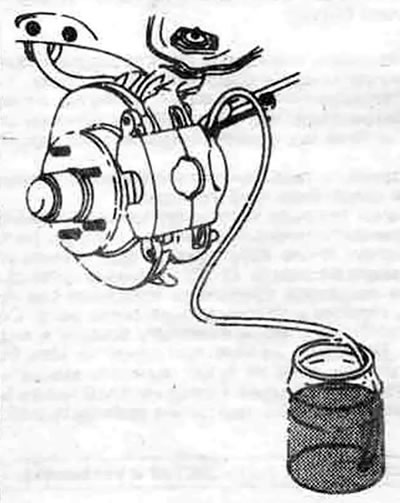
11.8. When bleeding the brake system, attach the hose to the bleed nipple on the brake mechanism or wheel cylinder, and lower the other end of the hose into the brake fluid. Air bubbles can be seen at the outlet of the hose. Bleeding can be completed only after all air bubbles have disappeared
9. Have an assistant slowly press the brake pedal several times to build up pressure in the system, then hold the pedal down.
10. With the brake pedal depressed, open the bleed nipple just enough to allow fluid to flow out. Watch for air bubbles coming out of the submerged end of the tube. After a few seconds, the fluid flow will slow down. Ask your assistant to release the pedal.
11. Repeat steps 9 and 10 until the fluid coming out of the tube is free of air bubbles. Tighten the nipple and move to the right rear wheel, then the right rear, and lastly bleed the left front wheel. Constantly check the fluid level in the brake master cylinder reservoir.
12. Do not use old brake fluid. It may contain water, which can have a harmful effect on brake system components.
13. After completing the operation, fill the master cylinder reservoir with brake fluid.
14. Check the operation of the brakes. The brake pedal should be hard when pressed. If necessary, repeat the entire procedure.
Warning: Do not operate the vehicle unless you are confident that the brakes are working properly.
Anti-lock braking system (ABS)
Warning: To effectively bleed the brakes on vehicles equipped with ABS, start the engine. Make sure the vehicle is properly supported on supports. Raise the front and rear of the vehicle and support it on supports. Make sure the work surface is level.
15. Start the engine. Perform steps 8 and 10, removing air from the brake mechanisms and delay valves. Observe the order of bleeding (different for wheel brake cylinders and delay valves).
Note: When bleeding the rear brakes, the brake pedal will feel heavier than when bleeding the front brakes. This is a result of air being compressed by the fluid pressure inside the brake retard valves and is not a malfunction.
16. Bleeding the delay valve is carried out in the same way as bleeding the brake mechanism.
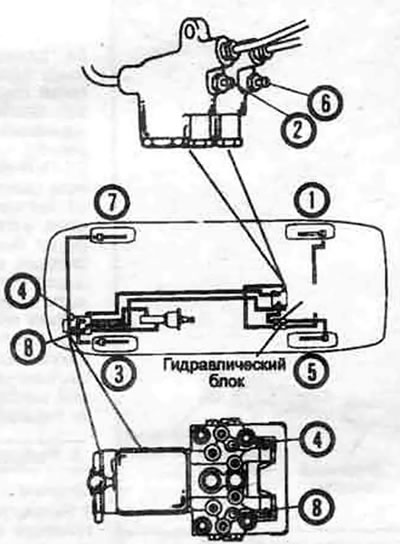
11.16. Perform bleeding in the order shown in the illustration (bleed nipple No.2 - for the left rear brake); bleed nipple #6 - for the rear right brake)
(The article was obtained from this portal: MITSUBISHIMAN.ru)
Note: The brake bleeder valve has bleed nipples for the left rear brake and the right rear brake. Do not mix them up!
17. Tighten the nipple on the delay valve securely.
18. Place a wrench on the bleed valve nipple on the hydraulic unit, located under the cover next to the cross-partition, then bleed the hydraulic unit.
19. After completing the operation, fill the master cylinder reservoir with brake fluid.