
English Русский
Български
Беларускі
Український
Српски
Hrvatski
Română
Polski
Slovenský
Magyar
Articles Bookmark Contacts Sitemap   
Company Audi Company Ford Company Hyundai Company Kia Company Mazda Company Mercedes-Benz Company Nissan
MitsubishiMan.ru


Home Colt Lancer Galant L200 Outlander Pajero Others
Galant 6 and 7 (1987-1998) Galant 5 (1983-1989, petrol)

Vacuum ignition timing regulator — checking and replacement (Mitsubishi Galant 5)

  • Home
  • Galant
  • 5 (1983-1989, petrol)
  • Power unit
  • Engine electrical equipment
  • Vacuum ignition timing regulator — checking and replacement
0
Contents: Examination ⤓ Replacement ⤓

Examination


1. Disconnect the vacuum line from the vacuum advance regulator and plug it. If there are two lines, disconnect and plug the outer one (the one further from the distributor).

2. Attach a strobe light to the vehicle.

3. Connect the vacuum pump to the advance controller.

4. Start the engine and gradually create a vacuum in the regulator, observing the ignition timing marks with a stroboscope.

5. The ignition advance should gradually increase. If this does not happen, but the device maintains a vacuum, then the moving plate of the distributor is jammed. If the ignition advance does not increase and the device does not maintain a vacuum, replace the regulator.

The original material is here www.MitsubishiMan.ru

Replacement


6. Remove the rotor from the shaft (see Chapter 1).

7. Unscrew the vacuum regulator mounting screws (see illustration).
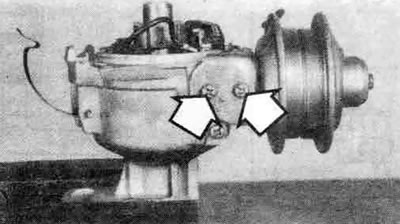


9.7. To remove the vacuum regulator from the distributor, unscrew the two screws (shown by arrows)...


8. Disconnect the vacuum regulator rod from the pin on the breaker base, then remove the vacuum regulator (see illustration).
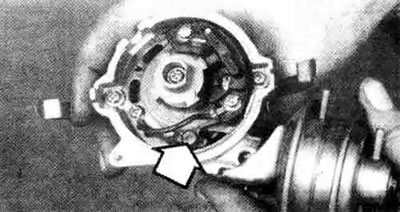


9.8...then tilt it down, remove the rod from the pin (shown by the arrow) on the base of the breaker.


9. Perform installation in reverse order.
This article is available at: russian, bulgarian, belarusian, ukrainian, serbian, croatian, romanian, polish, slovak, hungarian
This article was reviewed by: Vladimir Glazunov
Share with friends:
◀ Previous
Galant 5: Engine electrical equipment
Next ▶

Distributor — removal and installation
Ignition Coil — Checking and Replacing
Ignition system — check
Ignition system — general description and safety precautions
Battery Cables — Checking and Replacing
Sensor-switch — replacement
Checking and replacing the sensor coil
Centrifugal ignition timing regulator — checking and replacing components
Distributor Sensor Air Gap — Checking and Adjusting
Battery Charging System — General Description and Safety Precautions
Similar materials for other Mitsubishi models

➤ Checking and adjusting the ignition timing angle Mitsubishi Colt 2 and 3 (1983-1993)
➤ Checking/setting ignition timing Mitsubishi Lancer 3 and 5 (1984-1992)
➤ Checking and adjusting the rear brake force regulator… Mitsubishi L200 4 (2005-2014, diesel)
➤ Checking the ignition coil relay Mitsubishi Outlander 1 (2003-2008)
➤ Checking the ignition timing angle Mitsubishi Pajero 4 (2006-2021)
➤ Checking and adjusting the ignition timing (SOHC) Mitsubishi Carisma (1995-2004)
Link in different formats to this article
Comments and feedback from visitors
No comments yet


Add up two numbers 35 + 23


Galant 6 and 7 (1987-1998) 
  • General information
  • Introduction to guide
  • User manual
  • Driving and operation
  • Maintenance
  • Power unit
  • Dismantling the engine
  • Engine overhaul
  • Cooling and heating
  • Power and exhaust systems
  • Engine electrical equipment
  • Engine management systems
  • Transmission
  • Mechanical gearbox
  • Automatic gearbox
  • Clutch
  • Drive shafts and transfer case
  • Chassis and running gear
  • Brake system
  • Car suspension
  • Steering
  • Body and interior
  • Exterior (external elements)
  • Interior (internal elements)
  • Doors, locks and windows
  • Electrical equipment
  • Equipment and devices
  • Wiring diagrams Galant
  • Wiring diagrams Mirage
  • Wiring diagrams Diamante
Galant 5 (1983-1989, petrol) 
  • General information
  • Troubleshooting
  • Maintenance
  • Power unit
  • Engine repair
  • Engine overhaul
  • Cooling and heating
  • Fuel and exhaust system
  • Engine electrical equipment
  • Reducing exhaust toxicity
  • Transmission
  • Manual gearbox
  • Automatic gearbox
  • Clutch and drive shafts
  • Chassis and running gear
  • Brake system
  • Car suspension
  • Steering
  • Body and interior
  • Exterior (external elements)
  • Interior (internal elements)
  • Doors, locks and windows
  • Electrical equipment
  • Equipment and devices
  • Electrical diagrams
MitsubishiMan.ru © 2018–2026 • Mobile version • Articles about Mitsubishi • Contacts • Sitemap: EN BG BY UA RS HR RO PL SK HU • Site search • Bookmark
Colt 2 and 3 (1983-1993) · Colt 4 and 5 (1991-2003) · Colt 5 (1995-2003) · Lancer 3 and 5 (1984-1992) · Lancer 9 (2000-2007) · Galant 5 (1983-1989) · Galant 6 and 7 (1987-1998) · L200 4 (2005-2014) · Outlander 1 (2003-2008) · Pajero 1 and 2 (1982-1999) · Pajero 4 (2006-2021) · Carisma (1995-2004) · Space Star (1998-2005) ·
This resource sets cookies 🍪 to avoid bothering you with repeated data entry.