
Toothed belt and related parts of the 3.5L engine
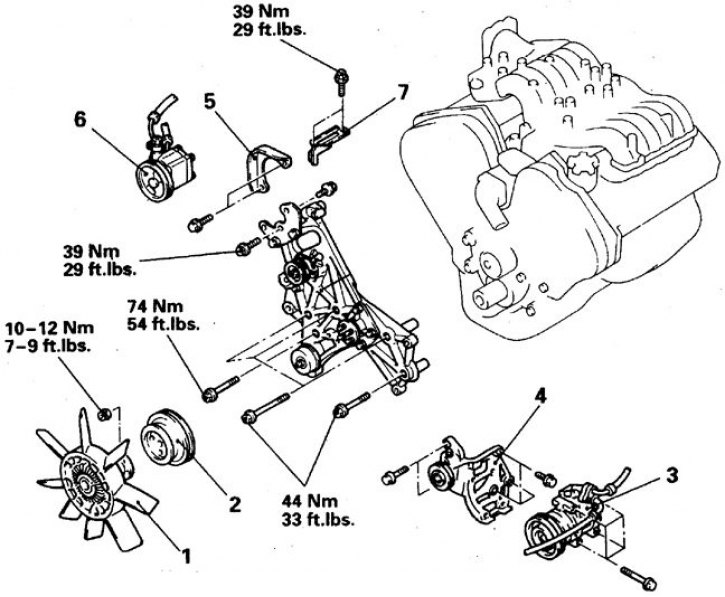
1. Fan; 2. Pulley; 3. Compressor; 4, 7. Brackets; 5. Lid; 6. Power steering pump
Details shown when the belt is removed (3.5 l)
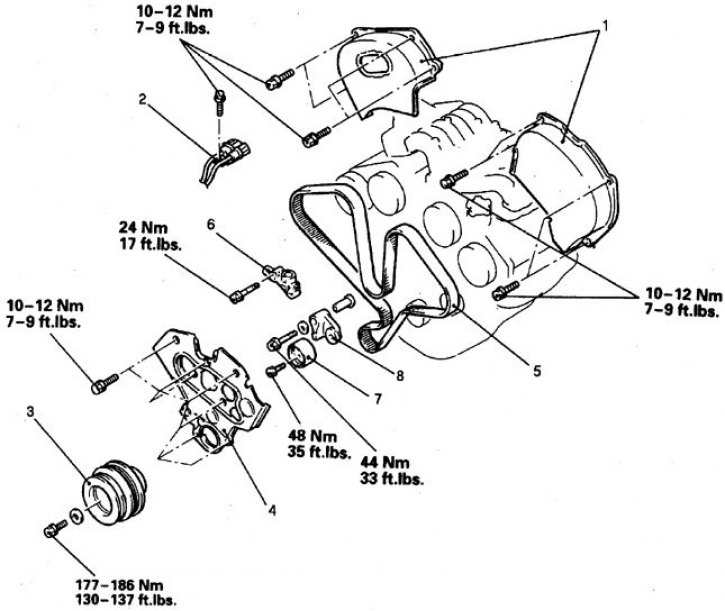
1, 4. Lid; 2. Connector for crankshaft rotation sensor; 3. Pulley; 5. Belt; 6. Automatic tension device; 7. Tensioner roller; 8. Lever
Removing
1. Disconnect the battery from the ground.
2. Drain the liquid.
3. Disconnect the radiator hose and remove the top fan shroud.
4. Remove fan with clutch.
5. Remove all attachment belts.
6. Remove the fan pulley from the cooling pump.
7. Remove the power steering pump and bracket. Take the pump aside without disconnecting from the line.
8. Remove the tensioner pulley bracket.
9. Remove the air conditioning compressor. Take the unit to the side without disconnecting it from the line, and secure it. Remove compressor bracket.
10. Remove the fan bracket.
11. Remove the top belt covers and spacers. On the 3.5L engine, remove the crankshaft rotation sensor.
12. Remove the lower belt cover.
13. Set the piston of the 1st cylinder to the TDC of the compression stroke. From now on, rotation of the crankshaft is not allowed.
14. Turn away a bolt of a pulley, holding a crankshaft a special key and remove a pulley.
15. Release the tensioner bolts and carefully remove the toothed belt, marking the direction of rotation.
Installing the belt on a 3.0L engine
1. Check the condition of the belt, replace if any defects are found.
2. Check up a condition of a roller of a tensioner and teeths of asterisks.
3. Install tensioner, turn counterclockwise and secure with bolts.
4. Check the alignment of the marks on the sprockets and put on the belt, guided by the printed arrow. The belt must be tensioned between the crankshaft and left camshaft sprockets. When dressing, lightly press the left camshaft sprocket counterclockwise. If the belt is tight, then the marks should match.
5. Install the flange on the crankshaft sprocket.
6. Release the tensioner bolt so that the roller rests on the belt.
7. Smoothly, without jerks, turn the crankshaft 2 turns clockwise and check the alignment of the marks.
8. Tighten the tensioner bolt with a torque of 25 Nm.
9. Install all parts in reverse order. Replace damaged cover gaskets by laying them in the cover with 3M EC 870 adhesive. Tighten the cover bolts to 11 Nm.
Installing a belt on a 3.5L engine
1. Check the condition of the belt, replace if any defects are found.
2. Check up a condition of a roller of a tensioner and teeths of asterisks.
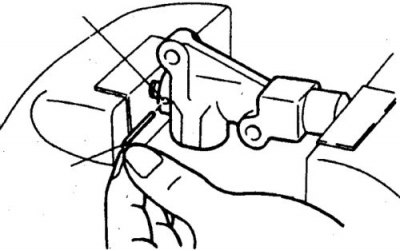
3. Compress the tensioner in a vise and fix it by inserting a wire with a diameter of 1.4 mm into the holes. Install the tensioner and tighten the bolt to 24 Nm.
4. Install the crankshaft pulley and rotate the crankshaft sprocket so that it moves 3 teeth clockwise.
5. Align the left head camshaft sprocket marks.
6. Align the camshaft sprocket marks on the right head, secure with a torque wrench.
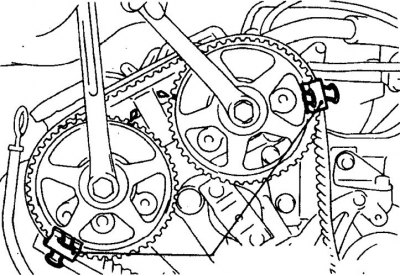
7. Make sure that the camshaft marks of the right cylinder head are aligned and fix the belt with 2 brackets.
8. Put the belt on the coolant pump pulley.
9. Be convinced of alignment of labels of a cam-shaft of the left head of cylinders and fix a belt 2 brackets.
10. Get a belt on an intermediate roller.
11. Aligning the marks on the crankshaft sprocket, turn the crankshaft 1 tooth counterclockwise.
12. Put the belt on the crankshaft sprocket and on the tensioner pulley.
13. Position tensioner pulley with pin hole facing up. Click on the roller and tighten the bolt.
14. Align the marks on the crankshaft sprocket.
15. Check the alignment of all marks.
16. Turn the crankshaft 1/4 turn counterclockwise, then turn clockwise and align the marks.
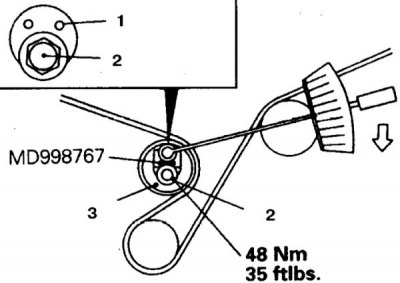
17. Loosen tensioner bolt (2).
Using a special wrench, turn the tensioner with a torque of 9.4 Nm, tightening the belt, and at the same time tighten the central bolt of the tensioner to the specified torque. When tightening the tensioner bolt, the roller should not rotate (1. Pin hole; 3. Tensioner roller).
18. Remove the wire from the tensioner and make sure that the pin can be easily removed.
19. Turn the crankshaft 2 turns and leave in this position for 5 minutes.
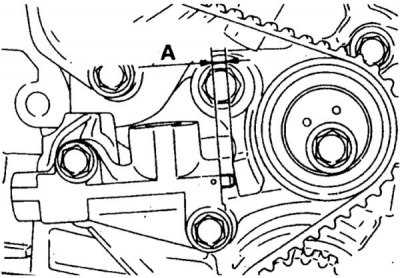
Check the freedom of movement of the pin in the tensioner hole. If the pin comes in with little effort, then check the protrusion of the tensioner rod (A), which should be 3.8–4.5 mm. Otherwise, repeat the procedure for putting on and adjusting the belt tension.
20. Check the alignment of all marks on the sprockets.
21. Install all parts in reverse order. Replace damaged cover gaskets by installing them into the cover with 3M EC 870 adhesive. Tighten the cover bolts to 11 Nm. After starting the engine, listen for noises from the belt. If unusual noises are heard, stop the engine and check the installation and tension of the belt. When finished, adjust the accessory drive belts.