



Contents: Engines 2.0 and 2.6 l ⤓ 2.4L engines ⤓ 12-valve 3.0L engine ⤓ 24-valve 3.0L engine and 3.5L engine ⤓
Engines 2.0 and 2.6 l
Exhaust manifold for 2.0 and 2.6 L engines
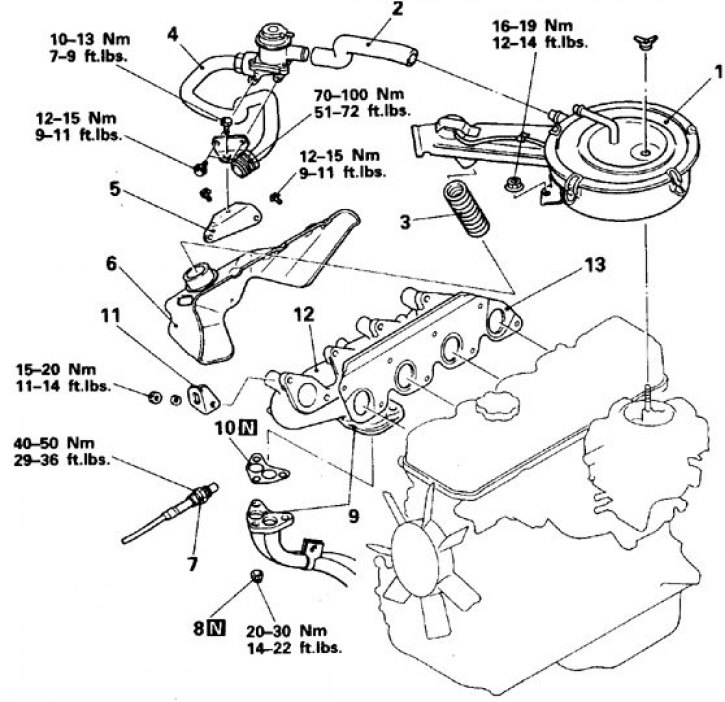
1. Filter; 2. Air vent; 3, 4. Branch pipe; 5. Bracket; 6. Lid; 7. Oxygen sensor; 8. Self-tightening nut; 9. Exhaust pipe flange; 10, 13. Gasket; 11. Hook; 12. Collector
Removal and installation
1. Disconnect the battery from ground. Remove the air filter.
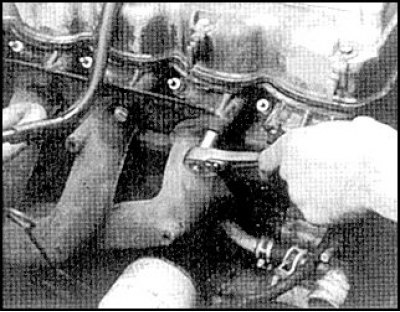
2. Disconnect the exhaust pipe from the manifold (if necessary, lift the car and remove the bolts from below).
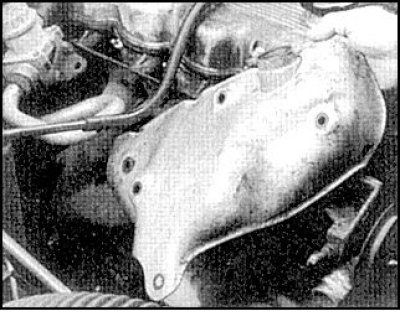
3. Disconnect the air duct, ground wire and hose. Remove the valve bracket and manifold cover.
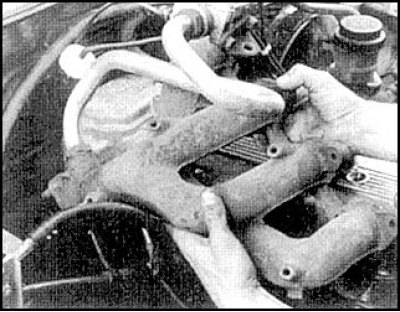
4. Lubricate the manifold nuts with penetrating fluid. Unscrew the oxygen sensor.
Unscrew the nuts and remove the manifold with the reed valve and pipe.
5. Clean the separating surfaces of the manifold and cylinder head.
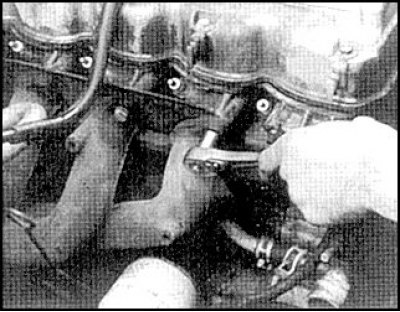
6. Installation is carried out in reverse order.
Replace the gasket, manifold nuts and damaged studs by unscrewing them with 2 lock nuts. Tighten all connections to the torques shown in the illustration for the 2.6L engine.
2.4L engines
Exhaust manifold of the 2.4L engine
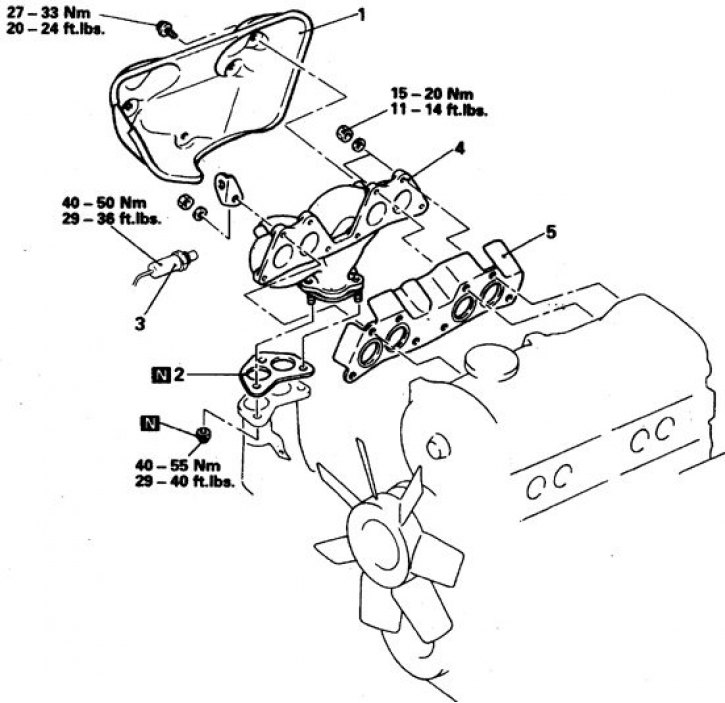
1. Lid; 2, 5. Gasket; 3. Oxygen sensor; 4. Collector
Removal and installation
1. Disconnect the battery from ground. Remove the air filter.
2. Remove the manifold cover.
3. Raise the front of the vehicle and disconnect the exhaust pipe from the manifold.
4. Unscrew the oxygen sensor and disconnect the ground wire.
5. Unscrew the nuts and remove the manifold.
6. Installation is carried out in reverse order. Replace the gaskets. Tighten all connections to the specified torques.
12-valve 3.0L engine
Exhaust manifold 12-valve engine 3.0 l
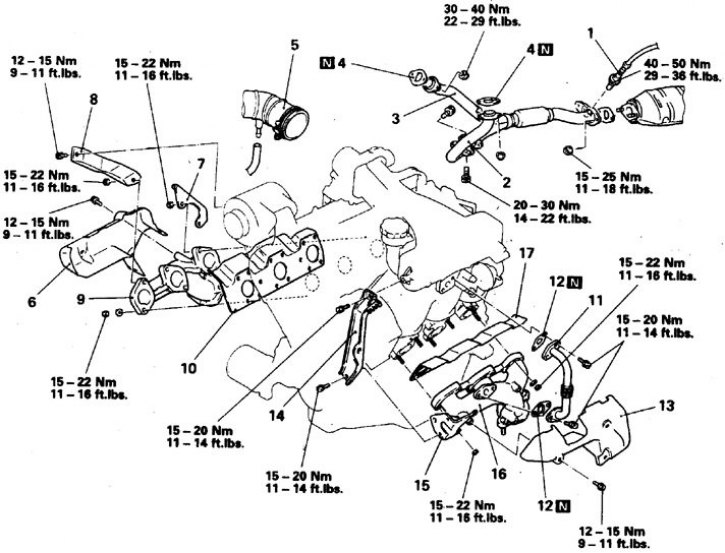
1. Oxygen sensors; 2, 3. Exhaust pipes; 4, 10, 17. Gaskets; 5. Air duct; 6, 13. Shield; 7. Hook; 8. Generator bracket; 9, 16. Collector; 11, 12. Tube and gasket; 14. Equalizing chamber stand; 15. Bracket
Removal and installation (left manifold)
1. Remove the battery and tray.
2. Disconnect the exhaust pipes from the manifold and secure them with wire.
3. Remove the manifold heat shield.
4. Disconnect the recirculation tube with gaskets on both sides.
5. Remove the intake manifold stand with the bracket.
6. Unscrew the nuts and remove the manifold.
7. Installation is carried out in reverse order. Replace all gaskets. Tighten all connections to the specified torques.
Removal and installation (right manifold)
1. Disconnect the ground. Remove the air duct.
2. Disconnect the exhaust pipes from the manifold and secure them with wire.
3. Remove the heat shield, right hook and generator support from the manifold.
4. Unscrew the nuts and remove the manifold.
5. Check the collector plane. Collector with cracks and with a deformed plane (deviation from caliber over 0.3 mm) replace.
6. Installation is carried out in reverse order. Replace all gaskets. Tighten all connections to the specified torques.
24-valve 3.0L engine and 3.5L engine
Exhaust manifold 24-valve engine 3.0L
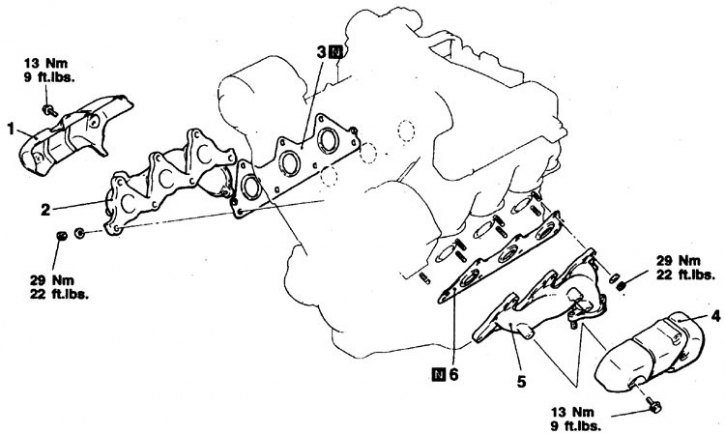
1. Shield; 2. Collector right; 3, 6. Gaskets; 5. Left collector
Exhaust manifold for 3.5L valve engine
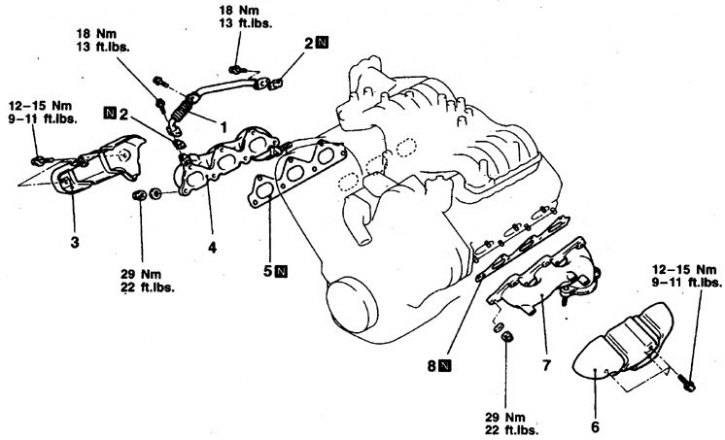
1. Recirculation tube; 2, 5, 8. Gaskets; 3, 6. Shields; 4. Collector right; 5. Left collector
Removal and installation (left manifold)
1. Remove the battery and tray.
2. Disconnect the exhaust pipes from the manifold and secure them with wire.
3. Remove the manifold heat shield.
4. Unscrew the nuts and remove the manifold.
5. Check the condition of the collector. Collector with cracks and with a deformed plane (deviation from caliber over 0.3 mm) replace.
6. Installation is carried out in reverse order. Replace all gaskets. Tighten all connections to the specified torques.
Removal and installation (right manifold)
1. Disconnect the ground. Remove the air duct.
2. Disconnect the exhaust pipes from the manifold and secure them with wire.
3. Remove the heat shield from the manifold.
4. Unscrew the nuts and remove the manifold and gasket.
5. Check the collector plane. Collector with cracks and with a deformed plane (deviation from caliber over 0.3 mm) replace.
6. Installation is carried out in reverse order. Replace all gaskets. Tighten all connections to the specified torques.