



Note: The operations for removing the 6V31, 4M4 or 6G7 engine are similar. Below is a description of the procedure using the 6G7 engine as an example.
Note:
- Use a protective coating on the fenders to avoid damaging the painted surfaces of the body.
- To avoid damage, hold connectors by their parts, not by the wires, when disconnecting.
- Mark all wires and hoses to avoid incorrect connections later. Also, make sure that they are not entangled with other wires or hoses, or touching moving parts.
1. Reduce the fuel pressure in the fuel line.
2. Remove the hood.
3. Remove the lower support plate and engine crankcase guard.
4. Drain the oil from the engine.
5. Drain the coolant.
6. Remove the air filter assembly.
7. Remove the battery and battery tray.
8. Remove the cooling fan and cooling fan clutch assembly.
9. Remove the radiator assembly.
10. Remove the front exhaust pipe.
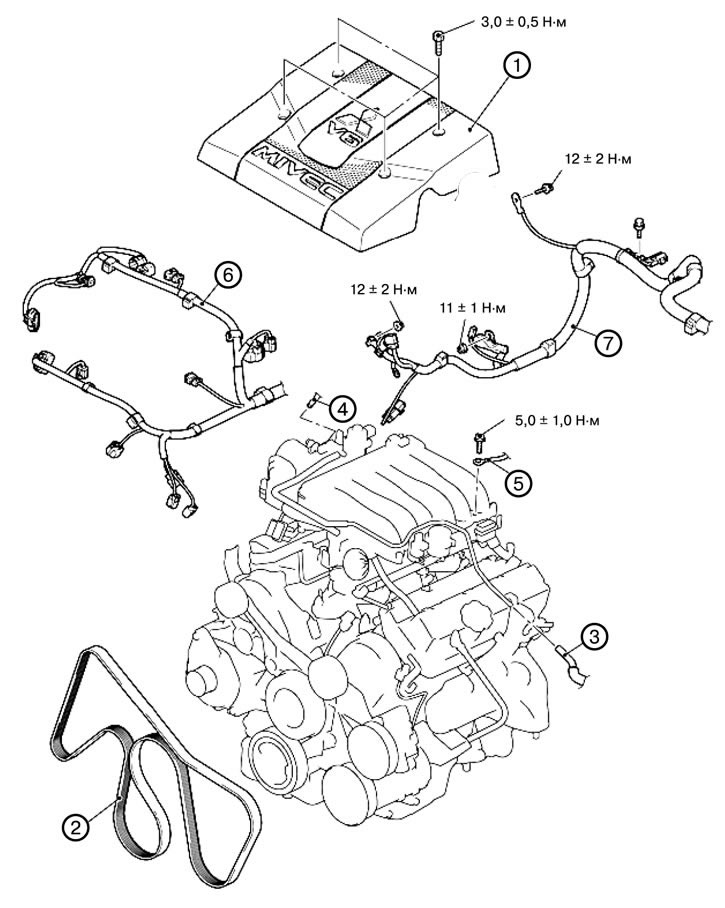
11. Remove the engine cover (1).
12. Remove the drive belt (2).
13. Remove the vacuum hose connection (3).
14. Remove the flywheel clutch vacuum hose connection (4).
15. Remove the ground cable connections (5).
16. Remove the control unit wiring (6).
17. Remove the battery wiring (7).
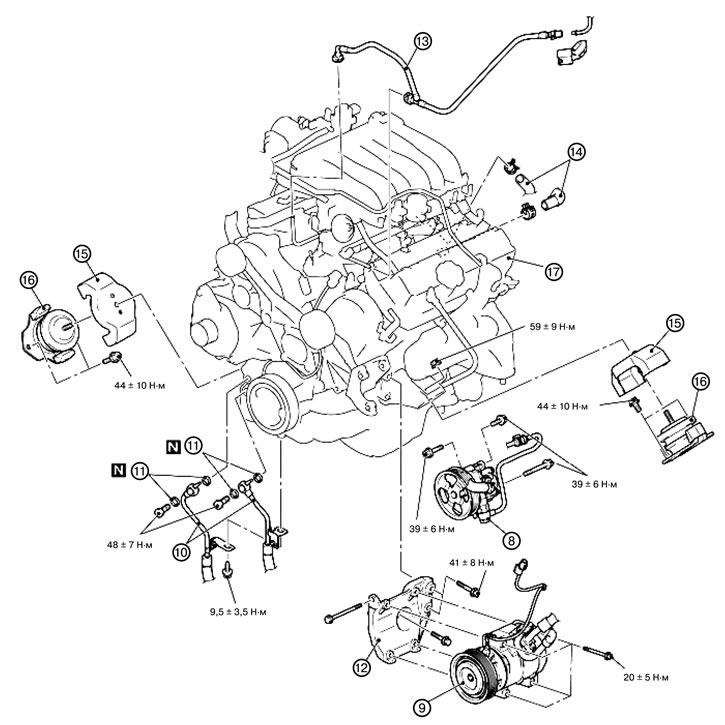
18. Remove the power steering pump (8).
Note: Tie the removed power steering pump assembly with bracket and hoses with wire and place it in a place where it will not interfere with removal and installation of the engine assembly.
19. Remove the compressor and air conditioner clutch assembly (9).
Note: Tie the removed compressor with wire and place it in a place where it will not interfere with the removal and installation of the engine.
20. Remove the engine oil cooler hose (10).
21. Remove the gasket (11).
22. Remove the air conditioning compressor bracket (12).
23. Disconnect the high pressure fuel hose connection (13).
24. Remove the gearbox assembly.
Caution: Do not remove the flywheel mounting bolt indicated by the arrow. If this bolt is removed, the flywheel will be unbalanced and damaged.
25. Disconnect the heater hose connection (14).
26. Remove the engine support limiter (15).
27. Remove the engine support bracket (16).
28. Remove the engine assembly (17).
1). Secure the engine to the crossbar and hang it on a hoist or similar device.
2). Insert a wooden block between the jack support foot and the engine oil pan and slightly lift the engine to relieve the support from the weight of the engine; then remove the engine mount bracket.
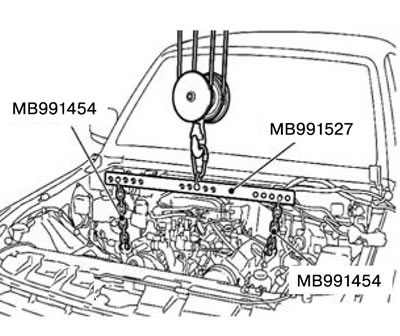
3). Remove the engine assembly.
Note: Make sure all wires are disconnected from the engine (electrical connectors), hoses, etc., and then slowly lift the engine up out of the engine compartment.
Model with 4M4 engine
Note: The operations for removing the engine assembly on a vehicle with a 4M4 engine are similar to the operations for removing the engine assembly on a vehicle with a 6G7 engine.