



Model with 6V31 engine
Note: When installing, tighten the bolts to the torques shown in the figure.
1. Install the tension pulley assembly (13).
2. Install the timing belt (12).
3. Install the timing belt automatic tensioner (11).
1) Use a press or vice to gently compress the automatic tensioner rod until hole A of the rod aligns with hole B in the tensioner cylinder.
Caution: If the compression speed of the piston rod is too fast, the piston rod may be damaged, so be careful and perform this operation slowly.
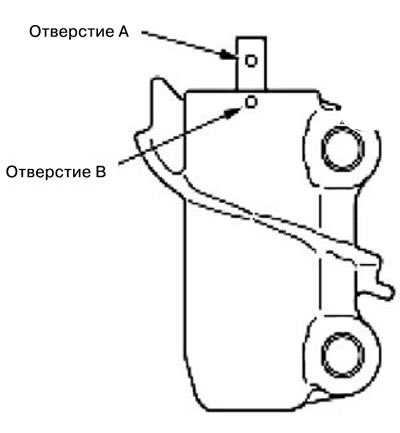
2) Once the holes are aligned, insert the dowel pin into them.
Note: When replacing the automatic tensioner with a new one, the pin will be inserted into it.
3). Remove the auto tensioner from the vice.
4). Align the timing marks on the camshaft sprockets with the marks on the rear timing belt cover and the timing marks on the crankshaft sprocket with the marks on the engine cylinder block, as shown in the figure.
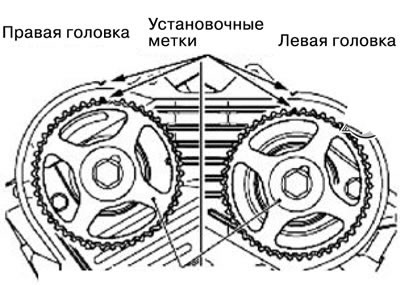
Camshaft Sprocket
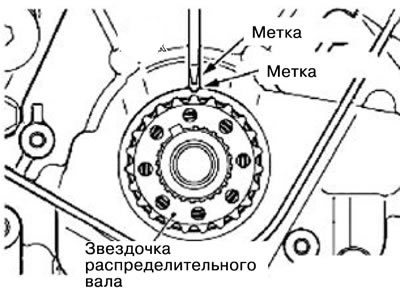
5). Install the timing belt in the following order: crankshaft sprocket, water pump pulley, left camshaft sprocket, intermediate pulley, right camshaft sprocket and tensioner pulley.
Attention. If the timing belt is to be reused, install the timing belt in such a way that the arrow mark placed at the time of removing the timing belt corresponds to the clockwise direction of rotation.
6) Check the alignment of all installation marks.
4. Install the front flange (10).
5. Install the engine mounting bracket (9).
Original version of the article on the website: MITSUBISHIMAN
6. Install the front engine mounting bracket.
7. Install the lower timing belt cover (8).
8. Install the left upper timing belt cover (7).
9. Install the right upper timing belt cover (6).
10. Install the crankshaft pulley (5).
11. Install the power steering pump drive belt (4).
12. Install the power steering pump drive belt tension pulley bracket (3).
13. Install the generator drive belt (2).
14. Install the timing belt automatic tensioner (1).
15. Check and adjust the tension of the timing belt.
16. Install the lower and side engine protection.
17. Install the engine cover.
Model with 6G7 engine
1. Install the power steering pump bracket (20).
2. Install the intermediate pulley of the timing belt (19).
3. Install the timing belt tensioner lever (18).
4. Install the automatic tensioner (17).
1) Use a press or vice to gently compress the automatic tensioner rod until hole A of the rod aligns with hole B in the tensioner cylinder.
Caution: If the compression speed of the piston rod is too fast, the piston rod may be damaged, so be careful and perform this operation slowly.
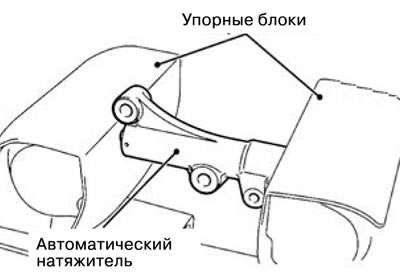
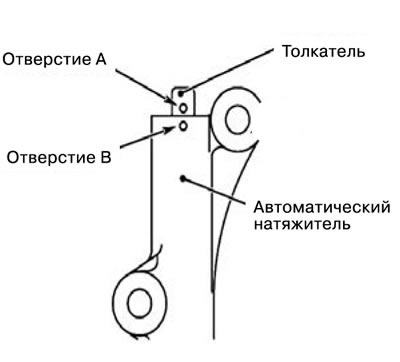
2) Once the holes are aligned, insert the dowel pin into them.
Note: When replacing the automatic tensioner with a new one, the pin will be inserted into it.
5. Install the timing belt (16).
1). Align the timing marks on the camshaft sprockets, crankshaft sprocket and oil pump sprocket.
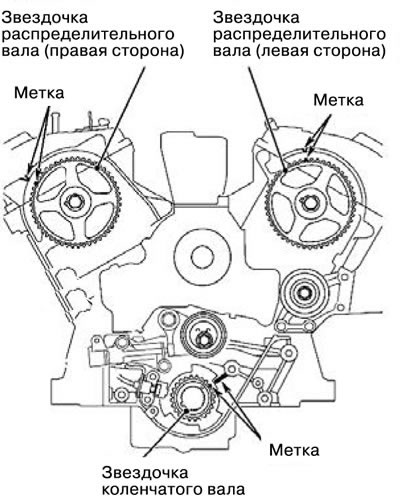
2). Install the timing belt on the crankshaft sprockets, intermediate pulley, camshaft sprocket (left cylinder head), coolant pump pulley, camshaft sprocket (right cylinder head) and the tensioner pulley in this order so that there is no glorification in the belt tension.
Attention. If the timing belt is to be reused, install the timing belt so that the arrow mark placed when removing the timing belt corresponds to the clockwise direction of rotation.
6. Install the tensioner pulley (15) so that the pin holes face up, lightly press the tension roller against the belt, and then temporarily tighten the fixing bolt.
7. Adjust the timing belt tension.
8. Install the front lower timing belt cover (14).
9. Install the crankshaft pulley (13).
1) Install the crankshaft pulley (13).
2) Install the crankshaft pulley washer.
3) Tighten the central bolt of the crankshaft pulley.
Tightening torque: 185 Nm.
10. Install the front right upper timing belt cover (12).
11. Install the front left upper timing belt cover (11).
12. Install the bracket (10).
13. Install the timing belt indicator bracket (9).
14. Install the cooling fan bracket (8).
15. Install the air conditioner compressor bracket (7).
16. Install the compressor and air conditioner clutch assembly (6).
17. Install the power steering pump (5).
18. Install the mounting bracket (4).
19. Install the drive belt tensioner (3).
20. Install the cooling fan pulley (2).
21. Install the cooling fan and cooling fan clutch assembly (1).
22. Install the generator assembly.
23. Install the drive belt.
24. Install the air filter assembly.
25. Install the battery and battery tray.
26. Check the drive belt tension.
27. Install the lower support plate and engine crankcase guard.