



Cylinder head
1. Before cleaning the cylinder head, check the head for water or air leaks, cracks or other defects.
2. Remove engine oil, adhesive sealant, soot and dirt, completely clean the cylinder head. After cleaning the oil bushing, blow out the bushing with compressed air to completely remove the blockage.
3. Measure the surface deformation of the cylinder head gasket, if the deformation value exceeds the maximum permissible value, it is necessary to grind the gasket (See the picture).
The magnitude of the surface deformation of the gasket:
- Standard value: < 0.03mm.
- Maximum allowable value: 0.2 mm.
- Height of new cylinder head: 120.0 mm.
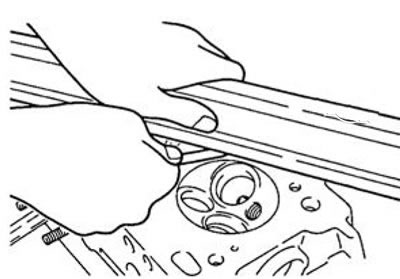
Note: The maximum lapping tolerance should not exceed 0.2 mm.
Gas distribution valves
1. Check that the valves are installed correctly. If necessary, grind the valve seat.
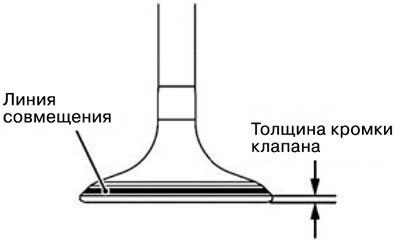
2. If the valve edge thickness is less than the maximum permissible minimum value, replace the valve with a new part (See the picture).
Default value:
- Inlet valves: 1.0 mm.
- Exhaust valves: 1.2 mm.
- Minimum allowable value: Inlet valves: 0.5 mm.
- Exhaust valves: 0.7 mm.
3. Measure the length of the valve. If it is less than the maximum permissible minimum value, replace the valve with a new part.
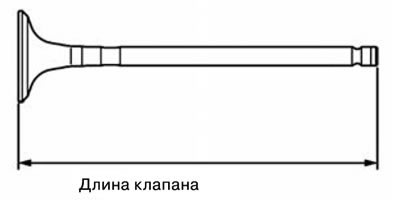
Model with 6V31 engine:
Default value:
- Intake valves: 111.84 mm.
- Exhaust valves: 114.04 mm.
Minimum acceptable value:
- Intake valves: 111.34 mm.
- Exhaust valves: 113.54 mm.
Standard value (model with 6G7 engine):
- Intake valves: 109.33 mm.
- Exhaust valves: 113.50 mm.
Minimum acceptable value:
- Intake valves: 108.83 mm.
- Exhaust valves: 113.00 mm.
Standard value (model with 4M4 engine):
- Intake valves: 115.4 mm.
- Exhaust valves: 115.4 mm.
Minimum acceptable value:
- Intake valves: 114.9 mm.
- Exhaust valves: 114.9 mm.
4. Check and adjust the valve clearance.
1). Start the engine and let it run for a few minutes until the temperature of the liquid in the cooling system rises to 80-90°C.
2). Unscrew all spark plugs.
3). Remove the valve cover.
4). Turn the crankshaft clockwise until the belt connector with a triangular cross-section aligns with the "T" mark on the timing scale.
5). Slightly move the rocker arms of cylinders 1 and 4 by hand, make sure that the corresponding pistons are at top dead center. If there is clearance for both the intake and exhaust valves, the pistons corresponding to them are at top dead center.
6). When the piston of cylinder 1 is at the top dead center position, the valve clearance of the rocker arms with the contour arrow can be measured and adjusted. When the piston of cylinder 4 is in the top dead center position, the valve clearance of the rocker arms with a solid arrow can be measured and adjusted.
7). Measure the valve clearance.
8) If the valve clearance does not meet the requirements, loosen the lock nut and turn the adjusting bolt while measuring the clearance with a bore gauge.
Standard values
| Valves | Ambient temperature (°C) | Warm engine | ||
| 0-15 | 15-25 | 25-40 | ||
| Intake | 0.12±0.03 mm | 0.14±0.33 mm | 0.16±0.03 mm | 0.20 mm |
| Graduation | 0.17±0.03 mm | 0.19±0.03 mm | 0.21±0.03 mm | 0.25 mm |
Note: One degree increase in ambient temperature corresponds to an increase in valve clearance of 0.0018 mm.
9) Tighten the adjusting bolt with a screwdriver; tighten the lock nut to the recommended torque.
10). Rotate the crankshaft 360* and align the belt pulley groove with the "T" mark on the timing scale.
11) Install the valve cover.
12) Install spark plugs.
Valve springs
1. Measure the height of the valve spring. If it is less than the maximum permissible minimum value, replace the spring with a new part.
Standard value (model with 6V31 engine):
- Inlet valve: 59.15 mm.
- Exhaust valve: 57.70 mm.
Minimum acceptable value (model with 6V31 engine):
- Inlet valve: 58.15 mm.
- Exhaust valve: 56.70 mm.
Standard value (model with 6G7 engine):
- Inlet valve: 56.19 mm.
- Exhaust valve: 53.30 mm.
Minimum acceptable value (model with 6G7 engine):
- Inlet valve: 55.19 mm.
- Exhaust valve: 52.30 mm.
Standard value (model with 4M4 engine): 51.3 mm.
Minimum acceptable value (model with 4M4 engine): 50.3 mm.
Exhaust valve: 52.30 mm.
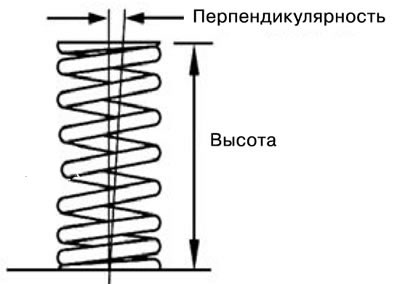
2. Measure the perpendicularity of the valve spring. If it exceeds the maximum permissible value, replace the spring with a new part (See the picture).
Standard value: 2*
Maximum allowed value: 4*
Valve bushings
1. Measure the gap between the sleeve and the valve stem. If it exceeds the maximum allowable value, replace the valve sleeve, valve stem, or both (See the picture).
Default value: (model with 6V31 engine):
Inlet valves: 0.020 - 0.047 mm.
Exhaust valves: 0.035 - 0.065 mm.
Maximum allowable value: Inlet valves: 0.10 mm.
Exhaust valves: 0.15 mm.
Default value: (model with 6G7 engine):
Inlet valves: 0.020-0.047 mm.
Exhaust valves: 0.035-0.062 mm.
Default value: (model with 4M4 engine):
Inlet valves: 0.015-0.058 mm.
Exhaust valves: 0.040-0.088 mm.
Maximum allowed value:
Inlet valves: 0.10 mm.
Exhaust valves: 0.15 mm.
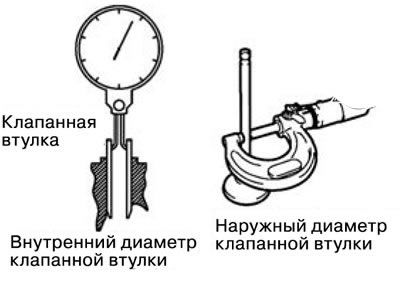
Valve seats
1. Installing the valve.
1) Measure the length of the protruding part as shown in the figure. If it exceeds the maximum permissible value, replace the valve seat with a new part.
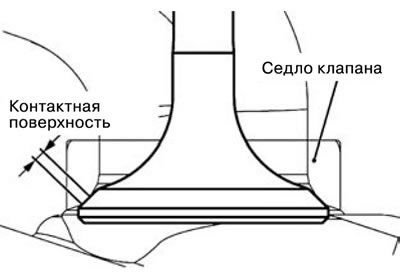
Default value: (model with 6V31 engine):
- Inlet valves: 45.5 mm.
- Exhaust valves: 52.5 mm.
Default value: (model with 6G7 engine):
- Intake valves: 53.21 mm.
- Exhaust valves: 54.10 mm.
Default value: (model with 4M4 engine):
- Intake valves: 40.95 mm.
- Exhaust valves: 40.95 mm.
Maximum allowed value (model with 6G7 engine):
- Intake valves: 53.71 mm.
- Exhaust valves: 54.60 mm.
Maximum allowed value (model with 4M4 engine):
- Intake valves: 41.45 mm.
- Exhaust valves: 41.45 mm.
2. Rules for fitting the valve seat.
1). Before grinding the valve seat, check the clearance between the sleeve and the valve stem. Replace the bushing if necessary.
2) Machine the valve seat using a valve seat grinder or other special repair tool that allows you to obtain the required dimensions and angles.
3). Use polishing paste to polish the valve and valve seat. Then check the length of the protruding part of the valve (See the picture).
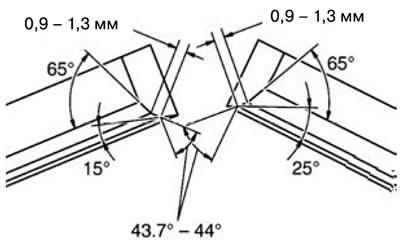
3. Rules for replacing the valve seat.
1) Cut out the worn valve seat from the inside, then remove it (See the picture).
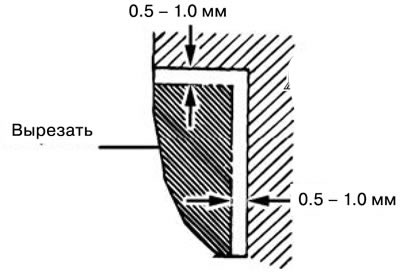
2). Treat the seat on the cylinder head to match the increased dimensions (See the picture).
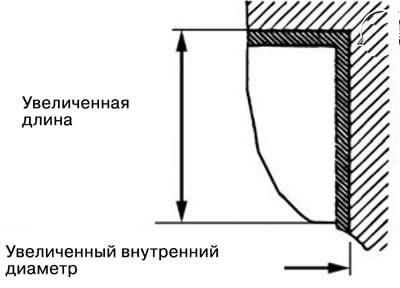
Extended inner diameter of the intake valve seat (model with 6V31 engine): 36,300 - 36,330 mm (magnification 0.3 mm).
Extended inner diameter of the exhaust valve seat (model with 6V31 engine): 32,300 - 32,330 mm (magnification 0.3 mm).
Extended inner diameter of the intake valve seat (model with 6G7 engine):
- 37,800 - 37,825 mm (magnification 0.3 mm).
- 38,100-38,125 mm (magnification 0.6 mm).
Extended inner diameter of the exhaust valve seat (model with 6G7 engine):
- 34,800-34,825 mm (magnification 0.3 mm).
- 35,100-35,125 mm (magnification 0.6 mm).
Extended inner diameter of the intake valve seat (model with 4M4 engine):
- 35,300 - 35,325 mm (magnification 0.3 mm).
- 35,600 - 35,625 mm (magnification 0.6 mm).
Extended inner diameter of the exhaust valve seat (model with 4M4 engine):
- 33,300-33,325 mm (magnification 0.3 mm).
- 33,600-33,625 mm (magnification 0.6 mm).
3) Avoid scratching the cylinder head when processing the valve seat.
4) Machine the valve seat to the required width and angle.
4. Rules for replacing the valve sleeve.
1). Push the used valve stem out of the cylinder head using a press.
2). Machine the valve bushing hole on the cylinder head to match the increased dimensions (See the picture).
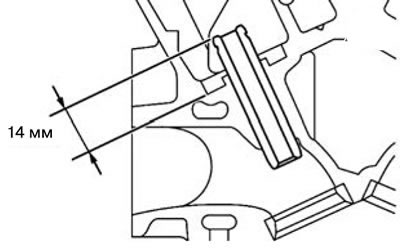
Note: Do not install a new valve sleeve that is the same size as the replacement sleeve.
Valve bushing bore diameter in cylinder head (model with 6V31 engine):
- 11,050 - 11,068 mm (increase 0.05).
- 11,250 - 11,268 mm (increase 0.25).
- 11,500 - 11,518 mm (increase 0.50).
Valve bushing bore diameter in cylinder head (model with 6G7 engine):
- 11,050 -11,068 mm (increase 0.05).
- 11,250 - 11,268 mm (increase 0.25).
- 11,500 - 11,518 mm (increase 0.50).
Valve bushing bore diameter in cylinder head (model with 4M4 engine):
- 12,050 -12,068 mm (increase 0.05).
- 12.250 - 12.268 mm (increase 0.25).
- 12,500 - 12,518 mm (increase 0.50).
3). Press the valve sleeve into the sleeve hole in the cylinder head, while the length of the protruding part of the sleeve should be 17.0 mm (See the picture).
Note: The valve sleeve is installed from the top side of the cylinder head. The length of the intake valve sleeve is different from the length of the exhaust valve sleeve. After completing the installation of the valve sleeve, insert the new valve and check its sliding in the sleeve.