
English Русский
Български
Беларускі
Український
Српски
Hrvatski
Română
Polski
Slovenský
Magyar
Articles Bookmark Contacts Sitemap   
Company Audi Company Ford Company Hyundai Company Kia Company Mazda Company Mercedes-Benz Company Nissan
MitsubishiMan.ru


Home Colt Lancer Galant L200 Outlander Pajero Others
Colt 5 (1995-2003, petrol) Colt 4 and 5 (1991-2003) Colt 2 and 3 (1983-1993)

Throttle body — disassembly and assembly (Mitsubishi Colt 4)

  • Home
  • Colt
  • 4 (1991-2003)
  • Power unit
  • Fuel injection MPI
  • Throttle body — disassembly and assembly
0
Contents: Non-TCL models ⤓ Models with TCL ⤓

Non-TCL models
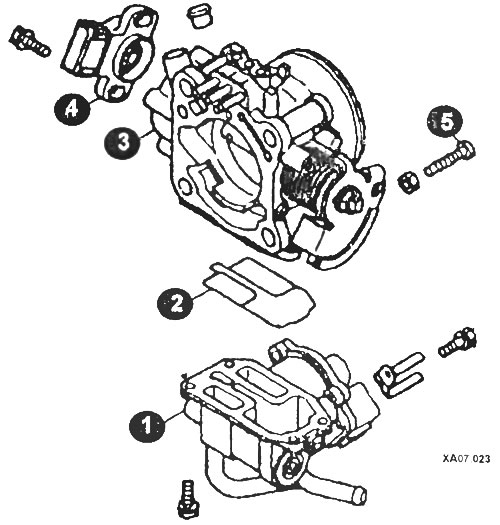


Throttle body components
1 - idle speed controller housing; 2 - gasket; 3 - throttle body; 4 - throttle position sensor; 5 - idle speed adjustment screw.


Disassembly


After unscrewing the bolts, remove the throttle position sensor (4).

Unscrew the screws and remove the idle speed control housing (1).

Remove the damper gasket (2).

Unscrew the factory idle speed adjustment screw (5) from the throttle body.

NOTE: The screw position is adjusted at the factory.


Clean all throttle body parts.

Check for deposits in the vacuum passage or fitting. Blow them out with compressed air.

Assembly


Assembly is carried out in reverse order, taking into account the following:

Install the throttle position sensor (1).
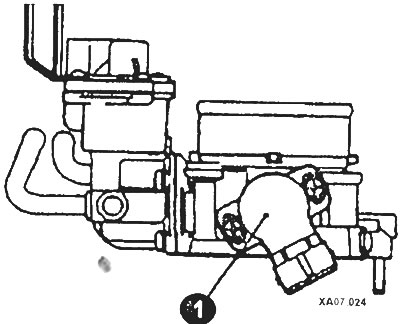


Connect a multimeter between terminals 1 and 2 of the throttle position sensor connector and check that the resistance gradually increases as the throttle valve is slowly opened.
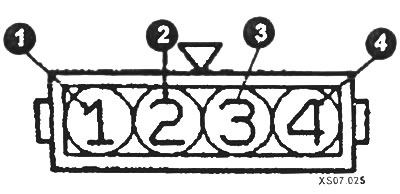


Throttle Position Sensor Connector
1 - Throttle Position Sensor - Power Supply; 2 - throttle position sensor - output signal; 3 - throttle valve closed position sensor switch; 4 - mass.


Models with TCL
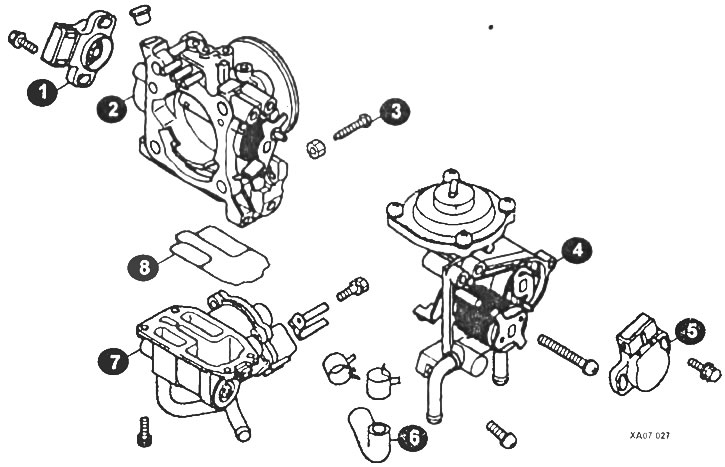


Throttle body components
1 - throttle position sensor; 2 - throttle body; 3 - idle speed adjustment screw; 4 - lever assembly; 3 - gas pedal position sensor (accelerator); 6 - cooling system hose; 7 - idle speed controller; 8 - gasket.


Check the circuit between terminal 3 and terminal 4 of the throttle position sensor with the throttle valve fully closed and fully open.

If the circuit is open when the throttle is fully closed, turn the throttle position sensor housing counterclockwise and repeat the test.


If faulty, replace the throttle position sensor.

Disassembly


Loosen the clamp and remove the cooling system hose.

After unscrewing the bolts, remove the throttle position sensor.

After unscrewing the bolts, remove the accelerator pedal position sensor.

After unscrewing the bolts, remove the lever assembly.

Remove the idle speed control valve housing assembly and gasket.

Remove the factory idle speed adjustment screw.

Assembly


Assembly is carried out in reverse order, taking into account the following:

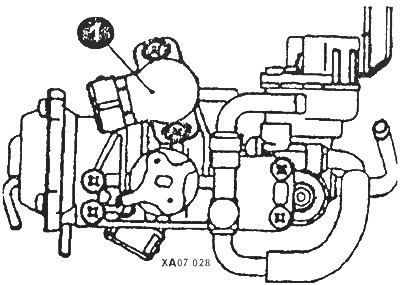
Install the accelerator pedal position sensor (1) as shown in the figure and tighten the screws that secure it.


Connect a multimeter between terminals 3 and 4 of the accelerator pedal position sensor connector and check that when the throttle valve is slowly opened (until it is fully opened), the resistance gradually increases.
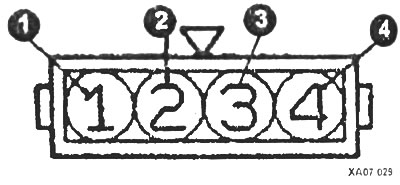


Accelerator Pedal Position Sensor Connector
1 - mass; 2 - throttle position sensor; 3 - power supply for the accelerator pedal position sensor; 4 - output signal of the accelerator pedal position sensor.


Check the circuit between terminal 2 and terminal 1. When the throttle is fully closed, the circuit should be closed, and when the throttle is open, the circuit should be open.

If the circuit is open with the throttle valve fully closed, turn the accelerator pedal position sensor housing clockwise and check again.

If there is a malfunction in the sensor, replace the accelerator pedal position sensor.

Install the throttle position sensor (see description for models without TSL).
This article is available at: russian, bulgarian, belarusian, ukrainian, serbian, croatian, romanian, polish, slovak, hungarian
This article was reviewed by: Nikita Romanov
Share with friends:
◀ Previous
Colt 4 and 5: Fuel injection MPI
Next ▶

Throttle body — removal and installation
Injector — removal and installation
Injector — check
Fuel system components
Oxygen sensor (lambda probe) — check
Typical fuel tank components
Fuel tank — removal and installation
Fuel filter — replacement
Fuel pump — replacement
Diagnostics of fuel injection system malfunction
Similar materials for other Mitsubishi models

➤ Throttle body Mitsubishi Lancer 9 (2000-2007, petrol)
➤ Removal and installation the throttle body Mitsubishi Galant 6 and 7 (1987-1998)
➤ Drop-down body side Mitsubishi L200 4 (2005-2014, diesel)
➤ Removal and installation the throttle body Mitsubishi Outlander 1 (2003-2008)
➤ Throttle body — removal and installation Mitsubishi Pajero 1 and 2 (1982-1999)
➤ Cleaning the throttle body Mitsubishi Carisma (1995-2004)
Link in different formats to this article
Comments and feedback from visitors
No comments yet


Add up two numbers 11 + 42


Colt 5 (1995-2003, petrol) 
  • General information
  • User manual
  • Specifications
  • Gasoline engines
  • 4G1 engines until 1995
  • 4G1 engines since 1995
  • Repair of 4G9 engines
  • Cooling system
  • Reduced exhaust gas toxicity
  • Engine electrical equipment
  • Injection system MPI
  • Carburetors
  • Transmission
  • Clutch and drive shafts
  • Manual gearbox F4M21/F5M21
  • Manual gearbox F4M41
  • Automatic gearbox F4A21
  • Automatic gearbox F4A41
  • Chassis and running gear
  • Car suspension
  • Steering
  • Brake system
  • Body
  • Exterior (external elements)
  • Electrical equipment
  • Equipment and devices
  • Electrical circuits
Colt 4 and 5 (1991-2003) 
  • General information
  • Maintenance
  • Power unit
  • Engine in a car
  • Engine repair (gasoline)
  • Engine repair (diesel)
  • Lubrication system
  • Cooling system
  • Carburetor
  • Fuel injection MPI
  • Fuel injection GDI
  • Emission reduction
  • Fuel system (diesel)
  • Ignition system
  • Exhaust system
  • Transmission
  • Clutch
  • Manual gearbox
  • Automatic gearbox
  • Drive shafts
  • Chassis and running gear
  • Chassis malfunctions
  • Front suspension
  • Rear suspension
  • Steering
  • Wheels and tires
  • Brake system
  • Body and interior
  • Body elements
  • Electrical equipment
  • Equipment and devices
  • Power devices
  • Heating and air conditioning
  • Electrical circuits
Colt 2 and 3 (1983-1993) 
  • General information
  • User manual
  • Daily care
  • Maintenance
  • Power unit
  • Engine in a car
  • Engine overhaul
  • Cooling system
  • Heater and air conditioner
  • Power and exhaust system
  • Engine electrical equipment
  • Emission reduction
  • Transmission
  • Mechanical gearbox
  • Automatic gearbox
  • Clutch and axles
  • Chassis and running gear
  • Brake system
  • Car suspension
  • Steering
  • Body and interior
  • Body and elements repair
  • Electrical equipment
  • Equipment and devices
  • Electrical circuits
MitsubishiMan.ru © 2018–2026 • Mobile version • Articles about Mitsubishi • Contacts • Sitemap: EN BG BY UA RS HR RO PL SK HU • Site search • Bookmark
Colt 2 and 3 (1983-1993) · Colt 4 and 5 (1991-2003) · Colt 5 (1995-2003) · Lancer 3 and 5 (1984-1992) · Lancer 9 (2000-2007) · Galant 5 (1983-1989) · Galant 6 and 7 (1987-1998) · L200 4 (2005-2014) · Outlander 1 (2003-2008) · Pajero 1 and 2 (1982-1999) · Pajero 4 (2006-2021) · Carisma (1995-2004) · Space Star (1998-2005) ·
This resource sets cookies 🍪 to avoid bothering you with repeated data entry.